Table of Contents >> Show >> Hide
- Why Yarn Spiderwebs Are the Perfect Spooky Decoration
- Supplies You’ll Need
- Step-by-Step: Classic Yarn Spiderweb on the Wall
- Variation 1: Popsicle-Stick Mini Yarn Spiderwebs
- Variation 2: Paper Plate Yarn Spiderwebs for Kids
- Variation 3: 3-D Hanging Yarn Spiderweb Ball
- Design Ideas: Where to Use Your Yarn Spiderwebs
- Safety and Cleanup Tips
- Common Mistakes (And How to Fix Them)
- Real-Life Experiences & Pro Tips for Making Yarn Spiderwebs
- Final Thoughts
Want to make your home look like a haunted lair without spending a ton of money or climbing a ladder with six pounds of fake cobwebs? Grab a ball of yarn.
A simple yarn spiderweb is one of the easiest spooky decorations you can make: it’s cheap, lightweight, renter-friendly, and surprisingly dramatic. With just a few strands of yarn and some tape or hooks, you can turn a blank wall, doorway, or corner into a creepy centerpiece that looks like a giant spider has moved in overnight.
In this guide, we’ll walk through how to make a classic wall-sized spiderweb with yarn, plus a few fun variations like popsicle-stick mini webs, kid-friendly paper plate webs, and a 3-D hanging yarn “web ball.” We’ll also cover tips, common mistakes, and real-life experiences so your webs look spooky instead of sad.
Why Yarn Spiderwebs Are the Perfect Spooky Decoration
Before we dive into the how-to steps, it helps to know why yarn spiderwebs are such a Halloween MVP:
- They’re very budget-friendly. A single skein of yarn can make multiple webs, plus accents for doors, mantels, and stair railings.
- They’re renter-safe. Use removable hooks or painter’s tape and you won’t damage walls or trim.
- They’re customizable. Make tiny webs for table decor or one huge web that fills a whole wall or doorway.
- They double as kids’ crafts. Smaller versions made with paper plates or popsicle sticks are great for working on fine motor skills while still feeling festive.
- They store flat. Unlike bulky fake cobweb fluff, yarn webs can be coiled, bagged, and reused next year.
Supplies You’ll Need
For a Classic Wall or Corner Yarn Spiderweb
- Yarn – Black or white works best for contrast. Acrylic or cotton yarn both work fine.
- Wall-safe tape or hooks – Painter’s tape, masking tape, or removable adhesive hooks (like Command™ hooks).
- Scissors – Sharp enough to cut yarn cleanly.
- Optional: measuring tape – Helpful if you like things symmetrical, but not required.
- Optional: fake spiders or Halloween accents – Plastic spiders, paper bats, mini skeletons, lights, etc.
Optional Extras for Fun Variations
- Popsicle or craft sticks – For mini yarn spiderwebs you can hang on trees, doorknobs, or mantels.
- Paper plates – Great base for kids’ paper-plate spiderweb crafts.
- White school glue + balloon – For a 3-D web ball made from stiffened yarn.
- Googly eyes, pipe cleaners, pom-poms – To create or dress up your spiders.
Step-by-Step: Classic Yarn Spiderweb on the Wall
Think of a spiderweb as two main parts: the spokes (the straight lines radiating out from the center) and the spiral (the circular lines that connect the spokes). Once you understand that structure, the web is incredibly easy to fake with yarn.
Step 1: Choose Your Web Location
First, decide where your yarn spiderweb will live:
- A corner of a room or hallway
- Across a doorway (just high enough so tall people don’t get clotheslined)
- Behind a sofa or console table as a spooky backdrop
- Above your fireplace mantel
- On a blank wall by the front door to greet trick-or-treaters
For a dramatic effect, choose a spot where the web can span at least 3–5 feet in width. The bigger the web, the more “giant spider” energy you get.
Step 2: Create the Web Spokes
- Cut long pieces of yarn. Start with 4–8 long strands, each a bit longer than you think you’ll need (around the width or height of your wall section plus extra for tying and taping).
- Anchor the center. Pick a center point for your webthis could be in the corner between two walls or in the middle of a flat wall. Use a small piece of tape or a removable hook and knot all the yarn strands to that point.
- Fan out the strands like spokes. Pull each strand outward from the center and attach the loose end to the wall, trim, or ceiling with tape or a hook. You’re essentially making a big star or “X” shape with more lines in between.
- Adjust the tension. The yarn should be taut but not so tight that it starts pulling hooks off the wall or bending anything. Adjust as needed until your framework looks symmetrical (or deliberately wonkyspiders aren’t perfectionists either).
Step 3: Weave the Spiral Web Lines
- Cut a long weaving strand. Cut another long piece of yarn. Tie one end to a spoke close to the center of the web.
- Start weaving around the spokes. Bring the yarn across to the next spoke, loop it around once, then move on to the next spoke. You’re making a loose spiral that slowly expands outward.
- Keep spacing the rings. Each time you go around the circle, keep your loops at roughly the same distance apart to mimic rings of a real spiderweb. Imperfect spacing is totally fine; in fact, a slightly irregular pattern often looks more natural.
- Secure the end. When you reach the outer edge of the webor run out of yarntie the end securely to a spoke and trim any excess.
Stand back and check the overall shape. If any sections look too empty, you can add a few extra loops or even another spiral line between existing ones.
Step 4: Add Spiders and Final Touches
- Attach fake spiders. Clip them directly onto the yarn or tie them on with a short scrap of thread.
- Layer in extra decor. Try adding a string of fairy lights, a paper bat, or a plastic skeleton nearby for extra mood.
- Dim the lights. Spiderwebs pop nicely under soft, indirect lighting or colored bulbs (like purple or orange).
At this point, you’ve got a full-sized yarn spiderweb that looks like it took hours, when in reality it probably took 20–30 minutes tops.
Variation 1: Popsicle-Stick Mini Yarn Spiderwebs
If you want smaller decorations or a kid-friendly craft that’s low-mess, popsicle-stick spiderwebs are perfect. They’re often used in classrooms and craft blogs because they’re cheap, simple, and great for little hands.
What You’ll Need
- 3 popsicle or craft sticks per web
- Yarn in white, black, or Halloween colors
- Glue (hot glue for adults, craft glue for kids)
- Optional: paint and paintbrushes to color the sticks
- Optional: small plastic spiders or spider stickers
How to Make Popsicle-Stick Yarn Spiderwebs
- Glue the sticks. Arrange three sticks into a star or “asterisk” shape and glue in the center. Let dry.
- Attach the yarn. Tie the yarn around the center where all the sticks meet.
- Wrap in a spiral. Wrap the yarn over one stick, then around the back, then move to the next stick. Keep circling, spiraling farther out as you go to create the web effect.
- Secure the end. When you reach the ends of the sticks, tie off the yarn and trim.
- Decorate. Add spiders, glitter, or hang your mini web on a tree, shelf, or doorknob.
This variation works well for parties or classroomsyou can set up a simple station and let everyone create their own tiny web to take home.
Variation 2: Paper Plate Yarn Spiderwebs for Kids
Paper plate spiderwebs combine easy materials (paper plates and yarn) with a lot of kid appeal. Many children’s craft resources recommend them because they’re great for threading practice and coordination.
Supplies
- Paper plate (sturdy works best)
- Yarn or string
- Hole punch or scissors
- Optional: paint, markers, stickers, googly eyes, pom-poms
Steps
- Prepare the plate. You can either use the plate as-is, or cut out the center so only the rim remains, creating an open circle.
- Punch holes. Use a hole punch to make holes around the edge of the plate, spaced about an inch apart.
- Thread the yarn. Tape one end of the yarn to the back of the plate. Then weave it in and out of the holes in a crisscross pattern, creating a web-like design.
- Secure and decorate. Tie off the yarn at the back when you’re done. Add a paper or pom-pom spider in the center, and maybe a hanging loop of yarn if you want to display it.
This project is especially good for younger kids because the plate gives them a firm base to hold while they weave the yarn.
Variation 3: 3-D Hanging Yarn Spiderweb Ball
Want something more dimensional? Try a 3-D yarn web created around a balloon. It looks like a spooky web orb and can be hung from the ceiling or placed in a bowl as a centerpiece. Similar techniques show up in kids’ craft kits and DIY balloon-yarn lantern projects.
What You’ll Need
- Balloon (round balloons work best)
- White school glue
- Yarn
- Plastic or disposable bowl for the glue
- Plastic spiders or small decorations
How to Make It
- Blow up the balloon. Tie it off at the desired size.
- Prepare the glue bath. Pour glue into a bowl and thin very slightly with water if it’s extremely thick.
- Soak the yarn. Feed a long piece of yarn into the glue and mix until it’s fully coated.
- Wrap the balloon. Wind the glue-soaked yarn around the balloon in all directions. Leave some gaps so it still looks webby and airy.
- Dry completely. Let it dry overnight until the yarn is stiff.
- Pop and remove the balloon. Carefully pop the balloon and pull it out through a gap, leaving a hollow yarn sphere.
- Add spiders and hang. Use a piece of yarn to hang your web ball and attach a spider or two.
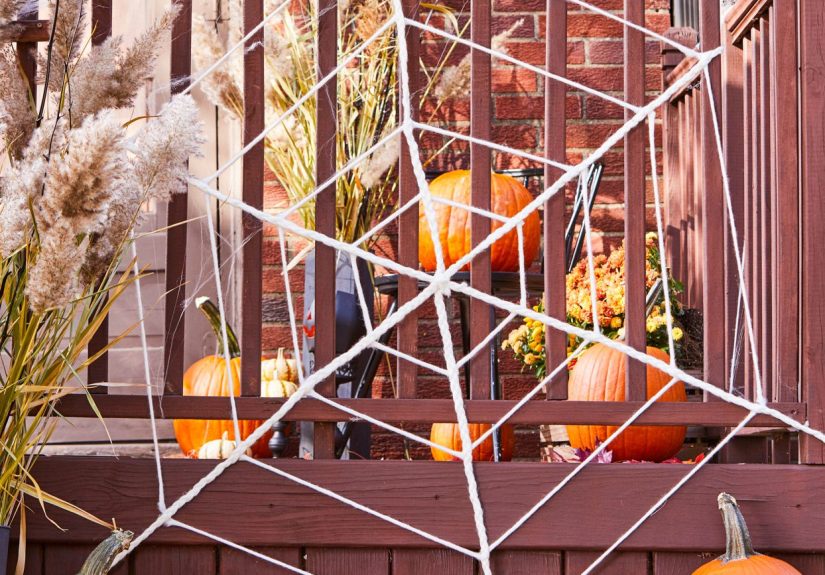
Design Ideas: Where to Use Your Yarn Spiderwebs
Once you’ve mastered the basic spiderweb with yarn, you can go wild with placement:
- Front porch or entryway. Hang a giant black web behind a bench or chair, or stretch it across a railing.
- Fireplace mantel. Use mini popsicle-stick webs and one medium wall web as a backdrop, layering in candles, pumpkins, and faux skulls.
- Staircase. Run yarn webs along the spindles of your stair rail for a tunnel effect.
- Bedroom or office. Use neutral-colored yarn (cream, gray) for a slightly gothic but still stylish look.
- Party backdrop. Combine one large web with a “photo booth” area so guests can pose like they’re trapped in the web.
Safety and Cleanup Tips
- Use wall-safe adhesives. Painter’s tape or removable hooks are best if you’re worried about paint damage or residue.
- Keep paths clear. Don’t stretch webs across areas where people need to walk freelyunless you want jump-scares and spilled drinks.
- Secure firmly if kids or pets are around. Curious hands and paws will test how secure your web really is.
- Store carefully. After Halloween, coil your web gently, pop it into a labeled zip-top bag, and toss it in your decor bin. Next year, you just rehang instead of remake.
Common Mistakes (And How to Fix Them)
1. The Web Looks Saggy
If your web hangs like a sad hammock, your yarn isn’t tight enough or you’re using very stretchy yarn. Try re-tensioning the spokes: pull them tighter and reattach the outer ends. You can also switch to a slightly thicker yarn for more structure.
2. The Web Looks Too Busy
It’s easy to overdo the spiral lines and end up with a solid yarn blob instead of a web. If that happens, cut away a few rings, leaving more open space. Real spiderwebs have lots of negative spacethat’s what makes them delicate and eerie.
3. The Web Blends Into the Wall
If your wall is light and you used white yarn, or your wall is dark and you used black yarn, the web might disappear. Fix it by:
- Adding small lights to outline the web
- Layering colored yarn (purple, orange, or metallic) between some of the rings
- Hanging a contrasting paper backdrop behind the web for party photos
Real-Life Experiences & Pro Tips for Making Yarn Spiderwebs
After you’ve made a few yarn spiderwebs, you start to notice the little tricks that make the process smoother and the result more impressive. Here are some experience-based tips to help you get there faster.
Start Smaller Than You Think
The first time many people try a yarn spiderweb, they go straight for “giant wall of doom.” Halfway through, they realize they’ve created a full-body workout that might qualify as cross-training. A good rule of thumb is to start with a web about as wide as your arm span. Once you understand how long the weaving stage actually takes, you can level up to bigger spaces confidently.
Plan Your Spokes Before You Commit
It’s tempting to just start taping string randomly, but taking one minute to plan your spokes helps a lot. Mentally divide your wall into sections like slices of pizza. If your spokes are spread evenly at the start, the spiral part will naturally look more balanced. If you want a dramatic asymmetrical web (like it’s all anchored in one corner), cluster more spokes in that area and fewer on the open side.
Embrace “Wonky” as a Feature, Not a Bug
Real spiderwebs are not perfect geometric grids. They rip, droop, and reconnect. If one of your loops is slightly crooked or closer to another ring, don’t stressstep back a few feet and you’ll see it actually makes the web look more organic. Some crafters who make giant yarn webs on walls even recommend purposely avoiding precise spacing so the finished design feels more natural and eerie.
Layer Webs for a “Haunted House” Feel
One yarn web looks great. Two or three overlapping webs? That’s haunted-mansion level. Try placing one large web in a corner and then adding smaller webs near the floor or ceiling. You can even mix styles: a classic large web plus a couple popsicle-stick webs hanging like ornaments, or a 3-D web ball floating nearby.
Yarn Choice Matters More Than You Think
If you use very thin, fuzzy yarn, the web can look wispybut it also tangles and breaks more easily. Medium-weight yarn (like what you’d use for a scarf) is usually the sweet spot: sturdy enough to hold shape, but not so thick that it looks like rope. If you want the web to show up in low light or on camera, brighter colors and thicker yarn help it stand out better in photos and videos.
Turn It Into a Family or Party Activity
Making spiderwebs with yarn is surprisingly social. One person can hold the center or outer yarn while another tapes and a third weaves. For kids’ parties, you can set up different “web stations”: one table for paper plate webs, one for popsicle-stick webs, and one adult-supervised station for the wall-sized web. Each guest can sign their name on a spider or add their own creepy charm somewhere in the design.
Think Beyond Halloween
While yarn spiderwebs scream Halloween, the same basic technique can be repurposed with different colors and shapes. Use soft neutrals and remove the spiders, and you’ve got a modern geometric backdrop. Use metallic yarn and snowflakes instead of spiders, and suddenly you’re in winter decor territory. Once you learn to “draw with yarn” on walls, the possibilities open up for year-round decorating.
Over time, you’ll figure out your favorite version: maybe a dramatic black corner web, a cluster of mini webs across your front door, or a glowing 3-D web ball above the snack table. However you spin it, yarn spiderwebs are one of those crafts that hit the magic trifectaeasy, inexpensive, and delightfully spooky.
Final Thoughts
Learning how to make a spiderweb with yarn for an easy spooky decoration is a low-pressure way to transform your space for Halloween. With a handful of supplies and a bit of patience, you can create decor that looks professionally styled but costs less than a takeout coffee. Start with one web, experiment with different variations, and you’ll quickly find yourself spinning new ideas every October.