Table of Contents >> Show >> Hide
- The Enchilada Blueprint (Memorize This and You’re Golden)
- Step 1: Choose Your Sauce (Red, Green, Creamy, or “Both”)
- Step 2: Pick a Filling (And Make Sure It’s Not Watery)
- Step 3: TortillasCorn vs. Flour (And How to Prevent Cracks)
- Step 4: AssemblySauce, Fill, Roll (Without Creating a Swamp)
- Step 5: Bake Until Bubbly (And Then Let Them Chill for 10 Minutes)
- Combo Builder: Sauce + Filling Matchmaking (Specific Examples)
- Toppings That Make Enchiladas Pop
- Make-Ahead, Storage, and Food Safety
- Troubleshooting: Common Enchilada Problems (And Fixes)
- Real-World Enchilada Experiences (What Usually Happens and What to Do Next)
- Conclusion: Your Perfect Enchiladas Are a System, Not a Secret
Enchiladas are the ultimate “choose-your-own-adventure” dinner: pick a sauce, pick a filling, roll (or fold) everything up, bake until bubbly, then cover it all in toppings like you’re auditioning for a very delicious reality show.
The best part? Once you learn the method, you can freestyle endlesslyred sauce with beef, green sauce with chicken, creamy sauce with veggies, “two-sauce” enchiladas for the indecisive… you get the idea.
This guide is built to help you make enchiladas that are flavorful, saucy (but not soupy), and sturdy enough to survive the journey from baking dish to plate without turning into tortilla confetti.
Let’s build your perfect enchilada comboon purpose.
The Enchilada Blueprint (Memorize This and You’re Golden)
Every enchilada situationtraditional, Tex-Mex, vegetarian, weeknight, “I’m feeding a crowd,” or “I’m feeding my feelings”comes down to the same structure:
- Sauce (warm, flavorful, enough to coatnot drown)
- Tortillas (softened so they don’t crack; ideally corn)
- Filling (cooked and seasoned; not watery)
- Cheese (optional but highly encouraged)
- Bake until hot and melty
- Toppings for brightness + crunch + drama
If your enchiladas ever come out soggy, gummy, or falling apart, it’s almost always one of these: watery filling, cold/thick sauce, tortillas that weren’t softened properly, or too much sauce applied too early.
Fix the method, and your combos can be as wild as you want.
Step 1: Choose Your Sauce (Red, Green, Creamy, or “Both”)
Think of sauce as the enchilada’s personality. It’s not just a topping; it seasons the tortillas and ties the whole dish together. You can go homemade or store-boughteither works if you treat it right.
Option A: Red Enchilada Sauce (Enchiladas Rojas)
Red sauce usually starts with dried chiles (like ancho or similar mild dried chiles), aromatics, and spices. The flavor is warm, earthy, and slightly sweetperfect with chicken, beef, beans, or roasted vegetables.
If you’re using canned red enchilada sauce, warm it gently and taste it. If it’s flat, add a squeeze of lime, a pinch of cumin, or a tiny bit of garlic powder. No one will call the sauce police.
Option B: Green Sauce (Enchiladas Verdes / Salsa Verde)
Green sauce is typically tomatillo-based with green chiles and cilantro vibesbright, tangy, and a little zippy. Great with chicken, pork, mushrooms, zucchini, or potatoes.
Roasting tomatillos and chiles deepens the flavor, but even jarred salsa verde can be upgraded with roasted onions or a squeeze of lime.
Option C: Creamy Sauce (Enchiladas Suizas-Style)
Creamy enchiladas are comfort food in a blanket. You’ll see versions made with crema/sour cream plus green sauce, or a mild cream sauce that gets extra cozy under a layer of cheese.
The key: keep the heat low when warming dairy-based sauces so they don’t split, and don’t bake them to death.
Option D: Mole or “Special Occasion” Sauces
Mole brings deep chile-chocolate-spice complexity and works beautifully with chicken or turkey. It’s also an excellent way to make Tuesday night feel like a holiday.
If you’re using mole paste or a prepared mole sauce, thin it with broth until it’s pourable and warm it gently.
Option E: Two Sauces (Enchiladas Divorciadas)
Can’t choose between red and green? Don’t. Make (or buy) both and sauce each side of the pan differently.
It looks fancy, tastes exciting, and requires exactly zero extra culinary degrees.
Step 2: Pick a Filling (And Make Sure It’s Not Watery)
The best enchilada fillings are flavorful, cohesive, and not dripping liquid. If your filling looks like it could star in a soup, it will sabotage your tortillas.
Cook off extra moisture and season assertivelytortillas and sauce can handle bold flavors.
Filling Ideas That Always Work
- Shredded chicken (rotisserie chicken is allowedthis is a safe space)
- Ground beef or turkey with onions, garlic, and a little cumin
- Shredded pork (carnitas-ish) with green sauce
- Black beans + corn with sautéed onions and smoky spices
- Roasted veggies (zucchini, peppers, mushrooms) + beans
- Cheese-only (yes, it counts; add diced chiles or onions for dimension)
- Sweet potato + poblano for a sweet-smoky vegetarian combo
- Spinach + mushrooms (cook down moisture first)
Simple Seasoning Rule
Season the filling like it’s going to be eaten alone, because it kind of is. Tortillas and sauce are not magic erasers for bland food.
A pinch of salt, a squeeze of lime, and something smoky (cumin, chipotle, roasted chiles) goes a long way.
Step 3: TortillasCorn vs. Flour (And How to Prevent Cracks)
For classic rolled enchiladas, corn tortillas are the traditional choice and tend to hold up best when properly softened.
Flour tortillas are more common in Tex-Mex-style enchiladas and can be delicious, but they can get gummy if heavily sauced.
The #1 Tortilla Trick: Soften Them Before Rolling
Cold corn tortillas crack. Dry tortillas split. Enchilada assembly is not the time to test your tortilla’s emotional resilience.
You have a few good options:
- Quick-fry in oil for a few seconds per side (makes them pliable and helps prevent sogginess)
- Warm in a dry skillet just until flexible
- Microwave wrapped in a damp paper towel for a fast soften
If you want enchiladas that don’t collapse into a saucy heap, the quick-fry method is a game changer: it softens tortillas and creates a thin barrier so they can absorb sauce without disintegrating.
You’re not making tostadasjust a brief dip in hot oil, then drain.
Step 4: AssemblySauce, Fill, Roll (Without Creating a Swamp)
Here’s the clean, repeatable enchilada workflow that keeps things neat:
1) Warm the Sauce
Warm sauce coats better and is less likely to make tortillas tear. If your sauce is super thick, thin it with a splash of broth or water until it’s pourable.
2) Prep the Baking Dish
Spoon a thin layer of sauce into the bottom of a 9×13-inch baking dish. This prevents sticking and gives the bottom tortillas flavor.
3) Dip (Lightly) or Spoon (Strategically)
There are two common approaches:
-
Dip method: Dip each tortilla in warm sauce to coat (not soak), then fill and roll.
Great for flavor, but go easyover-soaking leads to fragile tortillas. -
Spoon method: Keep tortillas mostly dry during rolling, then sauce them once they’re in the pan.
Great when you want more structure, especially with flour tortillas.
Either way, remember: enchiladas should be saucy, not submerged. Leaving a little tortilla edge exposed can even help you get lightly crisped corners.
4) Fill and Roll
Add 2–3 tablespoons of filling (more for larger tortillas), plus a pinch of cheese if you’re using it. Roll snugly and place seam-side down.
Pack enchiladas closely together so they don’t unroll during baking.
5) Top with Sauce and Cheese
Pour sauce over the top, aiming for even coverage. Add cheese (Monterey Jack, cheddar, pepper jack, queso frescowhatever fits your vibe).
If you love contrast, keep some edges less-sauced so you get a bit of texture.
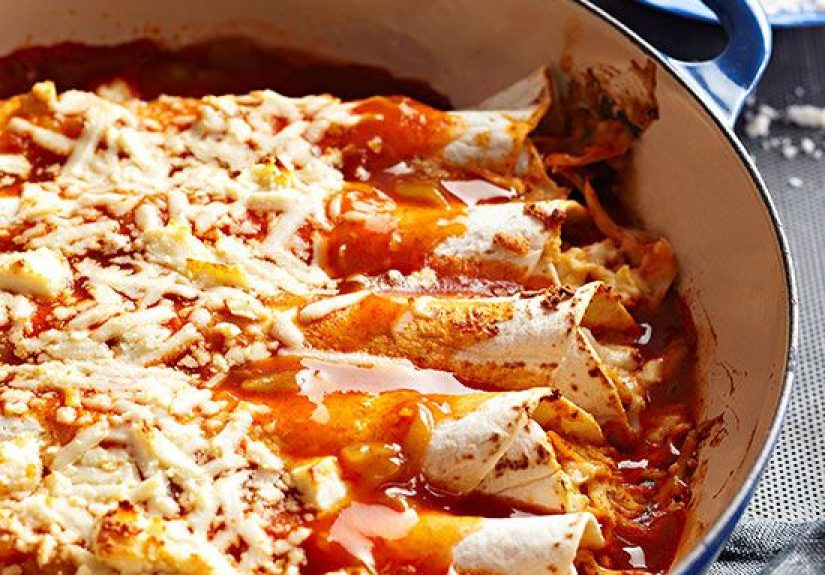
Step 5: Bake Until Bubbly (And Then Let Them Chill for 10 Minutes)
Bake at 350°F until the enchiladas are heated through and the cheese is melted and bubblyoften around 15–30 minutes depending on your filling temperature and how full the pan is.
If everything was warm going in, it’s faster; if you assembled from cold leftovers, it takes longer.
After baking, let the pan rest for about 10 minutes. This helps the sauce settle and the enchiladas hold their shape when served.
(Also, it prevents the roof-of-mouth lava incident. You know the one.)
Combo Builder: Sauce + Filling Matchmaking (Specific Examples)
Use these combos as a starting point, then remix based on what’s in your fridge.
Classic Comfort
- Red sauce + shredded chicken + Monterey Jack (top with lettuce + tomato + crema)
- Green sauce + shredded pork + queso fresco (top with cilantro + onion + lime)
- Cheese enchiladas + red sauce (simple, nostalgic, always hits)
Vegetarian That Eats Like a Meal
- Green sauce + black beans + sautéed kale + roasted poblanos (top with avocado)
- Red sauce + roasted sweet potato + black beans (top with pickled onions)
- Creamy green sauce + mushrooms + spinach (extra cheese encouraged)
Party Tricks (But Still Easy)
- Two-sauce enchiladas: red on one side, green on the othersame filling
- Mole + chicken with toasted sesame and sliced onions
- Breakfast enchiladas: scrambled eggs + chorizo (or beans) + salsa verde
Toppings That Make Enchiladas Pop
Enchiladas are rich and cozy, so toppings should add brightness, freshness, and crunch:
- Crema or sour cream
- Chopped cilantro
- Diced onion or pickled onions
- Sliced radishes
- Shredded lettuce (Tex-Mex classic)
- Avocado or guacamole
- Lime wedges
- Hot sauce if you like consequences
Make-Ahead, Storage, and Food Safety
Make-Ahead
Enchiladas are meal-prep friendly. You can prep sauce and filling 1–3 days ahead, then assemble and bake when ready.
If assembling ahead, store covered in the fridge and add a few extra minutes to bake time.
Freezing
For freezer enchiladas, assemble in a disposable foil pan if you want easy life points. Freeze tightly wrapped.
Thaw overnight in the fridge when possible, then bake until hot and bubbly.
Food Safety Note
If your filling includes poultry, make sure it reaches a safe internal temperature of 165°F before eating.
This matters whether you cooked it fresh or you’re reheating leftovers in enchilada form.
Troubleshooting: Common Enchilada Problems (And Fixes)
“My tortillas cracked while rolling.”
They weren’t softened enough. Next time: quick-fry, warm longer, or steam/microwave wrapped in a damp towel until flexible.
“My enchiladas turned soggy.”
Usually too much sauce + tortillas that weren’t treated. Quick-fry tortillas, keep filling thick (not wet), and coat lightly instead of soaking.
Also consider leaving some edges exposed for texture.
“The flavor is meh.”
Two easy upgrades: (1) season the filling more boldly, and (2) brighten the sauce with lime, salt, or a little roasted chile.
Finish with fresh toppingsacid and herbs wake everything up.
“They fall apart when serving.”
Let the pan rest 10 minutes after baking. Also, avoid over-soaking tortillas during assembly, and pack them snugly seam-side down.
Real-World Enchilada Experiences (What Usually Happens and What to Do Next)
Enchiladas are one of those dishes that feel “easy” right up until you’re holding a tortilla that’s cracking like thin ice.
If you’ve ever thought, “Why do restaurant enchiladas stay together while mine turn into delicious rubble?”welcome. You’re in extremely good company.
One super common first-time experience is going heavy on sauce because it looks right (and because sauce is tasty). Then you bake, scoop, and… the enchiladas slide apart like a stack of wet playing cards.
The fix is counterintuitive: use less sauce during dipping and focus on a thin, even coating. You’ll still get plenty of sauce on top, and your tortillas will keep their backbone.
Many home cooks find that once they treat tortillas firstespecially with a quick frythe whole process feels suddenly calmer, like the tortillas stopped plotting against them.
Another classic moment: the filling is too “juicy.” This happens a lot with sautéed vegetables (mushrooms, zucchini, spinach) and also with shredded meat tossed directly with salsa.
You assemble, everything looks fine, and then the bake releases moisture into the pan. Result: watery edges and mushy bottoms.
The practical fix is simple: cook fillings until excess liquid evaporates, and if you’re mixing in salsa, add just enough for flavornot enough to turn the bowl into a marinade.
If you want the salsa taste, keep it for the top and finish with fresh pico or a spoon of salsa at the table.
Then there’s the “my tortillas are tearing, so I’m rage-layering this into a casserole” pivot. Honestly? That’s not failurethat’s adaptability.
Layered enchiladas can be fantastic, especially for weeknights or feeding a crowd. If rolling is driving you bananas, stack sauced tortillas with filling like lasagna, bake, and call it “enchilada bake.”
The flavors are still there, and nobody at the table is going to demand you demonstrate your rolling technique like it’s an Olympic sport.
Some people also discover their strong enchilada identity by accident: they make “classic” red enchiladas, but realize they’re happier with tangy green sauce; or they go vegetarian “just for this meal” and end up preferring black beans and roasted poblanos because it tastes fresher and lighter.
Enchiladas are great like thatthey’re a technique that helps you learn what you actually like.
Finally, there’s the most relatable experience of all: leftovers.
Enchiladas the next day are often even better because the flavors have time to mingle. The texture can soften a bit, but a quick reheat in the oven (instead of the microwave) helps bring back some structure.
Many home cooks keep toppings separate (cilantro, onions, lettuce, lime) so reheated enchiladas still taste bright and fresh.
It’s the same pan, the same combo, but somehow it feels like you planned your life.
Conclusion: Your Perfect Enchiladas Are a System, Not a Secret
The magic of enchiladas isn’t one “authentic” recipeit’s the method. Warm sauce. Thick filling. Softened tortillas.
Light coating, snug rolling, bubbly bake, and fresh toppings at the end.
Once you’ve got that system, your favorite sauce-and-filling combo is basically guaranteed to workwhether it’s classic chicken enchiladas in red sauce, tangy verdes with pork, or a veggie-packed pan that makes you feel like a responsible adult.
(Even if you ate three and called it “research.”)