Table of Contents >> Show >> Hide
- Why Make Wool Dryer Balls From an Old Sweater?
- What Kind of Sweater Works Best?
- Supplies You’ll Need
- Step 1: Felt the Sweater First
- Step 2: Cut the Sweater Into Strips
- Step 3: Roll the Strips Into Tight Balls
- Step 4: Secure the Balls in Pantyhose or Thin Socks
- Step 5: Wash and Dry to Felt the Balls
- How to Use Your DIY Wool Dryer Balls
- Common Mistakes to Avoid
- How Long Do Wool Dryer Balls Last?
- Are DIY Wool Dryer Balls Worth It?
- Real-World Experiences With Wool Dryer Balls From an Old Sweater
- Final Thoughts
- SEO Tags
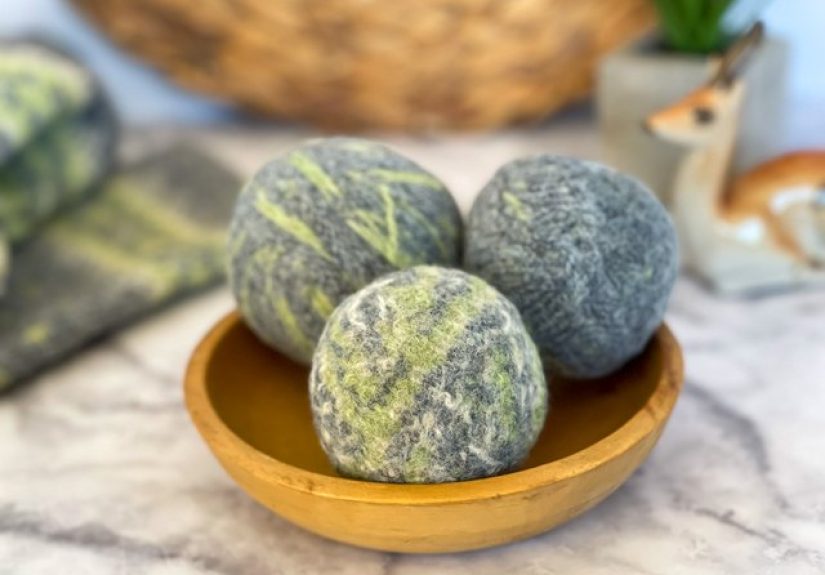
If your old wool sweater has already retired from active closet duty, do not send it off to the great donation bin in the sky just yet. It may have one more glorious career ahead of it: laundry assistant. Learning how to make wool dryer balls from an old sweater is one of those wonderfully practical DIY projects that feels a little crafty, a little thrifty, and a lot smarter than buying another box of single-use dryer sheets.
These soft, reusable balls tumble around in the dryer, helping separate wet clothes so warm air can move more freely. The result is laundry that can dry more efficiently, come out fluffier, and feel softer without heavy fragrance or chemical coatings. Even better, making DIY wool dryer balls is surprisingly simple. If you can roll a burrito, you can probably handle this project.
In this guide, you’ll learn exactly how to turn an old sweater into felted wool dryer balls, which materials work best, how to avoid common mistakes, and how to make sure your finished balls survive the dryer without looking like a woolly crime scene.
Why Make Wool Dryer Balls From an Old Sweater?
There are plenty of reasons this DIY is worth your time, especially if you like projects that are both useful and pleasantly low-drama.
1. You get a practical upcycling win
An old wool sweater that is stained, stretched, or shrunken can still be perfect for a second life. Instead of tossing it, you turn it into something you’ll actually use every week.
2. You can cut back on single-use laundry products
DIY dryer balls are a reusable alternative to traditional dryer sheets. That means less waste, fewer repeat purchases, and less clutter in the laundry room. It is the kind of tiny household swap that quietly saves money without demanding applause.
3. They help soften and separate laundry naturally
As the balls bounce around in the dryer, they can help prevent items from clumping together. That extra movement may reduce wrinkles, improve airflow, and help bulky things like towels or bedding dry more evenly.
4. They are ideal for people who prefer a fragrance-free laundry routine
If heavily scented dryer sheets make your nose twitch or your skin grumble, wool dryer balls can be a gentler option. You can also leave them unscented or lightly scent them later if you choose.
What Kind of Sweater Works Best?
This part matters more than many first-time DIYers expect. Not every sweater is a good candidate for wool dryer balls. The magic word here is wool, and not the “contains 8% wool and 92% mystery” kind.
Look for:
- 100% wool sweaters
- 100% lambswool, merino wool, or similar animal-fiber wool
- Old sweaters that already feel a little fuzzy, dense, or partially felted
Avoid:
- Acrylic, polyester, cotton, or rayon blends
- Loose knits that are mostly synthetic
- “Superwash” wool, which is treated to resist felting
If the sweater does not felt well, your dryer balls may unravel, shed badly, or stay too loose. In other words, they will look ambitious but perform like sleepy marshmallows.
Supplies You’ll Need
One of the best things about this project is that the supply list is refreshingly short.
- 1 old 100% wool sweater
- Sharp fabric scissors
- An old pair of pantyhose, knee-highs, or thin socks
- Cotton string or twine
- Hot water access
- Washing machine and dryer
- Optional: crochet hook or large needle for tucking ends
If you are the kind of person who loves a project that starts with “find something weird in the back of a drawer,” congratulations. This is your Super Bowl.
Step 1: Felt the Sweater First
If your old sweater is still soft, stretchy, and obviously knitted, felt it before cutting it up. Felting helps shrink and densify the wool so it locks together more easily later.
How to felt the sweater
- Wash the sweater in hot water.
- Dry it on high heat.
- Repeat if needed until the fabric looks dense and the knit stitches are less visible.
A properly felted sweater should look tighter, thicker, and a bit fuzzier. If you can still clearly see open loops in the knit, it probably needs another round.
This step is especially helpful if you are making wool dryer balls from an old sweater instead of using yarn. The denser the fabric, the easier it is to create a firm ball that holds together over time.
Step 2: Cut the Sweater Into Strips
Once the sweater is felted and fully dry, cut away seams, cuffs, and bulky areas if they make rolling awkward. Then cut the main body of the sweater into long strips.
A good target is:
- 1 to 2 inches wide
- As long as possible
You do not need ruler-level perfection here. This is laundry, not architecture. Just try to keep the strips reasonably even so the ball rolls smoothly.
Step 3: Roll the Strips Into Tight Balls
Now comes the satisfying part. Take one strip and start wrapping it tightly around two or three fingers to create the core. Then continue wrapping, switching directions every so often, until the shape becomes round rather than lopsided.
Your goal is a ball around the size of a tennis ball, or roughly 2.5 to 3 inches across. Keep the wrapping tight. Loose wrapping creates a soft ball that may not felt firmly enough in the next step.
When you reach the end of a strip, tuck it in and continue with another strip if needed. You want a solid, compact ball with no long flaps hanging out like a bad haircut.
Helpful rolling tips
- Wrap tightly from the beginning
- Turn the ball often to keep it round
- Tuck loose ends under outer layers
- Avoid giant oversized balls, which can dry poorly during the felting stage
Step 4: Secure the Balls in Pantyhose or Thin Socks
Place each ball into the leg of old pantyhose or a thin sock, tying a knot or string tightly between each one. This keeps them compressed while they go through the hot wash and dry cycles.
Why bother? Because without some containment, your carefully rolled ball may loosen during felting and turn into something that looks less like a dryer ball and more like a wool tumbleweed.
Step 5: Wash and Dry to Felt the Balls
Put the tied-up wool balls into a hot wash cycle, then dry them on high heat. The combination of moisture, heat, and friction helps the wool fibers lock together into a dense felted ball.
After one full cycle, check the texture. If the surface still looks loose or strips are shifting, repeat the process. Some sweaters felt quickly, while others need a second or third round.
You know the balls are ready when:
- The surface looks dense and unified
- You cannot easily lift a strip edge
- The shape stays firm when squeezed
- They no longer look like rolled fabric pretending to be a plan
How to Use Your DIY Wool Dryer Balls
Once your dryer balls are completely felted and dry, they are ready for action.
How many to use
- 3 balls for a regular load
- 4 to 6 balls for large, bulky, or heavy loads like towels, blankets, or comforters
What they do best
- Help separate wet items in the dryer
- Promote better airflow
- Help reduce clumping
- Soften laundry naturally
- Potentially reduce drying time
- Help minimize some wrinkles
If you want a light scent, add a drop or two of essential oil only after the balls are dry, then let the oil absorb before tossing them into the dryer. More is not better here. You want “fresh laundry,” not “linen closet collided with an aromatherapy convention.”
Common Mistakes to Avoid
Using the wrong sweater
This is the big one. If the sweater is not 100% feltable wool, the project may fail no matter how much optimism you throw at it.
Skipping the pre-felting step
If your sweater is still loosely knit, felting it first gives you a much better final result.
Rolling too loosely
A loose core leads to a floppy dryer ball. Keep everything snug from the start.
Making them too large
Oversized balls can take longer to felt and may not dry thoroughly after washing. Stick close to tennis-ball size.
Expecting miracles with static
Wool dryer balls can help with static, but they are not always as aggressive as dryer sheets, especially in cold, very dry conditions. If static is still an issue, try shortening drying time slightly and avoid over-drying fabrics.
How Long Do Wool Dryer Balls Last?
A well-made set of wool dryer balls can last for years. Over time, though, they may become fuzzy, misshapen, or coated with lint and hair. That does not necessarily mean they are done forever.
Signs they need refreshing
- They feel overly soft and less springy
- They are covered with lint buildup
- You notice more clumping or static than usual
How to refresh them
Wash them in hot water, then dry them on high heat. Some people also boil them briefly and let them cool in the water before drying. This can help tighten the fibers and clean off buildup.
When to replace them
Replace the balls when they are shedding pieces, unraveling, or so misshapen that they no longer move laundry effectively.
Are DIY Wool Dryer Balls Worth It?
Absolutely, especially if you already have an old sweater on hand. This is one of those rare DIY projects that checks multiple boxes at once: it is useful, inexpensive, beginner-friendly, and honestly kind of fun. You spend a little time making them once, then keep getting practical value load after load.
They also make a clever handmade gift. Pair a set with a small basket, a jar of clothespins, or a bottle of laundry-safe essential oil, and suddenly you look like the sort of person who has a very organized linen closet and definitely remembers to rotate seasonal bedding.
Real-World Experiences With Wool Dryer Balls From an Old Sweater
One of the most interesting things about making wool dryer balls from an old sweater is that the project usually teaches people something before the balls ever reach the dryer. The first lesson is often about wool itself. Many people discover, sometimes with surprise and sometimes with dramatic regret, that not all sweaters behave the same way. A sweater that looks promising can turn stubborn if it contains synthetic fibers, while a truly wool sweater often transforms beautifully after one or two hot wash-and-dry cycles. That first moment when a floppy thrift-store sweater turns dense and fuzzy feels oddly satisfying, like watching a random craft idea suddenly become a real household tool.
Another common experience is that the rolling step looks easy until you actually do it. At first, the strips may slide, bulge, or produce a lumpy little planet rather than a smooth ball. Most DIYers get better by the second or third one. Once people start switching directions as they wrap and tucking ends tightly, the ball firms up and starts looking much more polished. There is usually one “practice ball” that ends up a little weird, but that is part of the charm. Laundry does not care if your dryer ball is runway-ready.
When people begin using the finished balls, the first thing they tend to notice is the sound. It is not loud, but there is definitely a soft thump-thump in the dryer. For most households, that becomes background noise within a day or two. The second thing they notice is that towels and sheets often come out fluffier and less tangled. Bedding, especially, seems to benefit from the extra movement. Instead of one giant wet burrito of fitted sheet and pillowcase drama, the load usually dries more evenly.
Many users also say the biggest payoff is not some dramatic miracle but a collection of small improvements. Loads may finish a bit faster. Towels feel softer without added fragrance. Laundry products last longer because they are not being bought as often. Over time, that combination of convenience and savings is what wins people over. The balls become one of those boringly useful items you barely think about until you do a load without them and suddenly remember why you made them in the first place.
There are a few realistic frustrations too. Static can still show up during very dry weather, and some people find they need to experiment with load size or drying time to get the best results. Others discover that adding too much essential oil is a bad idea if they want clean-smelling clothes instead of mystery perfume. But overall, the experience tends to be positive because the project is low-risk, low-cost, and genuinely practical. For a lot of DIY-minded households, making wool dryer balls from an old sweater feels like the perfect mix of craft project and smart home habit: simple enough to finish in an afternoon, useful enough to stick around for years.
Final Thoughts
If you have been wondering how to make wool dryer balls from an old sweater, the short answer is this: use real wool, felt it well, roll it tightly, and let heat and friction do the rest. That is really the whole trick.
The better answer is that this project offers something many DIYs do not: a finished result you will actually use. Instead of creating another cute object that lives in a drawer, you make a practical laundry tool from something old and overlooked. That is a pretty good deal for one tired sweater and an hour or two of effort.
So yes, your old wool sweater may be done keeping you warm. But with a little snipping, rolling, and felting, it can still spend its retirement making your towels fluffier. Frankly, that is a noble second act.