Table of Contents >> Show >> Hide
- Why Opening a Paint Can Correctly Actually Matters
- The Best Tools for Opening a Paint Can
- How to Open a Paint Can the Right Way: Step by Step
- Common Mistakes People Make When Opening Paint Cans
- How to Pour Paint Without Making a Huge Mess
- How to Reseal a Paint Can Properly
- What to Do if the Paint Can Is Stuck
- Pro Tips for a Cleaner, Easier Paint Job
- Conclusion
- Real-World Experience: What Opening Paint Cans Teaches You Fast
Opening a paint can seems like the kind of task no adult should have to Google. You pop the lid, dip the brush, and suddenly your living room becomes a masterpiece, right? Not exactly. One bad pry can bend the lid, fill the rim with paint goo, splatter your floor, and leave you fighting the same can like it owes you money the next day.
The good news is that learning how to open a paint can the right way is easy. The better news is that it can save your paint, your tools, your patience, and possibly your favorite T-shirt. Whether you are painting a wall, touching up trim, or finally tackling that dresser you have been threatening to “upcycle” since last spring, this guide will show you the clean, smart, low-drama way to do it.
Below, you will learn the best tools to use, the step-by-step method for opening a paint can, common mistakes to avoid, and what to do afterward so the lid still closes properly. We will also cover how to pour paint with less mess, how to reseal the can for storage, and how real-life painting experience usually goes once optimism meets wet latex.
Why Opening a Paint Can Correctly Actually Matters
It is tempting to jam the nearest screwdriver under the lid, pry hard in one spot, and call it a day. That method works about as gracefully as opening a soda with a hammer. Yes, you might get the can open, but you can also warp the lid, deform the rim, and make resealing the can much harder later.
A properly opened paint can does three important things. First, it protects the rim so the can can still seal tightly after use. Second, it reduces drips and dried paint buildup around the edge. Third, it keeps your opening process controlled, which means less splatter, less frustration, and a much smaller chance of launching paint onto your shoes.
If you ever plan to save leftover paint for touch-ups, this matters even more. Paint that is poorly sealed does not age gracefully. It skins over, thickens, smells odd, and becomes the decorative equivalent of regret.
The Best Tools for Opening a Paint Can
If you want the shortest path between “I am ready to paint” and “nothing has gone terribly wrong,” use the right tool. Here are the best options:
1. A Paint Can Opener
This is the simplest and most reliable tool for the job. A metal paint can opener is inexpensive, small, easy to keep in a drawer, and designed specifically to pry lids without mangling them. It is one of those humble little tools that never looks exciting in the store but becomes oddly satisfying in real life.
2. A 5-in-1 Painter’s Tool
If you paint more than once every presidential era, a 5-in-1 tool is worth having. It can open cans, scrape dried paint, clean rollers, spread filler, and generally make you feel more competent than you may actually be. The blunt tip is especially useful for lifting a lid without damaging the edge.
3. A Flathead Screwdriver
If you do not have a paint opener, a flathead screwdriver can work as a backup. The key is to use it gently and move around the lid in small increments. This is not a crowbar situation. You are opening paint, not escaping a submarine.
4. A Rubber Mallet for Closing
Technically, this tool comes in after opening, but it deserves a place on the list. A rubber mallet helps you reseal the lid without denting the can. If you do not have one, a hammer and a small block of wood can do the job more safely than hitting the lid directly.
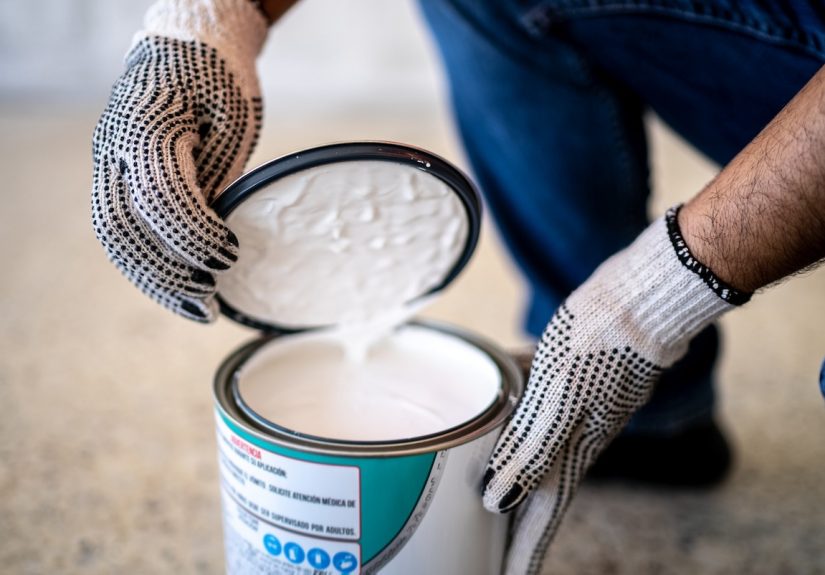
How to Open a Paint Can the Right Way: Step by Step
Step 1: Set up your workspace first
Before you open anything, place the can on a flat, stable surface. Put down a drop cloth, cardboard, or old protective covering underneath. This is one of those tiny prep steps that feels unnecessary until your first drip lands exactly where it should not.
If the can has been sitting for a while, wipe off dust, debris, or dried paint around the lid. You do not want grime falling into fresh paint the second the seal breaks.
Step 2: Give the can a quick check
Look for dents, bulges, rust, or dried paint sealing the rim shut. If the can is brand new from the store, you are mostly checking for shipping damage. If it is an older can, inspect it like you are interviewing it for a job. Does it look trustworthy? Is the lid crusted over? Is the label still readable? Are you about to discover a color called “Soft Fog” that is actually “Aggressive Beige”?
Step 3: Insert the opener into the groove
Place the tip of your paint opener, 5-in-1 tool, or screwdriver into the groove where the lid meets the can. Do not jam it straight down like you are trying to split firewood. Instead, wedge it in just enough to get leverage.
Step 4: Pry gently, then move around the rim
This is the part people rush, and it is exactly where the mess begins. Lift gently until that section of the lid pops slightly upward. Then stop. Rotate the can a few inches and repeat. Keep going around the full rim, lifting a little at a time.
This method matters because it loosens the lid evenly. If you pry in only one spot, you can bend the lid and distort the rim. That may not seem dramatic now, but it becomes very dramatic later when you try to close the can and discover the seal no longer fits well.
Step 5: Lift the lid off carefully
Once the seal is loose all the way around, lift the lid straight up. If it sticks slightly, do one more gentle pass around the edge rather than yanking harder. Set the lid aside on a protected surface, paint side up, so it does not collect dirt or transfer wet paint onto something expensive.
Step 6: Stir the paint before using it
Even if the paint looks fine at first glance, give it a thorough stir with a clean stir stick. Paint ingredients can separate in the can, especially if it has been sitting for a while. Stir from the bottom up until the color and texture look consistent. This is not glamorous work, but it is the difference between “smooth finish” and “why is this wall somehow three different moods?”
Common Mistakes People Make When Opening Paint Cans
Using brute force
If your opening strategy can be described as “angry leverage,” it is time for a reset. Paint lids respond better to patience than aggression.
Prying from one spot only
This is the classic mistake. One hard pry can bend the lid, misshape the seal, and make the can harder to reseal. Always work your way around the rim.
Letting paint pool in the rim
The channel around the edge of a paint can loves collecting excess paint. That pooled paint dries into a stubborn crust, makes the lid harder to close, and can create drips down the side of the can. Clean the rim before closing, every time.
Opening the can before protecting the area
Paint has an uncanny ability to find the only unprotected surface in the room. Put down protection first, then open the can.
Skipping the stir
Fresh-looking paint can still be poorly mixed. If you open and paint immediately without stirring, you may end up with inconsistent color or sheen.
How to Pour Paint Without Making a Huge Mess
Once the can is open, the next challenge begins: getting paint out of the can without decorating the sides, the handle, and your hand. Pour slowly and deliberately into a paint tray or smaller working container. There is no trophy for fastest pour.
For cleaner transfers, you can use a snap-on pour spout or a storage lid with a built-in pour opening. These accessories help reduce drips and keep the rim cleaner. They are especially handy if you are working alone and would prefer not to perform an awkward balancing act with a roller tray in one hand and a gallon of paint in the other.
If you are dipping a brush directly into the can, do not overload it. Dip the lower third of the bristles and tap lightly against the inside of the can. Scraping the brush hard across the rim only pushes more paint into the groove, which is basically how future-you gets punished.
How to Reseal a Paint Can Properly
Knowing how to open a paint can the right way is only half the story. If you want leftover paint to stay usable, you also need to close it correctly.
Clean the rim and lid
Use a brush, rag, or cloth-wrapped tool to remove excess paint from the rim and the underside of the lid. The cleaner the contact surfaces, the better the seal. This step also makes the can easier to reopen later.
Cover the opening if desired
Some painters place a layer of plastic wrap over the opening before putting the lid back on. This can help improve the seal and reduce dried paint buildup around the edge.
Tap around the edge, not the center
Set the lid back in place, then use a rubber mallet to tap around the perimeter until it is secure. If you only hit the middle, you can dent the lid and compromise the seal. No need to turn the can into a percussion instrument. Gentle, even taps do the trick.
Label what is inside
If the can is going into storage, write where you used the paint and dab a little color onto the lid. Your future self will thank you when touch-up day arrives and you are not forced to open five nearly identical cans in search of the correct shade of “definitely white but somehow not the same white.”
What to Do if the Paint Can Is Stuck
Sometimes older cans do not want to cooperate. Dried paint acts like glue, and the lid feels welded shut by pure stubbornness. In that case, start by cleaning away any crust around the rim. Then work your tool around the edge more slowly than usual.
If needed, use needle-nose pliers to gently loosen stubborn sections of the rim or continue prying in small increments with a flathead screwdriver. The goal is still controlled movement around the entire lid. Resist the urge to attack one corner like it insulted your family.
If the paint inside is old, lumpy, foul-smelling, heavily skinned over, or badly separated even after stirring, opening it successfully does not necessarily mean it is still worth using. A paint can is not a time capsule. Sometimes the smartest move is knowing when to stop.
Pro Tips for a Cleaner, Easier Paint Job
- Keep one dedicated paint opener in your tool kit. They are cheap, effective, and save the screwdriver from being drafted into every household emergency.
- Use a smaller container for trim or touch-up work. It keeps the main can cleaner and reduces contamination.
- Stir from the bottom, not just the top. Settled pigment loves hiding down there.
- Open every can before project day if you bought multiple cans. That way you can confirm the color and condition before you are already in painting mode.
- Do not leave the lid off forever. Paint starts changing the moment air gets invited to the party.
- Keep the can out of direct sun and extreme heat while working. Paint behaves better when it is not being cooked.
Conclusion
Opening a paint can the right way is one of those small DIY skills that pays off far more than you expect. It protects the lid, preserves the paint, reduces mess, and makes the whole project feel smoother from the start. The best method is simple: use the proper tool, pry gently around the rim, lift the lid carefully, stir the paint well, and clean the rim before closing it again.
In other words, do not wrestle the can. Outsmart it.
Once you get this process down, every painting project gets a little easier. You waste less paint, avoid bent lids, and spend less time scrubbing dried drips off the side of the can. That may not sound glamorous, but in the world of home improvement, glamour is often just another word for “nothing leaked.”
Real-World Experience: What Opening Paint Cans Teaches You Fast
The funny thing about painting is that the first five minutes can predict the whole mood of the project. If you open the can neatly, stir the paint properly, and keep the rim clean, the job starts calm and controlled. If you attack the lid with a random screwdriver while standing over an unprotected floor, you are basically writing the opening chapter of a very avoidable disaster.
One of the most common real-life lessons people learn is that paint cans reward patience. The first time you pry only one side and hear the lid bend with that awful little metal crunch, you suddenly understand why the “go around the rim” advice exists. It is not fussy. It is survival. A warped lid may still go back on, but it never seals quite the same, and the next time you open it, the dried paint in the rim behaves like industrial-strength glue.
Another experience many DIY painters have is discovering that the mess does not usually happen during painting. It happens before painting. It happens when the can is opened on a nice counter without cardboard underneath. It happens when the lid gets set face-down on a step stool. It happens when the brush is wiped hard against the rim every five seconds until the groove fills with paint like a tiny moat of bad decisions.
There is also a surprisingly emotional moment that comes with reopening a can months later for touch-ups. If you cleaned the rim, sealed the lid properly, and labeled the top, you feel like a genius. The paint opens, stirs back to life, and saves the day after a scuff mark, furniture scrape, or mystery wall ding. If you did none of those things, the can opens like an archaeological dig and smells like consequences.
Experienced painters also learn that small accessories can make a big difference. A simple pour spout, a 5-in-1 tool, a roll of painter’s tape, and a rubber mallet do not seem dramatic at checkout, but they quietly eliminate a lot of hassle. These are the kinds of tools that turn a project from “Why is this taking forever?” into “Okay, this is actually going pretty well.”
And perhaps the best lesson of all is that careful paint-can handling creates momentum. When the opening is clean, the pour is controlled, and the reseal is solid, the rest of the job tends to follow suit. You work slower in a good way. You notice drips sooner. You use less paint. You clean up faster. You feel less like you are battling the project and more like you are running it.
So yes, opening a paint can correctly sounds almost too basic to matter. But in real homes, with real walls, real trim, real furniture, and very real gravity, it matters a lot. It is one of those tiny skills that separates a messy, frustrating weekend from a satisfying one. And if a $1 opener and 30 extra seconds can help keep paint off the floor and your blood pressure off the ceiling, that is a trade worth making every single time.


