Table of Contents >> Show >> Hide
- Before You Start: The 60-Second Game Plan
- Tools & Supplies Beginners Actually Need
- Pick the Right Paint Finish (So It Survives Real Life)
- How Much Paint Do You Need? (A Real Example)
- Prep the Room (The Step Beginners Want to Skip… and Shouldn’t)
- Do You Need Primer? Here’s the Beginner Rule
- What Order Should You Paint In?
- Step-by-Step: How to Paint the Room (Without the Chaos)
- Dry Time vs. Cure Time (Why Your Wall Feels Dry but Isn’t “Done”)
- Cleanup: How to Finish Like You Meant to Do This
- Beginner Troubleshooting: Fix Common “Uh-Oh” Moments
- Beginner Experiences: What People Usually Learn the Hard Way (So You Don’t Have To)
Painting a room sounds simpleuntil you’re standing in the paint aisle holding 47 tiny color cards, wondering if “Soft Fog” is a color or a weather report. The good news: you don’t need a contractor’s license (or an Olympic-level attention span) to get clean, professional-looking results. You just need a plan, the right tools, and a few beginner-friendly techniques that prevent the classic DIY hall of fame mistakes: drips, lap marks, and that mysterious gritty texture that appears when you “painted over it anyway.”
This guide breaks down how to paint a room step by stepprep, priming, cutting in, rolling, drying, and cleanup with specific examples and realistic tips so your first room doesn’t look like it lost a fight with a roller cover.
Before You Start: The 60-Second Game Plan
- Day 1 (most rooms): Prep + paint first coat.
- Day 2: Second coat + touch-ups + cleanup.
- Big truth: Prep work is the difference between “wow!” and “why is it bumpy right there?”
Tools & Supplies Beginners Actually Need
Painting tools
- Angled sash brush (2–2.5 inch): for cutting in along trim, corners, and ceilings.
- Roller frame + covers (9-inch): a solid everyday size for walls.
- Roller nap (thickness):
- 3/8-inch nap for smooth to lightly textured walls (most modern interiors).
- 1/2-inch nap for more texture (orange peel, heavier drywall texture).
- Extension pole: saves your back and improves even pressure (translation: fewer streaks).
- Paint tray + liners (or a small paint bucket for cutting in).
- Painter’s tape: optional, but helpful for beginnersespecially around trim and edges.
Prep supplies
- Drop cloths (canvas is best; plastic can be slippery)
- Spackle/joint compound + putty knife
- Sanding sponge (fine/medium)
- Caulk (paintable) for small trim gaps
- Mild soap + water (or wall cleaner) and microfiber cloths
- Vacuum or tack cloth for dust
Paint & primer
- Interior wall paint (usually latex/acrylic)
- Primer (as neededmore on this below)
- Stain-blocking primer if you’re dealing with water stains, smoke, or heavy marks
Pick the Right Paint Finish (So It Survives Real Life)
“Finish” (also called sheen) affects both how the wall looks and how well it holds up to fingerprints, scrubbing, humidity, and that one family member who believes walls are a napkin.
- Flat/Matte: Hides imperfections well, but can be less forgiving when you need to wipe it down.
- Eggshell: The popular “sweet spot” for many living rooms and bedroomssoft look, decent cleanability.
- Satin: More durable and washable; great for busy areas, kids’ rooms, hallways, and some kitchens.
- Semi-gloss: Common for trim, doors, and bathroomstough and moisture-friendly, but it shows wall flaws.
Beginner tip: if your walls have visible dings or texture weirdness, choose a lower sheen (matte/eggshell) rather than satin, because higher sheen reflects more light and highlights imperfections.
How Much Paint Do You Need? (A Real Example)
Most interior paints cover roughly 350–400 square feet per gallon per coat on a smooth, primed surface. Textured walls, dramatic color changes, and thirsty patches can reduce that coverage.
Easy calculation
- Measure the room perimeter: (Length + Width) × 2
- Multiply by ceiling height to get wall square footage.
- Subtract big openings (windows/doors) if you want extra accuracy.
- Divide by 350–400 for gallons per coat.
- Plan for two coats (very common for even color and durability).
Example: 12×15 room, 8-foot ceilings
- Perimeter: (12 + 15) × 2 = 54 ft
- Wall area: 54 × 8 = 432 sq ft
- Paint per coat: 432 ÷ 350 ≈ 1.24 gallons (round up for real life)
- Two coats: plan on ~2.5 gallons total → typically buy 3 gallons (or 2 gallons + 1 quart, depending on store options).
Pro move for beginners: use a brand’s paint calculator if you’re unsureit’s faster than doing math with a tape measure in one hand and existential dread in the other.
Prep the Room (The Step Beginners Want to Skip… and Shouldn’t)
If painting had a secret handshake, it would be spelled P-R-E-P. Prep is what makes paint stick, look smooth, and avoid peeling later. Here’s the beginner-safe checklist.
1) Protect floors and move stuff
- Move furniture to the center of the room and cover it.
- Cover floors with drop cloths; tape edges if needed so they don’t slide.
- Remove curtains, wall art, and anything hanging that you “promise you’ll paint around.” (You won’t. Remove it.)
2) Remove plates and hardware
- Take off outlet/switch covers and store screws in a small cup or bag.
- If you’re painting trim/doors too, remove or mask hardware.
3) Clean the walls (yes, even if they look clean)
Paint does not like grease, dust, or mystery smudges from the back of a sofa. Wash walls with mild soap and water, especially around light switches and kitchen zones. Let surfaces dry fully.
4) Patch holes and fix rough spots
- Fill nail holes and dents with spackle.
- Let it dry, then sand smooth (feather the edges so you don’t see a “patch halo”).
- Vacuum or wipe off sanding dustdust under paint creates gritty texture.
5) Lightly sand glossy areas
If walls or trim are glossy, lightly scuff sanding helps the new coating grip better. You’re not trying to destroy the wall you’re just giving it a tiny “tooth” to hang onto.
Safety note for older homes (important)
If your home was built before 1978, old layers may contain lead-based paint. If you’re scraping, sanding, or disturbing old paint (especially if it’s chipping), use lead-safe practices and consider hiring certified help for larger jobs. Even DIY homeowners should be cautious: control dust, keep kids/pets away, and avoid dry sanding old paint.
Do You Need Primer? Here’s the Beginner Rule
Primer is like the “insurance policy” of paintingsometimes you can skip it, but when you need it, you really need it. Use primer if any of these are true:
- New drywall or raw patches/spackle (prevents flashing and uneven sheen)
- Stains (water, smoke, markers, grease)use a stain-blocking primer
- Big color change (very dark to very light, or strong reds/oranges)
- Glossy surfaces that need better adhesion
- Uneven surfaces where paint soaks in differently (repairs, porous areas)
Beginner-friendly tip: for small repairs, you can often spot-prime patches instead of priming the whole room. But if the wall is full of patches (or has stains), full priming saves frustration later.
What Order Should You Paint In?
If you’re painting everything (ceiling, walls, trim), a common pro sequence is: ceiling → walls → trim. If you’re only painting the walls, don’t overthink itjust focus on clean cut lines and smooth rolling.
DIY-friendly approach: many painters recommend doing walls before trim if trim is staying the same color, because it’s easier to clean up small wall drifts on trim later with trim paint. If you’re repainting trim, save it for last for the crispest look.
Step-by-Step: How to Paint the Room (Without the Chaos)
Step 1: Tape (optional, but helpful)
Painter’s tape is training wheels for sharp lines. Apply in short sections, press firmly along the edge, and avoid stretching it. If you do tape, remove it carefully (more on timing in the cleanup section).
Step 2: Cut in the edges
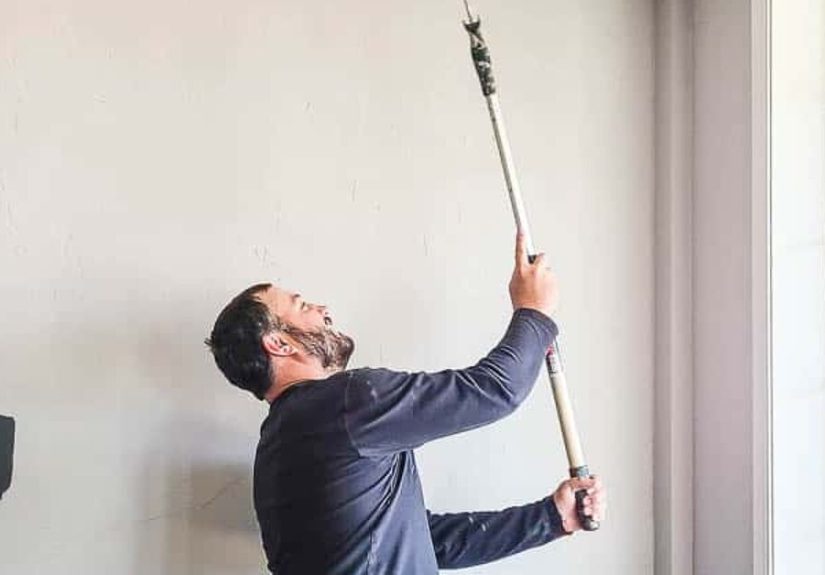
“Cutting in” means painting a clean border where rollers can’t reach: corners, ceiling lines, trim edges, around doors/windows. Use an angled brush and aim for a 2–3 inch band.
- Don’t dip the brush straight into the can like it’s a cookie jaruse a small bucket or tray so you don’t contaminate the main paint.
- Load the brush, tap off excess (don’t wipe it dry), and keep a steady hand.
- Work one wall at a time so the cut-in edge stays wet enough to blend with rolling.
The #1 beginner mistake is cutting in the whole room first, then rolling later. By then, edges are dry and you can get a darker border (sometimes called “picture framing”). The fix: cut in a wall, then roll that wall while the edge is still workable.
Step 3: Roll the walls (the “W” method that actually works)
Pour paint into the tray, load the roller evenly, and roll off excess so it’s not dripping. Then paint in manageable sections (roughly 3×3 feet or so).
- Start a few inches away from the edge (so you don’t smash paint into corners).
- Roll a big “W” or zigzag pattern.
- Fill it in without lifting the roller much, keeping even pressure.
- Finish with light, steady passes to level the paint.
Key concept: keep a wet edge. Lap marks happen when fresh paint overlaps paint that’s already drying. Work steadily, reload as needed, and avoid stopping mid-wall for a snack break (paint waits for no one).
Step 4: Let it dry, then do the second coat
Follow your paint can’s recoat time. Many latex paints can be recoated in a few hours under normal conditions, but humidity and cold rooms can slow things down. If you recoat too soon, you can get dragging, streaking, or peeling later.
Second coat is where rooms go from “kind of better” to “oh wow.” It evens out roller coverage, deepens color, and improves durability. Apply it the same way: cut in one wall, roll that wall, repeat.
Step 5: Touch-ups (use the same tools)
Touch-ups look best when you use the same nap roller and paint batch. If you dab with a brush in the middle of a rolled wall, you may see a different texture or sheen. For small wall touch-ups, lightly roll the area instead of brushing.
Dry Time vs. Cure Time (Why Your Wall Feels Dry but Isn’t “Done”)
Paint can feel dry to the touch fairly quickly, but curing (fully hardening) takes longer. During the cure period, be gentle: don’t scrub aggressively, avoid tape on fresh paint, and don’t press heavy furniture into the wall like you’re trying to leave a fossil record.
Cleanup: How to Finish Like You Meant to Do This
When to remove painter’s tape
If you used tape, remove it slowly at about a 45-degree angle. Many DIYers get the cleanest results removing it while paint is still slightly wet (or at least not fully hardened) so it doesn’t peel off in sheets.
Clean brushes and rollers
- For latex paint: wash with warm water and mild soap until water runs clear.
- Spin or shake out excess water, reshape brush bristles, and let tools dry.
- Label leftover paint (room + date) and store sealed in a moderate temperature space.
Ventilation matters
Keep windows open and use fans to move fumes outespecially for small rooms or higher-VOC products. Good airflow also helps drying and reduces lingering odor.
Beginner Troubleshooting: Fix Common “Uh-Oh” Moments
Problem: Roller marks or streaks
- Cause: Too little paint on the roller, pressing too hard, or rolling over paint that’s drying.
- Fix: Load the roller well, roll in sections, keep a wet edge, and do a second coat.
Problem: Lap marks (darker overlaps)
- Cause: Overlapping dry edges.
- Fix: Work faster in smaller sections; don’t let one area dry before the next overlap.
Problem: Peeling paint
- Cause: Dirty/greasy walls, moisture issues, glossy surface not prepped, or painting too soon after cleaning.
- Fix: Clean, dry, scuff-sand glossy areas, and use the right primer.
Problem: “Flashing” (patches show through)
- Cause: Unprimed spackle/repairs absorb paint differently and change sheen.
- Fix: Spot-prime repairs before painting, then apply two full coats.
Problem: Paint bleed under tape
- Cause: Tape not pressed firmly, dusty surface, or paint pushed into the edge.
- Fix: Clean surface, press tape down well, and paint away from the tape edge with lighter pressure.
Beginner Experiences: What People Usually Learn the Hard Way (So You Don’t Have To)
The first room you paint is like your first pancake: it’s still edible, but you learn a lot about temperature, timing, and why rushing is a trap. Below are real-world “beginner experiences” that show up again and againplus the lesson that turns them into a better second room (and third room, and “why did I decide to paint the hallway at 9 p.m.” room).
Experience #1: The “One Coat Myth.” Almost everyone tries to convince themselves that one coat is enoughespecially after you’ve been painting for hours and your arm is making a formal complaint. Then the paint dries and you notice patchy spots, roller shadows, or the previous color peeking through like it paid rent. The takeaway: two coats aren’t a sales pitch, they’re how you get even color and a finish that doesn’t look tired under daylight.
Experience #2: The Tape Betrayal. You tape everything beautifully, stand back proudly, and then peel it off to reveal… tiny jagged bleeds that look like your baseboard got into a fight with a marker. Usually it’s because the tape edge wasn’t pressed down firmly, the wall was dusty, or you flooded paint into the tape line. The takeaway: clean the surface, apply tape in short sections, press it down well, and don’t overload the edge. Also: tape is helpful, but good cutting-in technique is the long-term superpower.
Experience #3: The Fuzzy Roller Surprise. First-time painters often skip prepping the roller cover. Thenmid-walltiny fibers appear in the paint like you painted with a sleepy cat. The takeaway: remove loose lint before you start (some people lightly dab with painter’s tape) and use a quality roller cover matched to your wall texture. Bonus lesson: cheaper rollers can shed more, and your wall will remember.
Experience #4: The “I’ll Just Paint Around It” Lie. Many beginners try to paint around outlet covers, door hinges, or furniture they didn’t want to move. It usually ends with crooked lines, bumps, and paint on something that absolutely should not have paint on it. The takeaway: removing covers takes minutes and makes the room look finished. Moving furniture is annoying, but repainting a smeared edge is worse.
Experience #5: The Wet Edge Race. Cutting in feels slow, so beginners often cut in the entire room first, then roll everything later. When the roller finally arrives, the edges are dry and the wall develops a darker outlinelike the room is framed in “Oops.” The takeaway: work one wall at a time. Cut in, then roll while the edge is still fresh enough to blend. This single habit is one of the biggest “pro-looking” upgrades you can make.
Experience #6: The “Why Is This Wall Bumpy?” Mystery. Sometimes the wall looks smooth before painting, but after it dries you notice gritty bumps, tiny hairs, or rough patches. The takeaway: dust is real and it is sneaky. Sanding dust, pet hair, and even lint from rags can cling to damp paint. Vacuum the walls after sanding, wipe them down, and keep your space as clean as possible while you work.
Experience #7: The Too-Soon Furniture Comeback. You finish painting, it feels dry, and you move everything back immediatelyonly to scuff the wall, leave impressions, or stick something to paint that isn’t fully cured yet. The takeaway: “dry” and “cured” are different. Give walls time before heavy cleaning, aggressive scrubbing, or pushing furniture tight against them. If you want to do something right away, do the low-risk jobs: reinstall plates, tidy tools, and admire your crisp corners like you planned them that way all along.
The overall pattern in beginner experiences is simple: painting is 30% paint application and 70% setup, timing, and patience. Once you accept that, your next room goes faster, looks better, and requires fewer “creative explanations” when someone asks why one corner is shinier than the rest.


