Table of Contents >> Show >> Hide
- Why Extra High Vaulted Ceilings Need a Different Game Plan
- Decide First: DIY or Hire a Pro?
- Tools and Materials You Will Actually Need
- Safety Rules You Should Not “Kind Of” Follow
- How To Prep an Extra High Vaulted Ceiling
- The Best Paint for Vaulted Ceilings
- Step-by-Step: How To Paint Extra High Vaulted Ceilings
- How To Handle Vaulted Ceilings With Texture, Beams, or Awkward Angles
- Mistakes That Ruin the Finish
- When a Vaulted Ceiling Color Change Makes Sense
- Real-Life Experiences Painting Extra High Vaulted Ceilings
- Conclusion
Painting a regular ceiling is already a mildly insulting workout. Painting an extra high vaulted ceiling? That is a full-on relationship test between you, gravity, and your shoulders. The good news is that this job is absolutely doable in many homes if you plan carefully, use the right tools, and respect the part where ladders are not magical creatures.
Whether you are freshening up a cathedral ceiling in a living room, brightening a dark great room, or finally covering that suspicious water stain that has been silently judging you for months, this guide will walk you through the process. We will cover how to prep, what tools matter most, which paint works best, how to stay safe, and when to stop pretending this is a “fun weekend project” and call a pro instead.
Why Extra High Vaulted Ceilings Need a Different Game Plan
Vaulted ceilings look dramatic, airy, and expensive. They also make simple paint jobs feel like an indoor mountain expedition. Unlike flat eight-foot ceilings, vaulted ceilings often involve steep angles, uneven access, tall walls, open stairwells, chandeliers, beams, and lighting conditions that reveal every missed spot and roller mark.
That means your approach needs to be smarter, not just taller. The main challenges are reach, safety, even coverage, and fatigue. If you go into the job with a tiny step ladder, a bargain-bin roller, and the confidence of someone who once painted a bathroom, the ceiling will humble you very quickly.
Decide First: DIY or Hire a Pro?
Before you buy paint, decide whether this project truly belongs in your hands. A straightforward vaulted ceiling over a wide, open floor may be manageable with an extension pole and a proper ladder. A ceiling above a staircase, foyer, or landing is a completely different beast.
You should strongly consider hiring a professional if:
- The ceiling is above stairs or an open drop.
- You need scaffolding or specialty ladder systems.
- The ceiling has heavy texture, large beams, skylights, or intricate trim.
- You see old peeling paint in a home built before 1978.
- You are not comfortable working overhead for long periods.
There is nothing noble about balancing on the wrong ladder while whispering, “I’ve got this,” right before you definitely do not have this.
Tools and Materials You Will Actually Need
If you want a smooth finish on an extra high ceiling, tools matter almost as much as technique. Cheap rollers shed fuzz. Weak extension poles flex like fishing rods. Tiny brushes turn a one-day job into a saga.
Essential painting tools
- High-quality ceiling paint with a flat or very low-luster finish
- Stain-blocking primer for water spots, smoke stains, or patched areas
- A sturdy extension pole
- A 9-inch roller frame and roller covers
- A 2 to 2.5-inch angled sash brush for cutting in
- A reliable step ladder or extension ladder suited to the space
- Painter’s tape
- Canvas or heavy-duty drop cloths
- Paint tray or bucket grid
- Spackle or joint compound for minor repairs
- Sandpaper or sanding sponge
- Microfiber cloths, broom, or vacuum with brush attachment
- Safety glasses and a hat you do not love
Choosing the right roller nap
This is where many DIY jobs go sideways. For smooth ceilings, a shorter nap gives a cleaner result. For lightly textured surfaces, move up slightly. For textured ceilings, you need a thicker nap so paint actually gets into the surface instead of skimming over it like a lazy tourist.
As a practical rule of thumb, use a 3/8-inch nap for smoother ceilings, a 1/2-inch nap for lightly textured surfaces, and something closer to 3/4-inch for heavily textured ceilings. If you use too much nap on a smooth ceiling, you can leave unwanted texture behind. If you use too little on a textured ceiling, you will miss half the surface and say words not approved for home blogs.
Safety Rules You Should Not “Kind Of” Follow
Extra high ceiling projects are won or lost on safety. Do not stand on the top step of a stepladder. Do not place ladders on boxes, furniture, or stacked boards to gain height. Do not move or extend a ladder while you are on it. And do not set up on a slippery or uneven surface unless it is properly stabilized.
If your ladder is near a doorway or walkway, block the area off so nobody bumps it. If you are working near fixtures or wiring, shut off power where appropriate and give yourself clearance. Most importantly, keep your torso between the ladder rails. Reaching too far to avoid climbing down and repositioning feels efficient right up until it is not.
One more big warning: if your house was built before 1978 and the old paint is peeling, chipping, or likely to be disturbed during prep, treat the situation seriously. Older homes can contain lead-based paint. In that case, lead-safe practices or professional help are the smart move.
How To Prep an Extra High Vaulted Ceiling
1. Clear the room as much as possible
Move furniture out if you can. If not, push everything to the center and cover it completely. Take down art, curtains, vents, and anything fragile. Cover the floors generously. Ceiling painting is a spatter sport.
2. Dust before you paint
Ceilings collect dust, cobwebs, and mystery fluff at an elite level. Use a vacuum with a brush attachment, a microfiber duster, or a clean broom wrapped in a cloth to remove debris. Paint sticks much better to a clean surface, and you do not want to roll wet paint over a year’s worth of airborne nonsense.
3. Repair cracks, dents, and old patchwork
Fill nail pops, seams, and minor cracks with spackle or compound. Let repairs dry, then sand smooth. If the ceiling has larger cracks or sagging drywall, deal with that first. Paint is not a structural repair, no matter how optimistic the label sounds.
4. Prime stains and repairs
If you are covering water stains, smoke residue, or patched areas, use a stain-blocking primer. Skipping primer often leads to the classic disappointment of watching the stain ghost right back through your fresh white paint like it pays rent there.
The Best Paint for Vaulted Ceilings
For most extra high ceilings, a flat ceiling paint is your best friend. Flat finishes hide imperfections better than shinier sheens and reduce glare from windows, recessed lighting, and skylights. That matters a lot on vaulted ceilings, where light hits the surface from multiple angles and loves to highlight every flaw.
Many ceiling paints are formulated to splatter less, which is very helpful when your face is not exactly optional equipment on the job. If your ceiling is smooth and you want the cleanest look possible, pick a high-quality ceiling paint rather than using leftover wall paint just because it is already in the garage looking hopeful.
Color also matters. White brightens the room and keeps the architecture feeling open. A slightly warmer white can soften a huge room. A darker ceiling color can make a very tall room feel cozier. In some rooms, painting walls and ceiling the same color creates a seamless, intentional look that visually tones down extreme height.
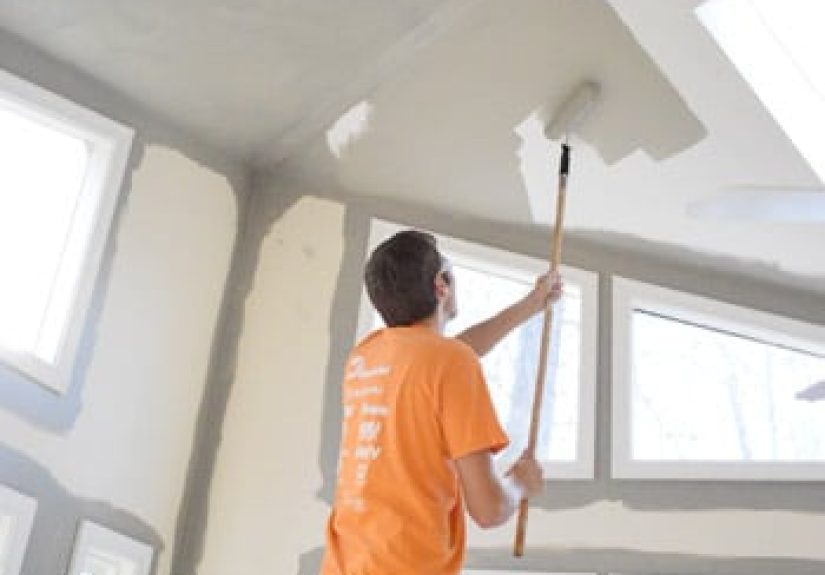
Step-by-Step: How To Paint Extra High Vaulted Ceilings
Step 1: Paint the ceiling before the walls
This is the correct order for a reason. Ceilings drip, flick, and occasionally launch paint in directions that feel personal. Painting the ceiling first keeps you from splattering your freshly finished walls and trim.
Step 2: Cut in the edges
Use your angled brush to cut in where the ceiling meets the wall, around beams, skylights, vents, or trim. On extra high ceilings, this may mean working from a ladder for the perimeter and using an extension-compatible brush setup where possible.
Work in manageable sections instead of outlining the entire room and letting it dry before rolling. The goal is to keep your cut-in area wet enough to blend with the rolled section. That is how you avoid visible framing lines around the edges.
Step 3: Load the roller correctly
Do not drown the roller. A roller that is too wet drips more, splatters more, and makes you look like you lost a fight with whipped cream. Load it evenly, then roll off excess paint on the tray or grid so it is full but not sloppy.
Step 4: Roll in sections and keep a wet edge
Start near one end of the ceiling and work across in sections. Use long, controlled, overlapping strokes. A gentle W or N pattern works well to distribute paint, but the main goal is even coverage without dry edges. Keep the roller moving into the still-wet paint rather than starting and stopping randomly.
On a vaulted ceiling, it often helps to work with the direction of the major light source when possible. That can make roller marks less noticeable. Overlap each pass slightly and do not let one section dry completely before you connect the next one.
Step 5: Never paint directly over your head if you can help it
Reposition yourself instead. It is safer, more comfortable, and gives you better control. Benjamin Moore’s advice for high walls and ceilings is especially sensible here: move your ladder as needed and avoid painting directly overhead. Your neck will send a thank-you card later.
Step 6: Let the first coat dry fully
Resist the urge to judge the finish while it is still drying. Ceiling paint often looks uneven before it cures. Once the first coat is dry, inspect from multiple angles. If needed, apply a second coat. Rolling the second coat perpendicular to the first can improve coverage on some ceilings, especially textured ones.
How To Handle Vaulted Ceilings With Texture, Beams, or Awkward Angles
Texture changes everything. On popcorn or rough surfaces, roll gently and avoid oversaturating the ceiling. Too much pressure or too much wet paint can damage fragile texture. If the surface crumbles when taped or rolled, stop and reassess before you turn a paint project into ceiling archaeology.
For beams, tongue-and-groove boards, or deep angles, break the job into zones. Paint one architectural section at a time so you can maintain a wet edge and keep your body position stable. On ceilings with exposed beams, cut in carefully where planes meet, then roll the broad sections. It is slower, but it looks much better than trying to brute-force your way through details with a giant roller.
Mistakes That Ruin the Finish
- Using the wrong ladder setup: Unsafe and usually less efficient.
- Choosing shiny paint: It magnifies flaws on large overhead surfaces.
- Skipping primer on stains: Water spots love an encore performance.
- Using the wrong roller nap: Too short misses texture, too thick adds texture where you do not want it.
- Letting cut-in dry before rolling: Hello, visible lines.
- Overloading the roller: More splatter, more drips, more regret.
- Trying to finish over several random sessions: Ceilings usually look best when painted in one organized push.
- Reaching too far: The ceiling is not worth a fall.
When a Vaulted Ceiling Color Change Makes Sense
If you are repainting from white to white, the project is mostly about freshness and coverage. But if you are considering a new color, vaulted ceilings can dramatically influence how a room feels.
Use white or pale neutrals if you want the ceiling to recede and reflect more light. Use a warm off-white if stark white feels cold or echoey. Consider painting the ceiling the same color as the upper walls if you want the room to feel more cohesive. In very large spaces, a slightly deeper tone overhead can visually lower the ceiling just enough to make the room feel less like an indoor airplane hangar.
Real-Life Experiences Painting Extra High Vaulted Ceilings
The first thing most people notice when painting an extra high vaulted ceiling is that the room suddenly feels way bigger than it did when you were just living in it. From the floor, the ceiling can seem manageable. Once you are on a ladder holding a roller pole like a medieval lance, you realize the ceiling has ambitions.
One common experience is underestimating how much time the prep takes. People often imagine the “real work” starts when the paint can opens, but the real sanity-saving work happens before that. Covering floors properly, removing cobwebs, checking light fixtures, patching cracks, and figuring out a safe ladder route through the room can easily take longer than expected. It is not glamorous, but it is the reason the job ends well instead of becoming a cautionary tale told at family dinners.
Another very normal experience is discovering that shoulders and neck muscles have opinions. Even with a good extension pole, overhead rolling is tiring in a way that seems oddly personal. The smartest painters take frequent short breaks, switch positions often, and avoid trying to power through the entire ceiling in one heroic burst. Painting a vaulted ceiling is less like sprinting and more like pacing yourself through a mildly ridiculous endurance event in old sneakers.
Lighting is another surprise. A section that looks perfect from one side of the room can look blotchy from another angle once sunlight shifts or recessed lights come on. That is why experienced painters keep stepping back to check the ceiling from different parts of the room. It can feel repetitive, but it is far better than cleaning up, putting the furniture back, and then spotting a giant streak from the sofa that somehow was invisible for six straight hours.
Many homeowners also find that the emotional payoff is bigger than expected. A freshly painted vaulted ceiling does not just look cleaner. It changes the whole mood of the room. Dingy white becomes crisp and reflective. A shadowy ceiling suddenly bounces light around. The walls look newer even if you did not touch them. In rooms with beams or dramatic angles, the architecture stands out more once the surface looks fresh and intentional.
There is also a very specific kind of satisfaction that comes from finishing the last section without drips on the couch, without stepping on a tray, and without making a panicked hardware-store run at 8:47 p.m. for “some weird roller thing.” People who finish these projects successfully usually say the same thing: the right tools made all the difference. Not bravery. Not luck. Not motivational music. The right ladder, the right pole, the right roller cover, and enough patience to keep a wet edge.
And finally, nearly everyone who has painted a tall vaulted ceiling comes away with one deeply held belief: if the next room involves a stairwell, they are at least going to price out a professional before volunteering themselves for round two.
Conclusion
If you want to know how to paint extra high vaulted ceilings successfully, the formula is simple: plan more than you think you need to, prioritize safety, use the right roller and extension pole, work in sections, and do not rush the prep. A vaulted ceiling can absolutely be a DIY win, but only when you respect the height, the lighting, and the physical demands of overhead painting.
Take your time, keep your ladder setup safe, use a quality flat ceiling paint, and let technique do the heavy lifting. Your ceiling will look brighter, cleaner, and far more expensive than the actual cost of the project. Your shoulders may not forgive you immediately, but your room definitely will.


