Table of Contents >> Show >> Hide
- Before You Start: A 10-Minute Prep That Can Save You Hours
- Method 1: Smother the Grass (Sheet Mulching with Cardboard or Newspaper)
- Method 2: Tarping (Solarization or Occultation)
- Method 3: Dig It Out (Hand Removal for Small Areas)
- Method 4: Use a Sod Cutter (Fastest for Large Areas)
- Method 5: Herbicide (A Last-Resort Option, Used Carefully)
- After the Grass Is Gone: Set Yourself Up So It Stays Gone
- Keeping Grass Out of Beds: The “It Came Back” Prevention Plan
- Which Method Should You Choose? (Quick Decision Guide)
- Conclusion: A Grass-Free Yard Is a Plan, Not a Moment
- Real-World Experiences and Lessons Learned (The Part You’ll Remember)
- The cardboard smothering method feels too easy… until the wind shows up
- You’ll underestimate how much mulch you need
- Hidden obstacles are basically guaranteed
- Sod cutters are fast, but they’re not exactly ballet dancers
- Tarping works… but your yard will look like it’s grounded
- Grass tries to return from the edges first
- The best “experience” upgrade: cover bare soil quickly
- And yessomeone will comment
Maybe your lawn is dying in the shade. Maybe you’re turning a patch of turf into raised beds. Maybe you just woke up one day and thought,
“Why am I mowing this green carpet like it’s my second job?” Whatever your reason, removing grass from your yard can be surprisingly
satisfyinglike finally deleting 4,000 blurry screenshots from your phone.
The trick is choosing the right method for your timeline, your tolerance for sweat, and your grass type (some grasses don’t “quit,”
they just take a short break and come back with friends). Below are the most practical ways to remove sod, kill grass, or smother a lawnplus
how to keep it from returning when you’ve moved on emotionally.
Before You Start: A 10-Minute Prep That Can Save You Hours
1) Decide what “remove” means for your project
- Installing hardscape (patio, pavers, gravel path): You usually want grass and roots gone, and the base compacted.
- Creating a garden bed or native planting area: Smothering/tarping can work great and can improve soil over time.
- Reducing lawn size: Choose a method that won’t wreck surrounding turf you’re keeping.
2) Mark the area clearly
Use a hose, marking paint, stakes, or string. Curves look natural, but they also invite scope creep (“While I’m here, I’ll just widen it…”).
Pick your border and stick to it like it’s a budget.
3) Check what’s underneath
- Irrigation lines: Know where sprinkler heads and drip lines run.
- Buried cables/utility lines: If you’ll dig more than a couple inches, follow your local utility locating process.
- Grass type: Runner-style grasses (like bermudagrass) can require extra persistence.
4) Pick your method based on speed vs. effort
If you want results this weekend, you’ll likely use physical removal (digging or sod cutter). If you want results with less
back pain, you’ll use smothering or tarping and let time do the heavy lifting.
Method 1: Smother the Grass (Sheet Mulching with Cardboard or Newspaper)
Best for: converting lawn to garden beds, pollinator zones, or planting areasespecially if you’d rather not dig. This is the “quiet quitting”
approach for grass: block the light, keep moisture in, and let soil life handle the exit interview.
How it works
You block sunlight so grass can’t photosynthesize. The grass dies back, and the buried material breaks down over timeoften leaving you with
softer soil than you started with.
Step-by-step
- Mow low. Bag or rake up thick clippings so the barrier sits flat.
- Water the area. Damp soil speeds decomposition and helps the barrier conform to the ground.
-
Lay cardboard or newspaper.
Overlap seams like shingles so grass can’t find “windows.” Remove tape and glossy bits. If using newspaper, layer multiple sheets. - Soak the barrier. Wet cardboard stays put and starts breaking down faster.
-
Cover with organic material.
Add a generous layer of mulch (wood chips, shredded bark, leaves) and/or compost. Thicker coverage generally smothers better, but you still
want water to soak through eventually. - Wait. Warm months speed things up. Cool seasons take longer. For many projects, starting in fall sets you up nicely for spring planting.
Tips that make this method actually work
- Don’t overdo the paper thickness. Too thick can slow water and air movement.
- Edge matters. Grass often sneaks in from the sides first. Plan a clean border (edging, trench, or a “mow strip”).
- Planting timeline: For immediate planting, consider building soil on top (compost + soil) and planting into that layer while the grass underneath dies.
- Weeds you already have: Smothering is great for existing grass, but you’ll still want mulch on top to reduce new weed seeds blowing in.
Method 2: Tarping (Solarization or Occultation)
Best for: medium-to-large areas when you can wait a few weeks (or longer) and want a low-labor, chemical-free option. Think of it as giving your lawn a time-out under a blanket.
Solarization (clear plastic)
Solarization uses clear plastic to trap heat and cook vegetation and some weed seeds near the surface. It’s most effective during the hottest, sunniest part of summer.
Occultation (opaque tarp, often black)
Occultation uses an opaque tarp to block light and starve plants. It usually takes longer than solarization, but it can be useful when it’s not peak-summer hot.
Step-by-step
- Mow or string-trim low. Less height = better contact with the tarp.
- Water lightly if soil is very dry. Some moisture improves results and helps heat transfer.
- Lay tarp/plastic tight to the ground. Anchor edges with boards, rocks, soil, or landscape staples so wind can’t turn it into a backyard parachute.
- Wait the recommended time. In hot, sunny stretches, solarization can be faster; occultation usually needs more time to fully knock back grass.
- Remove and assess. If you see green survivors, re-cover that section or switch to spot smothering.
What people don’t tell you (but you’ll want to know)
- Sun exposure is everything. Shady yards solarize poorly. Occultation may still work, just slower.
- Wind is the villain. Anchor like you mean it. “One rock in each corner” is optimism, not anchoring.
- Plastic stewardship: If you use plastic, plan to reuse it and keep it out of sunlight when not needed to extend its life.
Method 3: Dig It Out (Hand Removal for Small Areas)
Best for: small patches, tight spaces, awkward corners, or when you want grass gone today. This is the most direct methodand also the one most likely to make you text friends things like, “Do you own a heating pad?”
Step-by-step
- Water the day before (if soil is hard). You want soil damp, not muddy.
- Cut the turf into strips or squares. A flat spade works well for scoring lines.
- Pry up sod. Slide the spade under the roots and lift. Shake off excess soil to keep what you paid foryour dirtin your yard.
- Remove runners and roots. For grasses that spread by stolons or rhizomes, take extra time here.
- Level and amend. Rake smooth and add compost if you’ll plant.
Pros and cons
- Pros: Instant results, minimal extra materials.
- Cons: Labor-intensive, and digging can bring buried weed seeds to the surface.
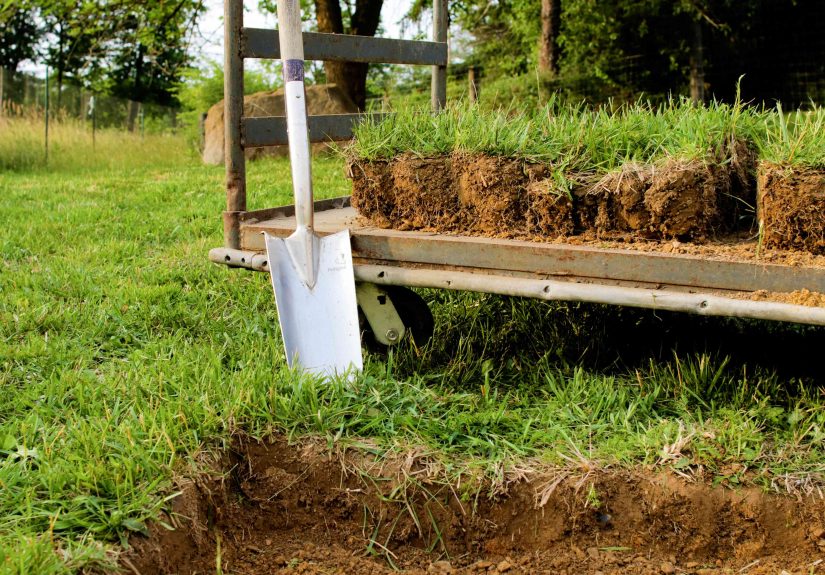
Method 4: Use a Sod Cutter (Fastest for Large Areas)
Best for: removing lots of grass quicklyespecially if you’re regrading, installing hardscape, or starting fresh. A sod cutter slices under the turf so you can roll it up like a lawn carpet (which is satisfying in a “why did I ever have this much lawn?” way).
What to expect
- Manual sod cutters can work for smaller areas but require stamina.
- Motorized sod cutters make large jobs realistic in a day, but they’re heavy and can be tricky on slopes.
Basic workflow
- Moisten soil lightly. Too dry is brutal; too wet gets gummy.
- Cut in manageable strips. Narrower rolls are easier to move without needing a second mortgage in chiropractor visits.
- Roll and remove (or repurpose). You can haul it away, compost it, or flip it upside down to decompose in place where appropriate.
- Clean up roots and level. Rake, fill low spots, and plan your next layer (soil, gravel base, mulch, etc.).
What to do with the removed sod
- Compost it: Stack sod grass-side down in a pile; it can break down over time.
- Create a berm: In some landscapes, flipped sod can become part of a mound or fill a low area.
- Dispose responsibly: Check local yard-waste rules for sod disposal.
Method 5: Herbicide (A Last-Resort Option, Used Carefully)
Best for: situations where physical removal is impractical and smothering/tarping won’t fit the timeline. If you choose this route, treat it like any other potentially hazardous yard product:
follow the label exactly, keep kids and pets away, and avoid drift or runoff.
Important considerations
- Nonselective products can kill grass and many plants they touchso borders and wind conditions matter.
- Timing matters. Grass typically responds best when actively growing.
- Replanting intervals vary by product. Some products allow replanting sooner than others, but always follow the product label.
- Safer alternatives exist. If you can wait, cardboard smothering or tarping often gets you to the same destination without chemicals.
If you’re unsure, your local Cooperative Extension resources can help you choose a method that fits your region and goals. When in doubt, go mechanical or go slow (smother/tarp).
Grass is patientso you have to be, too.
After the Grass Is Gone: Set Yourself Up So It Stays Gone
Step 1: Don’t panic-till
It’s tempting to fire up a tiller and “fluff” everything. But aggressive tilling can bring buried weed seeds to the surface and create a future you that spends weekends pulling mystery sprouts.
For planting beds, consider adding compost and lightly cultivating the top few inches instead.
Step 2: Improve the soil (especially if it’s been lawn forever)
- Add compost to improve structure and biology.
- Level and grade so water drains away from foundations and doesn’t pool where you’ll plant.
- Consider a soil test if you’re planting something picky (like vegetables).
Step 3: Install a border that keeps lawn from creeping back
Many grasses spread sideways. A defined edge is your future maintenance plan in physical form.
- Edging: Metal, composite, brick, or stone can block roots and runners.
- Trenching: A simple trench can interrupt spreading grass (it’s old-school for a reason).
- Mulch buffer: A strip of mulch between lawn and bed makes edging and mowing easier.
Keeping Grass Out of Beds: The “It Came Back” Prevention Plan
If your goal is to remove grass from your yard permanently (or at least from one specific area), prevention is where the victory is decided.
Use the 3-layer defense
- A clear edge (physical barrier or trench).
- A weed-suppressing top layer (mulch maintained at a useful depth).
- Routine check-ins (pull or cut runners before they root deeply).
Watch for these common comeback moves
- Runners sneaking under edging: Happens with aggressive grassesinspect edges a few times each growing season.
- Seeds moving in: Bare soil is an invitation. Cover it with plants or mulch quickly.
- Thin mulch: Mulch breaks down over time; top it off as needed.
Which Method Should You Choose? (Quick Decision Guide)
| Method | Speed | Effort | Best For | Big Watch-Out |
|---|---|---|---|---|
| Sheet mulching (cardboard/newspaper) | Slow | Low–Medium | Garden beds, soil improvement | Edges and patience |
| Solarization (clear plastic) | Medium | Low | Sunny areas in hot months | Needs heat + sun; anchoring |
| Occultation (opaque tarp) | Slow–Medium | Low | Chem-free lawn kill, broader seasons | Time; anchoring; aesthetics |
| Digging by hand | Fast (small areas) | High | Small patches, tight spaces | Back/shoulders; weed seeds stirred up |
| Sod cutter | Fast | Medium | Large removals, hardscape prep | Heavy equipment; disposal plan |
| Herbicide (careful use) | Medium | Low | When other methods don’t fit | Safety, drift, label restrictions |
Conclusion: A Grass-Free Yard Is a Plan, Not a Moment
Removing grass from your yard isn’t complicatedbut it is a choose-your-own-adventure based on time, labor, and how determined your lawn is to remain employed.
For quick results, mechanical removal (digging or sod cutter) wins. For the least digging and better soil, sheet mulching is hard to beat. For low-labor, chemical-free removal on bigger areas,
tarping (solarization or occultation) is a smart middle path.
Whatever method you choose, the real secret is what happens next: protect the edges, cover bare soil, and give grass fewer opportunities to sneak back in.
Do that, and your new garden bed/patio/native planting area won’t just look betterit’ll stay that way.
Real-World Experiences and Lessons Learned (The Part You’ll Remember)
If you’ve never tried to remove grass from your yard, here are the most common “experience-based” surprises people run intoalong with what usually fixes them.
This isn’t about perfection; it’s about avoiding the classic backyard plot twist where the grass returns like a sequel nobody asked for.
The cardboard smothering method feels too easy… until the wind shows up
A lot of first-timers lay down cardboard and think, “Nice. I am unstoppable.” Then a breezy afternoon arrives and your carefully overlapped sheets start
shifting like a bad deck of cards. The fix is simple: soak the cardboard thoroughly (wet cardboard stays put), overlap generously, and weigh edges down with
mulch right away. If you’re using wood chips, don’t sprinkle them like parsleycommit to a real layer so the cardboard can’t curl.
You’ll underestimate how much mulch you need
People often buy “a few bags” and then realize their project needs “a few bags” the way a swimming pool needs “a few cups of water.”
For a decent smother layer, you’ll want a real volume of mulch. The upside: a thicker mulch layer suppresses weeds, moderates soil temperature,
and makes the whole area look finished. The downside: carrying it. Pace yourself and treat your wheelbarrow like the MVP it is.
Hidden obstacles are basically guaranteed
Removing sod has a way of revealing things your yard has been hiding: sprinkler lines that don’t match your memory, a surprise patch of gravel, a
root from a nearby tree, or a rock collection you did not knowingly start. The “experience” move is to slow down when you hit resistance and
investigate instead of forcing tools through it. Even if you’re doing a small area, a quick scan for irrigation heads and a gentle probe with a shovel
can prevent accidental damage.
Sod cutters are fast, but they’re not exactly ballet dancers
A sod cutter can turn a multi-day dig into a single afternoonyet first-time users are often surprised by how heavy and stubborn the machine feels,
especially on slopes or uneven ground. The smart approach is to work in shorter passes, keep your cuts manageable, and plan the “roll handling” part of
the job. Rolling sod looks tidy, but those rolls get heavy fast. If your removal area is big, make a disposal plan before you begin so you’re not stuck
with a mountain of turf that slowly becomes a science project.
Tarping works… but your yard will look like it’s grounded
Occultation and solarization are wonderfully low-labor, but you’re committing to a tarp or plastic sheet sitting there for weeks. That’s normal.
What helps is setting expectations: you’re trading aesthetics for effort. Anchoring is the real skill hereuse enough weight that the tarp won’t flap,
because flapping lets light and air sneak in and reduces effectiveness. People who succeed with tarping tend to anchor edges thoroughly, check after storms,
and resist the temptation to “peek” too often (it’s not a slow cooker; lifting the lid doesn’t help).
Grass tries to return from the edges first
Even when the center is dead and buried, edges can stay annoyingly alive. That’s because lawn grass often creeps laterally, and it doesn’t need much of a gap.
Many gardeners learn the hard way that the border is the whole game: add edging, trench, or maintain a mulch strip. In practice, a 10-minute edge check every couple
of weeks during the growing season is far easier than a full “why is my garden bed becoming a lawn again?” rescue mission later.
The best “experience” upgrade: cover bare soil quickly
After removal, bare soil is like an open invitation for weed seeds. The most successful yard conversions usually go one of two ways: either you mulch heavily right away,
or you plant something (groundcovers, shrubs, perennials, natives) as soon as your method allows. A living canopy plus mulch is a powerful one-two punch against weedsand
it keeps your new space looking intentional instead of “construction zone.”
And yessomeone will comment
If you tarp an area, stack sod, or sheet-mulch with cardboard, there’s a good chance a neighbor, friend, or relative will ask if everything is okay.
Consider this your chance to confidently say, “Yes, I’m upgrading my yard,” like you’re the CEO of Outdoor Improvement. Because you are. You’re just paid in tomatoes,
pollinators, or the pure joy of never mowing that spot again.


