Table of Contents >> Show >> Hide
- Table of Contents
- Why German Shepherd Puppy Ears Don’t Stand (Yet)
- Before You Tape: Health + Ethics Check
- Supplies: What to Use (and What to Avoid)
- A Gentle Ear-Taping Method (Support + Breathability)
- How Long to Tape (and When to Stop)
- Common Mistakes That Make Things Worse
- Non-Tape Helpers That Actually Help
- FAQ
- Owner Experiences: What It’s Really Like (Extra )
- Wrap-Up
German Shepherd puppy ears are basically tiny mood rings: up, down, sideways, and occasionally doing interpretive dance.
If your pup is stuck in the “one ear up, one ear down” era (or “both ears down and I swear they were up yesterday”),
you’re not aloneand you’re not automatically doomed to a lifetime of floppy photos.
This guide walks you through a safety-first, humane approach to ear taping: when it makes sense, when it
doesn’t, what supplies to use, and a gentle method that supports the ear without pinching, trapping moisture, or
turning your puppy into an itchy little gremlin. We’ll also cover what actually helps (hint: not random calcium
“hacks”), plus troubleshooting and real-world lessons owners tend to learn the hard way.
Why German Shepherd Puppy Ears Don’t Stand (Yet)
Adult German Shepherds are known for upright ears, but puppies don’t arrive with built-in satellite dishes.
Ear carriage changes as cartilage strengthens and as your puppy grows. The “stubborn ear” phase often shows up during
heavy teething, when puppies are busy swapping baby teeth for adult teeth and their bodies are juggling
rapid growth demands. In that window, it’s common for ears to go up, fall, switch sides, or look “almost there” for
weeks.
Quick reality check: what’s normal vs. what’s not
- Normal: one ear up/one ear down, ears that change day-to-day, ears that stand after naps but flop after play.
- Also normal: ears that look weaker during teething months and then firm up later.
- Worth investigating: sudden flopping after an injury, constant head shaking/scratching, foul odor, redness, discharge, or obvious pain.
The biggest factor is still genetics (ear strength tends to run in lines). But health, nutrition,
and how much the ear gets irritated (by infections, rough play, or constant handling) can influence what happens
during the puppy months.
Before You Tape: Health + Ethics Check
Ear taping should never be a casual “DIY craft project.” Done wrong, it can irritate skin, trap moisture, and even
damage cartilage. So before you tape anything, do this quick check:
1) Rule out ear problems first
If your puppy is scratching, head-shaking, has a smell coming from the ears, or you see redness/discharge, pause the
taping plan. Those signs can point to infection, mites, allergies, or inflammationthings that should be handled by a
veterinarian. Taping over an unhappy ear is like putting a sticker over your car’s “check engine” light.
2) Ask your breeder or veterinarian for a technique demo (seriously)
If you can, get a quick in-person demo. Ten minutes of professional guidance can prevent weeks of irritation and
multiple “why is my puppy now side-eyeing me?” moments.
3) Decide if taping is even necessary
If this is a beloved family pet, floppy ears are not a health issue by themselves. If your goal is simply the classic
breed look, weigh the benefit against the stress to your puppy. If you do tape, keep it gentle and short-term.
Supplies: What to Use (and What to Avoid)
What to use (puppy-friendly basics)
- Breathable paper medical tape (hypoallergenic if possible). It should tear easily and not feel like duct tape’s angry cousin.
- Soft foam support (e.g., a clean, smooth foam cylinder/rod) that can sit against the inner ear flap without entering the ear canal.
- Skin-safe adhesive remover (optional) made for medical tapehelpful for painless removal.
- Blunt-tip scissors for trimming tape and foam safely.
- Clean, dry cloth to wipe the ear leather; if your vet recommends a cleanser, use that.
- Treats (tiny ones) to make the whole process less dramatic.
What to avoid (these cause most “help me” scenarios)
- Duct tape or heavy tape: too sticky, too occlusive, and far too rude to skin/hair.
- Super glue or household adhesives: not appropriate for skin, can cause burns/irritation.
- Anything placed into the ear canal: supports should brace the ear flap, not the canal.
- Over-tight wrapping: it can cut circulation and trap moisture.
- Powders in/near the canal: drying agents can irritate the ear environment.
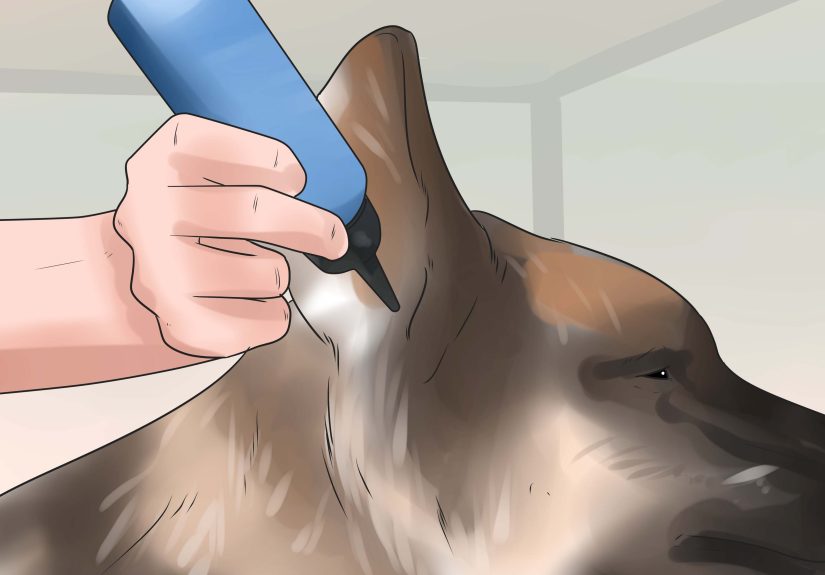
A Gentle Ear-Taping Method (Support + Breathability)
This method is designed for the common “soft tip” or “ear not staying up” situation, and focuses on
supporting the ear rather than forcing it. Your goal is to keep the ear in an upright, natural position
while still allowing airflow and normal movement.
Step 0: Pick the right time
Choose a calm momentafter a walk, after training, or when your puppy is relaxed. If your puppy is in full zoom mode,
you will be taping a tornado.
Step 1: Inspect and prep the ear
- Check for redness, odor, discharge, or soreness. If present, stop and call your vet.
- Wipe the ear leather gently with a clean, dry cloth. The ear must be dry so tape sticks without excessive adhesive.
- Do not clean deep into the ear canal. This is not the moment for “archaeology.”
Step 2: Make a soft support “post” for the ear flap (not the canal)
Cut a piece of soft foam so it’s long enough to support most of the ear’s height without poking past the tip.
The support should rest against the inner ear flap (the ear “leather”)not inserted into the canal.
If you’re unsure where the canal opening is, don’t guessget a vet demo.
Step 3: Cushion contact points
If your puppy has sensitive skin, you can wrap the foam lightly with paper tape first (so foam edges don’t rub) or use
a thin layer of skin-safe padding. Keep everything smoothno hard corners.
Step 4: Position the support and tape gently
- Hold the ear upright in a natural position (not pulled too far forward or backward).
- Place the foam support along the inner ear flap where it provides lift.
- Use short strips of breathable tape to secure the support to the ear flapthink “anchor points,” not a full mummy wrap.
- Leave space for airflow. The ear should not feel hot, damp, or tightly compressed.
- Ensure the ear canal opening is not blocked.
Optional: A “bridge” for symmetry (only if your puppy tolerates it)
Some people use a light tape bridge between ears to prevent ears from leaning inward/outward while posted. If you do this:
- Make it loose and minimal (a small connector, not a rigid helmet).
- Never force ears closer than their natural position.
- Stop if your puppy becomes stressed or the bridge causes rubbing.
Step 5: Reward and monitor
Give treats, praise, and do something fun. Then monitor closely for the first hour. Most problems show up fast:
head shaking, frantic scratching, rubbing on furniture, or obvious discomfort.
How Long to Tape (and When to Stop)
For most gentle posting/taping routines, owners replace supports every few days to keep things clean and dry.
If tape gets wet, dirty, starts slipping, or causes irritation, remove it sooner.
A simple, safe schedule to start
- Check 2–3 times daily: look for redness, swelling, odor, dampness, or hair loss from rubbing.
- Replace every 3–5 days: sooner if wet or loose.
- Give breaks if skin looks irritated: a day off can help the ear leather recover.
If your puppy is still in the heavy teething period, you may find ears improve on their own after teething settles.
If you’re approaching the later puppy months and ears are consistently flat, consult your breeder and vet about whether
continued taping is worthwhile.
Common Mistakes That Make Things Worse
1) Taping too early or panicking too fast
Lots of ears do their own thing before settling. Starting taping the moment an ear flops can add irritation without
changing the outcome.
2) Using the wrong tape
Thick, sticky tape can rip hair and inflame skin. Breathable medical paper tape is far kinder and easier to remove.
3) Wrapping too tightly
Tight taping can reduce circulation and trap heat/moisturean invitation for skin irritation and ear problems. If you
can’t slide a fingertip gently under a taped edge, it’s too tight.
4) Blocking airflow
Ears need to breathe. A fully wrapped ear is more likely to get sweaty/itchy and trigger scratching.
5) Forgetting the “why”
If your puppy is scratching or shaking their head, the issue might be discomfortnot ear “stubbornness.”
Don’t tape over a health problem.
Non-Tape Helpers That Actually Help
Feed for healthy growth (and don’t play supplement roulette)
Large-breed puppies need balanced growth nutrition. Random mineral supplementationespecially extra calciumcan create
skeletal problems and doesn’t “force” ear cartilage to stand. Choose a quality puppy food formulated for growth and
talk to your vet before adding supplements.
Encourage healthy chewing (the jaw-muscle bonus)
Safe chewing during teething supports jaw and head muscle development and gives your puppy an outlet (so your shoes
can continue living). Use appropriate puppy chews and rotate options to keep interest high.
Protect the ears from “helpful” hands
Constant rubbing, massaging, folding, or kids tugging ears can irritate the cartilage and skin. Teach gentle handling:
pet the chest, scratch the shoulders, leave the ears alone.
Prevent rough ear trauma
If your puppy plays with older dogs who love to grab ears, supervise. Rough ear play can cause swelling and set you
back fast.
FAQ
Is it normal for one ear to stand before the other?
Yes. Many German Shepherd puppies go through a lopsided stage, especially during teething. It can alternate, too.
When should I be concerned?
Be concerned if you see pain, odor, discharge, persistent head shaking, or sudden ear changes after an injury. Also,
if ears remain consistently flat well past the typical puppy development window, talk to your breeder and vet for a
realistic expectation based on your puppy’s lines and health.
Can ear taping hurt my puppy?
It can if done too tightly, with the wrong materials, or if it traps moisture and irritates skin. That’s why
breathable tape, minimal wrapping, and frequent checks matterand why a vet demo is so helpful.
Should I tape both ears or just the stubborn one?
Often, people support only the ear that needs it. Sometimes a light approach on both ears helps symmetry. Your breeder
and vet can advise based on ear set, cartilage feel, and what your puppy tolerates.
Owner Experiences: What It’s Really Like (Extra )
Let’s talk about the part nobody puts in the “perfect” tutorials: the emotional rollercoaster. Many owners start
taping with big hopes and a roll of tape, only to discover that puppy ears have their own calendarand it’s not synced
to yours.
A very common experience goes like this: your puppy’s ear looks great for two days, you celebrate, you take 47 photos,
and then on day three the tape loosens during a wrestling match with a plush toy shaped like a chicken. The ear droops,
your puppy looks at you like you betrayed them personally, and you start Googling at 2 a.m. That’s normal too. Taping
is rarely a one-and-done fix; it’s more like gentle support while the puppy’s body does the real work.
Owners also learn quickly that comfort beats cosmetics. One family might notice their puppy becomes
dramatically itchy whenever the ear is wrapped too much. They switch to shorter “anchor” strips, improve airflow, and
suddenly the puppy tolerates the routine with minimal fuss. Another owner realizes their tape job was “secure” but
slightly too tightafter an hour, the puppy is head-shaking nonstop. They remove it immediately, give the ear a break,
and the next attempt is looser and shorter. Lesson: if your puppy is uncomfortable, the method needs changing.
There’s also the classic teething plot twist: an owner supports an ear, things improve, and then teething hits hard
and both ears slump like overcooked noodles. The owner feels defeateduntil a month later, the ears perk back up as the
teething stage calms down. This is why many breeders remind people not to panic during the peak teething months. It’s
a phase where ears can look worse before they look better.
Owners who have the smoothest experiences tend to do three things: (1) they get a quick demo from a
breeder or vet instead of inventing a technique, (2) they keep sessions short and positive with treats
and calm handling, and (3) they check the ears daily like it’s a tiny health inspection, not a set-it-
and-forget-it project. They also stop the moment irritation shows up, because a healthy ear is more important than a
perfectly upright one.
Finally, many owners end up laughing at the photos later. The “one ear up” stage becomes part of the puppy’s story.
And even when ears don’t end up textbook-perfect, the vast majority of people realize their dog’s confidence,
temperament, and health matter far more than whether the ears meet a mental Instagram standard. If taping supports your
puppy gently and safely, great. If it turns into stress for either of you, it’s okay to step back, talk to your vet,
and let your puppy grow at their own pace.
Wrap-Up
Taping stubborn German Shepherd puppy ears is all about gentle support, not force. Start by ruling out
health issues, use breathable materials, avoid tight wrapping, and monitor closely. Pair any taping with good nutrition,
safe teething outlets, and calm handlingand remember that many ears sort themselves out as your puppy finishes
teething and matures.


