Table of Contents >> Show >> Hide
- What Are Pecan Tassies?
- Why This Pecan Tassies Recipe Works
- Ingredients
- Tools You’ll Want
- Step-by-Step: How to Make Pecan Tassies
- Timing and Temperature (Because Ovens Have Opinions)
- Pro Tips for Perfect Pecan Tassies
- Flavor Variations (Choose Your Adventure)
- Make-Ahead, Storage, and Freezing
- Serving Ideas
- Troubleshooting: When Your Tassies Get Sassy
- Conclusion
- Kitchen Experiences: Pecan Tassies in the Real World
- SEO Tags
If pecan pie and a butter cookie had a tiny, adorable baby that could fit in your palm (and disappear in two bites), it would be a pecan tassie. These little “mini pecan pies” have a tender cream cheese crust and a gooey, nutty filling that tastes like the holidayseven if you’re making them in sweatpants on a random Tuesday. No judgment. In fact, that’s the recommended uniform.
What Are Pecan Tassies?
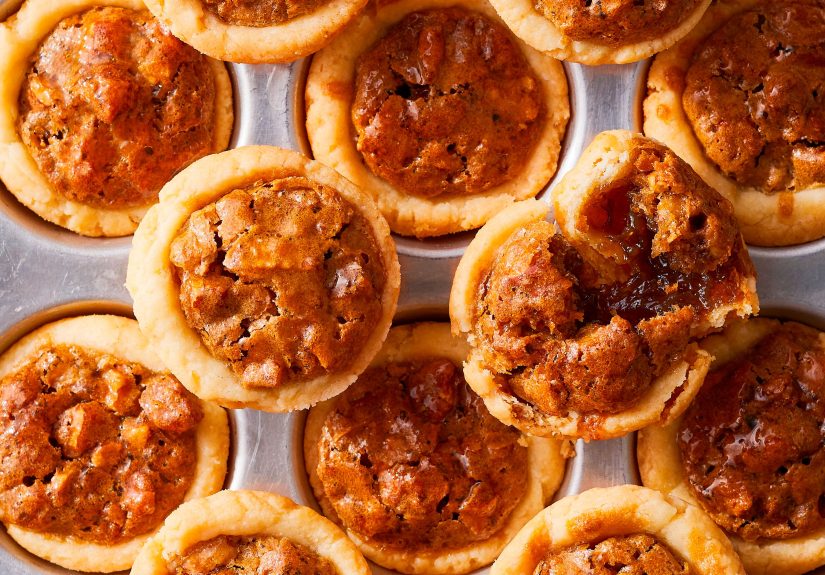
Pecan tassies are bite-size pecan pie tartlets baked in a mini muffin tin. The crust is usually a simple cream cheese doughsoft, buttery, and easy to press into cupswhile the filling is a classic pecan-pie-style mixture of brown sugar, egg, butter, vanilla, and chopped pecans. The result: crisp edges, a tender “cookie cup” bottom, and a caramel-y center that makes people hover around the dessert tray like it’s giving out free Wi-Fi.
Why This Pecan Tassies Recipe Works
- No rolling pin drama: The crust presses right into the pan.
- Big pecan pie flavor, smaller commitment: Perfect for cookie trays and parties.
- Make-ahead friendly: They store well and freeze like champs.
- Customizable: Go classic, add bourbon, swap maple, or sneak in chocolate.
Ingredients
This recipe aims for that sweet spot: plenty gooey without being cloying, a crust that stays tender, and a filling that sets nicely without turning into pecan cement. You’ll get about 24 pecan tassies (aka: enough to share, but also enough to “accidentally” keep a few in the fridge for “quality control”).
For the cream cheese crust
- 1/2 cup (1 stick) unsalted butter, softened
- 3 oz cream cheese, softened (brick-style)
- 1 cup all-purpose flour
- Pinch of salt
- Optional but excellent: 1 tablespoon granulated sugar (for a slightly cookie-like crust)
- Optional flavor boost: 2 tablespoons finely ground pecans mixed into the dough
For the gooey pecan filling
- 1 large egg, room temperature
- 2/3 to 3/4 cup packed light brown sugar (use 2/3 for less sweet, 3/4 for classic sweetness)
- 2 tablespoons melted butter
- 2 tablespoons maple syrup or light corn syrup (either workschoose your vibe)
- 1 teaspoon vanilla extract
- Pinch of salt (or 1/4 teaspoon if you like a stronger sweet-salty contrast)
- 2/3 cup finely chopped pecans
- Optional: 1 teaspoon bourbon (or a tiny splash more if you’re feeling festive)
- Optional garnish: 24 pecan halves for the classic “mini pecan pie” look
Tools You’ll Want
- 24-cup mini muffin pan (nonstick helps, but greasing is still your friend)
- Hand mixer or stand mixer (a sturdy spoon works too, just bring bicep energy)
- 1-tablespoon scoop or measuring spoon (for evenly sized crust cups)
- Small spoon for filling
- Wire rack
- Offset spatula or butter knife (for gentle removal)
Step-by-Step: How to Make Pecan Tassies
1) Make the crust dough
- In a mixing bowl, beat the softened butter and cream cheese until smooth and well combined.
- Add the flour and salt (plus optional sugar and optional ground pecans). Mix just until a soft dough forms.
- Scrape the bowl and bring the dough together with your hands if it looks shaggy. That’s normal.
2) Chill briefly (yes, it matters)
Cover the dough and refrigerate for 30–60 minutes. This firms the butter, relaxes the dough, and helps prevent shrinking while baking. If you’re short on time, 20 minutes in the fridge helps; 10–15 minutes in the freezer works in a pinch.
3) Prep the pan and form the cups
- Heat the oven to 325°F for a gentler bake (or 350°F if your oven runs cool and you prefer a faster set).
- Generously spray the mini muffin pan with nonstick spray (even if it claims to be nonstick).
- Scoop about 1 tablespoon of dough per cup. Roll into balls and place one in each cavity.
- With lightly wet fingertips, press the dough into the bottom and up the sides to form an even cup. Aim for a similar thickness all around.
- Optional but helpful: Freeze the filled pan for 10–15 minutes while you make the filling. This helps the cups hold their shape.
4) Mix the filling (gently!)
- In a bowl, whisk the egg, brown sugar, melted butter, maple syrup (or corn syrup), vanilla, salt, and optional bourbon until smooth.
- Stir in the chopped pecans.
- Important: Mix until combined, not until you’ve whipped it like a protein shake. Too much air = puff-then-sink drama.
5) Fill the cups
Spoon filling into each crust cup. A good target is about 1 heaping teaspoon per tassie. You can go closer to “almost full” (especially if your cups are sturdy and deep), but avoid overflowingburnt sugar on a muffin pan is the culinary version of stepping on a LEGO.
If using pecan halves, gently place one on top of each filled cup.
6) Bake until set
Bake until the crust edges are lightly golden and the filling looks set (it may puff slightly in the oven and settle as it cools). Typical bake time is 20–25 minutes at 325°F, or 15–22 minutes depending on pan color, oven quirks, and how full you filled them.
- Visual cues: golden edges, filling no longer looks wet in the center
- Touch cue: a gentle jiggle is okay; sloshing is not
7) Cool, then remove
- Let the tassies cool in the pan for 5–10 minutes.
- Use an offset spatula or butter knife to lift them out carefully.
- Cool completely on a wire rack for the best texture (and to avoid “molten filling tongue regrets”).
Timing and Temperature (Because Ovens Have Opinions)
If you see multiple temperatures and bake times online, that’s not a conspiracyit’s just baking. Mini muffin pans vary, ovens vary, and filling depth changes everything. Here’s the practical takeaway:
- 325°F = slightly gentler bake, great for avoiding over-browned crust while the center sets.
- 350°F = faster bake, great if your oven runs cool or you like a more toasted crust edge.
- Start checking at 18 minutes and expect to land around 20–25 minutes for most setups.
Pro Tips for Perfect Pecan Tassies
Don’t overwork the dough
Mix just until it comes together. Overmixing can toughen the crust and make it shrink. You want tender, not “edible rubber band.”
Grease the pan like you mean it
Pecan filling is basically delicious glue once cooled. A good spray (or butter + flour if you’re old-school) makes removal dramatically easier.
Use wet fingers for shaping
A little water keeps the dough from sticking to your hands and helps you press an even shell. If you have a tart shaper tool, it’s a nice helperbut totally optional.
Chill (and optionally freeze) for shape
Chilling the dough prevents shrinkage and helps the cups bake up neatly. A short freeze after pressing the cups can make them look extra tidylike you had your life together before baking. (You did. Totally.)
Mix filling gently to avoid sinking
Overmixing can whip air into the egg mixture. That air expands in the oven (puff!) then collapses while cooling (sad trombone). Stir gently; your tassies will thank you.
Flavor Variations (Choose Your Adventure)
Maple-Bourbon Pecan Tassies
Use maple syrup instead of corn syrup and add 1–2 teaspoons bourbon. The result is cozy, a little smoky, and very “holiday party at a cabin” energy.
Classic Southern-Style with Extra Pecans
Add a spoonful of chopped pecans into each crust cup before pouring in the filling. It’s a small move that makes a big “wow” in texture.
Chocolate Pecan Tassies
Sprinkle a few mini chocolate chips or finely chopped dark chocolate into each crust cup before filling. Chocolate + pecan is a power couple.
Orange-Spice Holiday Tassies
Add 1/2 teaspoon cinnamon and a little orange zest to the filling. It tastes like pecan pie got a festive sweater.
Make-Ahead, Storage, and Freezing
Pecan tassies are a make-ahead dessert dream. Once cooled, store them in a single layer (or layers separated by parchment) in an airtight container.
- Room temperature: up to 3 days (best texture on day 1–2)
- Refrigerator: up to 5 days (great for food safety and longer freshness)
- Freezer: up to 2–3 months
To serve from frozen: thaw at room temperature for about 30–60 minutes. Want that fresh-baked vibe? Warm them briefly (a few minutes) in a low oven so the filling turns softly gooey again.
Serving Ideas
- Build a holiday cookie tray with pecan tassies as the “fancy bite.”
- Serve with coffee or hot cocoa for a cozy dessert moment.
- Add a dollop of whipped cream (or crème fraîche if you’re feeling fancy) for a mini plated dessert.
- Pack in cookie boxesthese travel well and feel special.
Troubleshooting: When Your Tassies Get Sassy
My crust shrank down the sides
Usually: dough wasn’t chilled enough or was overworked. Chill longer next time, and mix only until combined. Freezing the shaped cups for 10–15 minutes also helps them hold their shape.
My filling overflowed and welded itself to the pan
You slightly overfilled. (It happens. The filling is persuasive.) Fill to about 2/3 to nearly full depending on cup depth, and keep the rim clean. Also: grease the pan generously.
My centers sank after baking
Common causes: overmixing (too much air) or slightly underbaking. Stir gently and bake until the filling looks setpuffed is fine, but it shouldn’t look wet.
They’re stuck and I’m emotionally stuck too
Let the pan sit for a few minutes (warm filling releases better than cold glue). Then gently run a thin knife around the edges. Next batch: spray the pan well and avoid letting filling drip onto the rim.
Conclusion
A great pecan tassies recipe is basically the best parts of pecan piesweet, buttery, nutty goodnessserved in a tidy, handheld package. They’re easy enough for a weeknight baking session, but impressive enough for holiday dessert tables, cookie swaps, and “I brought dessert” moments that earn you instant popularity. Make them once, and you’ll understand why people guard their pecan tassie stash like it’s a national treasure.
Kitchen Experiences: Pecan Tassies in the Real World
The first time you bake pecan tassies, you learn something important about human nature: people have absolutely no patience for “cool completely.” You’ll set the pan down, turn around to wash a bowl, and suddenly there’s someone hovering, asking if they can “just try one.” (Translation: “Please hand me molten sugar disguised as a mini pie.”) The funniest part? They’re right to be excitedpecan tassies smell like brown sugar caramelizing and butter doing its best work, which is basically a universal siren song.
In my experience, pecan tassies are also the MVP of cookie boxes. They look fancy even if you made them while listening to a podcast and wearing socks that don’t match. They stack neatly, they survive travel, and they don’t crumble into sad crumbs the way some cookies do when they hit a pothole. If you’re gifting them, here’s a practical trick: place them in single layers with parchment between layers, and make sure they’re fully cool before boxing. Warm tassies steam, steam becomes moisture, and moisture turns crisp edges into “soft in a way we did not request.”
Another real-world lesson: your mini muffin pan is now a popularity magnet. The moment friends find out you own one, you’ll get texts like, “Hey, do you still have that pan? Asking for… science.” Pecan tassies do that. They’re a small dessert with big social consequences. And because the recipe is so adaptable, you can tailor them to the crowd: maple-bourbon for the grown-up table, classic vanilla for the everyone table, chocolate-pecan for the “I’m not a pie person” people (who will suddenly become a pie person).
The biggest “aha” moment I’ve seen with pecan tassies is how much control you actually have over sweetness and texture. If you’ve ever thought pecan pie is delicious but slightly too sweet, tassies are your chance to calibrate. Use the lower amount of brown sugar, add a little extra salt, and choose maple syrup for a deeper sweetness. Toasting the pecans before chopping them is another small move with huge payoff: it intensifies the nutty flavor so the filling tastes richer without needing more sugar. That’s the kind of kitchen math we all support.
And yesthere will be a batch where you overfill. It’s almost a rite of passage. The filling bubbles, caramelizes, and glues itself around the edges like it’s trying to become part of the pan forever. The silver lining is that you’ll learn the “just shy of the rim” rule very quickly. Plus, the ones that do come out are still tasty. The “ugly” tassies get eaten first anyway, usually by the baker, standing at the counter, declaring, “These are for… testing.” Convenient how testing tastes exactly like dessert.
Over time, pecan tassies become one of those recipes you can make on autopilotsoft dough, press, fill, bake, cool, repeatwhile you chat with family, watch a game, or build a holiday playlist. That rhythm is part of their charm. They’re not just a sweet treat; they’re a little kitchen tradition you can scale up or down depending on the occasion. And when someone bites into one and says, “Wait… this is pecan pie in cookie form,” you’ll know you’ve done your job. Then you’ll casually pretend you’re not pleased. (You are.)


