Table of Contents >> Show >> Hide
- First: Know What Kind of Wood Countertop You Have
- Way 1: The Daily Gentle Clean (Soap + Warm Water)
- Way 2: The Deep Clean + Deodorize (Salt + Lemon, or Baking Soda Paste)
- Way 3: Sanitize + Restore (Hydrogen Peroxide, Then Condition)
- Common Mistakes That Make Wood Countertops Look Worse (Fast)
- Mini Troubleshooting Guide
- Real-World Experiences: What People Learn After Owning Wood Countertops (500+ Words)
- Conclusion
Wood countertops are basically the golden retrievers of the kitchen: warm, friendly, and always making the room feel better
but they also need a little routine care so they don’t get funky. Whether you have classic butcher block, a wide-plank top,
or reclaimed wood, the goal is the same: clean without soaking, sanitize without stripping,
and maintain the finish so your counters stay gorgeous (and not “mysteriously sticky”).
This guide breaks it down into three proven cleaning methodsfrom quick daily wipe-downs to deep-clean
stain rescueplus the maintenance steps that keep wood from drying out, cracking, or looking like it survived a food fight.
(Because it did. It was taco night.)
First: Know What Kind of Wood Countertop You Have
The safest way to clean wood depends on the finish. Two wood countertops can look identical but behave very differently
under cleaners.
Quick finish check (no lab coat required)
-
Sealed (polyurethane/varnish/hard film finish): Water tends to bead up. The surface feels smoother, almost like a “top coat.”
These are more stain-resistant but can get cloudy or dull if you use harsh cleaners or abrasives. -
Oiled or waxed (common for butcher block): Water may darken the wood slightly before drying. The finish feels more natural and “woody.”
These need periodic conditioning (oil/conditioner) because the protection is replenished over time. - Unfinished or worn spots: Water soaks in quickly and darkens the grain. These areas are extra stain-prone and need gentle careand likely re-oiling.
If you’re unsure, treat it like an oiled surface until proven otherwise: gentle cleaners, minimal moisture, and dry it like you mean it.
When in doubt, follow your countertop manufacturer’s care notes.
Way 1: The Daily Gentle Clean (Soap + Warm Water)
This is the “brush your teeth” of wood-countertop care. It’s simple, safe for most finishes, and prevents 90% of the drama
(stains, odors, sticky buildup, and that one spot that somehow always feels… tacky).
Best for
- Everyday crumbs, spills, and normal kitchen life
- Sealed, oiled, and waxed wood countertops
- Keeping residue from turning into “glue, but make it organic”
What you’ll need
- Mild dish soap
- Warm water
- Soft sponge or microfiber cloth
- Dry towel (the real MVP)
Step-by-step
- Clear debris first. Sweep crumbs and grit away. Tiny particles can act like sandpaper if you scrub too hard.
-
Wipe with warm, soapy water. Dampen (don’t drench) a cloth or sponge, add a drop of dish soap, and wipe with the grain.
For corners and seams, use a lightly soapy cloth and gentle pressure. - Rinse the cloth and wipe again. You want to remove soap residue so it doesn’t build up over time.
-
Dry immediately. Use a clean towel and dry the surface thoroughly, especially near sinks and seams.
Standing water is wood’s sworn enemy.
Pro tips (because wood has opinions)
- Skip the soaking. Wood doesn’t want a bath; it wants a spa facial: light moisture, quick rinse, full dry.
- Avoid abrasive pads. If it can polish a cast-iron pan, it can scuff your finish.
- Don’t let spills “marinate.” Red wine, coffee, beet juicethese are basically stain influencers.
Way 2: The Deep Clean + Deodorize (Salt + Lemon, or Baking Soda Paste)
When your wood countertop starts holding onto smells (hello, onion and garlic encore performance), or you have light stains
and dull spots, it’s time for a deeper clean. The goal here is controlled abrasion and odor-liftingwithout tearing up your finish.
Best for
- Lingering odors (garlic, fish, “something spilled and we pretended it didn’t”)
- Light stains and discoloration
- Sticky spots or dull areas that didn’t improve with daily cleaning
Option A: Salt + Lemon scrub (classic and satisfying)
Salt acts like a gentle scrub, and lemon helps cut odors. This is especially popular for butcher block and oiled wood surfaces.
What you’ll need
- Coarse salt (kosher salt is perfect)
- Half a lemon
- Soft cloth
- Dry towel
Steps
- Start with a clean surface. Do the daily soap-and-water clean first and dry it.
- Sprinkle coarse salt over the problem area (or the whole counter for an odor reset).
- Scrub with half a lemon, cut-side down, using small circles and light pressure. Work with the grain as you finish each section.
- Let it sit 2–5 minutes if odors are stubborn (don’t leave it long enough to dry into a salt sculpture).
- Wipe clean with a damp cloth, then dry thoroughly.
Option B: Baking soda paste (for stuck-on grime)
Baking soda is mildly abrasive and great for small spotsespecially on sealed finishes where you want controlled scrubbing.
What you’ll need
- Baking soda
- Warm water
- Soft cloth or non-scratch sponge
- Dry towel
Steps
- Make a paste (about 2 parts baking soda to 1 part water).
- Apply to the spot and gently rub with a cloth. Avoid aggressive scrubbinglet the paste do the work.
- Wipe away residue with a clean damp cloth.
- Dry immediately.
Stain reality check
If a stain has soaked deep into unfinished or very dry wood, deep cleaning may lighten itbut not erase it completely.
The good news: wood is one of the few countertop materials you can often refinish (light sanding + re-oiling/sealing)
if needed.
Way 3: Sanitize + Restore (Hydrogen Peroxide, Then Condition)
Wood countertops can be hygienic when cared for properly, but “clean” and “sanitized” are not the same thing.
For regular kitchens, daily soap-and-water plus good food handling is usually enough. Still, if you want an extra hygiene step
(especially after messy prep), choose a sanitizer that won’t wreck your finishand follow it with the maintenance that keeps wood protected.
Best for
- After cooking prep that feels extra messy (sticky marinades, lots of handling, etc.)
- Oiled butcher block that you want to keep refreshed and protected
- Reducing odors and keeping wood from drying out long-term
Part 1: Sanitize with 3% hydrogen peroxide (a wood-friendly option)
What you’ll need
- 3% hydrogen peroxide (standard pharmacy strength)
- Spray bottle (optional)
- Clean cloths
- Dry towel
Steps
- Clean first. Always do Way 1 (soap + warm water) and dry the surface before sanitizing.
- Apply 3% hydrogen peroxide. Lightly spray or wipe it across the surfacedon’t flood it.
- Let it sit briefly (a few minutes) so it can work.
- Wipe it off with a clean damp cloth, then dry thoroughly.
About vinegar (because the internet can’t agree)
You’ll see vinegar recommended in many cleaning guidesespecially diluted vinegar sprays. But vinegar is acidic, and acidity can
dull certain finishes and may strip oils/waxes over time. If you want to use vinegar, use it sparingly,
dilute it, spot-test first, and rinse and dry thoroughly. For many households,
hydrogen peroxide is a simpler “less finish drama” choice.
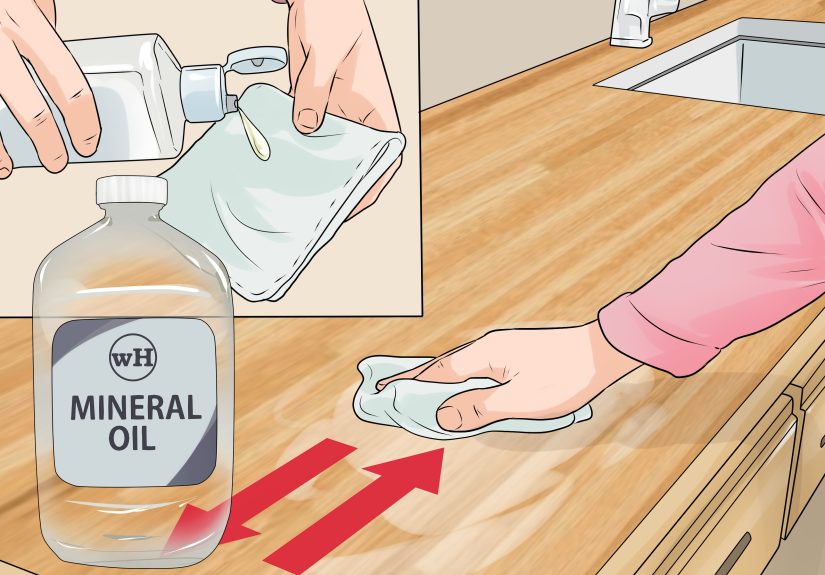
Part 2: Restore and protect (oil/conditioner for oiled wood)
If your countertop is oiled/waxed butcher block (not a sealed film finish), conditioning is what keeps the wood from drying out
and becoming stain-prone. Think of it like moisturizerexcept your counter doesn’t need a ten-step skincare routine. Just one good step,
repeated when it looks thirsty.
What you’ll need
- Food-grade mineral oil or a butcher block conditioner (often mineral oil + beeswax blend)
- Lint-free cloth
Steps
- Make sure the surface is clean and fully dry. Oil + moisture = not a vibe.
- Apply a thin layer of mineral oil/conditioner with a cloth, working with the grain.
- Let it soak in (at least an hour; overnight is great if the wood is dry).
- Buff off excess so the surface doesn’t feel oily or attract dust.
How often should you oil?
It depends on use, climate, and the wood’s mood that month. A common rhythm is monthly (or whenever the surface looks dry, dull,
or starts absorbing water instead of beading). New installations often need more frequent oiling early on.
A big “please don’t” about cooking oils
Avoid olive oil, vegetable oil, and other cooking oils for conditioningthese can oxidize and go rancid, leaving odors and a sticky feel.
Food-grade mineral oil is stable and widely used for wood kitchen tools and butcher block maintenance.
Common Mistakes That Make Wood Countertops Look Worse (Fast)
- Letting water pool near seams or sinks (hello, swelling and dark edges).
- Using harsh cleaners like strong bleach solutions, ammonia, or abrasive powders that scratch finishes.
- Scrubbing like you’re mad at it (wood remembers).
- Skipping the dry towel stepthe simplest habit with the biggest payoff.
- Never re-oiling oiled wood until it looks like a desert documentary.
Mini Troubleshooting Guide
Why does my wood countertop feel sticky?
Usually it’s soap residue, grease film, or too much conditioner left on the surface. Try Way 1 (with a thorough rinse wipe),
then dry well. If it’s still tacky, do a gentle deep clean (Way 2) and buff.
What about dark water stains around the sink?
Dark staining often means moisture is getting into the wood. Address habits first (wipe and dry every time), then deep clean.
If stains persist, light sanding and refinishing might be the real fix.
Can I cut directly on wood countertops?
You can, especially on butcher block, but it increases scratches and can make sanitation more complicated. Many people use a cutting board for raw proteins
and keep the countertop for general prep to reduce wear.
Real-World Experiences: What People Learn After Owning Wood Countertops (500+ Words)
Most people don’t realize wood countertops come with a personality until the first week. Day one: you’re in love. Day three:
you’re admiring the grain like it’s museum art. Day seven: you’re staring at a suspicious dark spot wondering if your counter is
“broken” or just… having feelings.
Here’s the funny truth: wood is incredibly forgiving, but it’s also honest. Stone countertops hide a lot; wood gently reports back
on your habits. Leave a wet dishcloth on it? Wood will highlight that decision with a tasteful shadow. Let lemon juice linger?
Wood may respond with a slightly lighter patch that looks like it’s auditioning for a “before and after” video. None of this means
you ruined anythingit just means wood is a living material that reacts to moisture, acids, and time.
One of the most common “aha” moments is discovering that cleaning isn’t the whole jobdrying is. People will swear they
“cleaned perfectly,” but they also left a little puddle near the sink, or they wiped the counter and let it air-dry. Air-drying sounds
responsible until you remember: evaporation takes time, and time is what lets moisture creep into seams, end grain, and tiny scratches.
The day you start drying wood countertops immediately is the day you stop fighting random discoloration.
Another real-life lesson: the internet will enthusiastically recommend vinegar for everything, including (probably) your taxes.
Some homeowners do use diluted vinegar successfullyespecially on certain sealed surfaceswhile others end up with a finish that looks
a little dull or patchy over time. The difference often isn’t “right vs. wrong,” it’s finish type and frequency.
Occasional diluted vinegar, wiped and dried quickly, might be fine for one kitchen. Daily vinegar spritzing on an oiled butcher block
can slowly strip that protective oil and make the surface look thirsty faster. That’s why many people end up happier switching their
“sanitize step” to hydrogen peroxide (brief contact, less finish drama), then conditioning when needed.
And then there’s oiling. If you’ve never oiled a butcher block countertop before, your first time is oddly satisfyinglike watching
a dry plant perk up after watering. The wood deepens in color, the grain pops, and suddenly your kitchen looks like a cozy magazine shoot.
The catch is that oiling is also where people overdo it. Too much oil left sitting on the surface can feel greasy or attract grime,
which leads to the sad cycle of “I oiled it, now it’s sticky, so I scrubbed harder, now it looks dry, so I oiled it again…”
The fix is simple: apply a thin layer, let it soak, and buff off the excess. Your countertop should feel smooth and protected,
not like it’s wearing lip gloss.
People also learn to stop expecting wood to behave like plastic. Wood will get micro-scratches. It will show wear in high-use areas.
The good news is that wood’s wear can look charming (a “patina,” if we’re being fancy) and, unlike many countertop materials, wood can often
be refreshed with light sanding and a new coat of oil or finish. In other words: it’s not fragile; it’s maintainable.
The best long-term experience usually comes from adopting a simple rhythm:
clean gently (Way 1), deep clean occasionally (Way 2), sanitize and condition when needed (Way 3).
That’s it. No complicated ritual. No panic. Just consistent, low-drama careso your wood countertops stay the warm, beautiful heart of your kitchen
instead of the place where mystery stains go to start a new life.
Conclusion
Wood countertops don’t need harsh chemicals or complicated routines. Most of the time, a gentle daily clean and a quick dry-down will keep them
looking great. When odors or stains show up, a controlled deep clean (like salt + lemon or a baking soda paste) can reset the surface without damage.
And if you want extra hygiene or your butcher block is looking dry, sanitize thoughtfully and condition with a food-safe oil so the wood stays protected.
Treat wood like the natural material it iskeep moisture brief, avoid aggressive cleaners, and maintain the finishand your countertops can stay
beautiful for years (even if taco night gets a little wild).


