Table of Contents >> Show >> Hide
- Before You Start: Pick the Right Dinosaur Tail Style
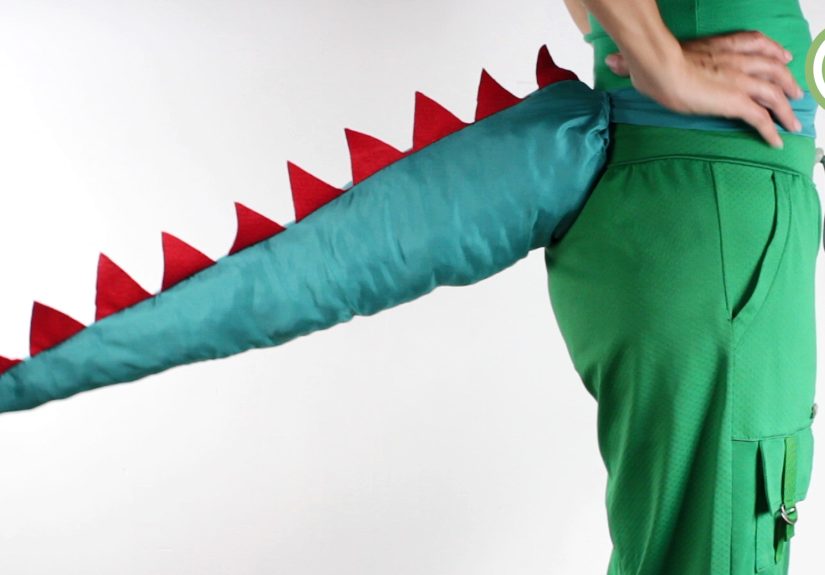
- Way 1: Make a Sewn Fabric Dinosaur Tail
- Way 2: Make a No-Sew Felt or Fleece Dinosaur Tail
- Way 3: Make a Cardboard Dinosaur Tail
- Comfort and Safety Tips for Any Dinosaur Tail
- Creative Dinosaur Tail Ideas
- Common Mistakes to Avoid
- My Experience Making Dinosaur Tails: What Actually Helps
- Conclusion
- SEO Tags
There are two kinds of people in this world: people who see a pile of fabric scraps and think, “I should clean that up,” and people who think, “Excellent, raw materials for a tiny stegosaurus.” If you are in the second groupor if a child in your life has recently announced, with the confidence of a paleontologist in pajamas, that they need a dinosaur tail immediatelyyou are in the right place.
Learning how to make a dinosaur tail is one of those surprisingly satisfying DIY costume projects. It is simple enough for beginners, flexible enough for creative upgrades, and dramatic enough to make a living room feel like Jurassic Park before lunch. A homemade dinosaur tail can be used for Halloween, school spirit days, birthday parties, pretend play, photo shoots, classroom activities, or any ordinary Tuesday that needs more roaring.
This guide covers three practical ways to make a dinosaur tail: a sewn fabric tail, a no-sew felt or fleece tail, and a cardboard costume tail. Each method uses common materials, beginner-friendly steps, and smart comfort tips so the final result is cute, wearable, and not secretly plotting to trip anyone on the stairs.
Before You Start: Pick the Right Dinosaur Tail Style
Not all dinosaur tails are created equal. A soft stuffed tail is best for toddlers and kids who want to run, sit, roll, and dramatically collapse after a T. rex chase. A no-sew tail is perfect when you need a quick costume and do not want to negotiate with a sewing machine. A cardboard tail works beautifully for box-style costumes, party crafts, and structured dinosaur looks.
Before choosing a method, ask three simple questions: Who will wear it? How long does it need to last? Where will it be worn? A tail for indoor pretend play can be larger and fluffier. A tail for trick-or-treating should be lightweight, visible, and short enough to avoid dragging. A tail for a school performance should be sturdy but not so long that the child becomes a prehistoric traffic hazard.
Basic Supplies You May Need
Depending on the method you choose, gather fabric, felt, fleece, cardboard, stuffing, elastic, ribbon, Velcro, scissors, fabric glue, hot glue, a needle and thread, or a sewing machine. For decoration, you can add felt spikes, painted scales, foam plates, fabric scraps, reflective tape, or washable markers. The best dinosaur tail is not the most expensive oneit is the one that survives snack time.
Way 1: Make a Sewn Fabric Dinosaur Tail
The sewn fabric dinosaur tail is the classic version. It is soft, durable, washable if made with washable fabric, and comfortable for kids to wear. This method is ideal for anyone who owns a sewing machine or is willing to hand-sew with patience, tea, and maybe one dramatic sigh.
Best For
This version is best for Halloween costumes, dress-up bins, dinosaur birthday parties, and kids who will wear the tail again and again. It also makes a wonderful handmade gift because it feels more like a toy than a one-day costume piece.
Materials
- 1/2 to 1 yard of cotton, fleece, corduroy, or canvas fabric
- Contrasting felt or fleece for spikes
- Polyester stuffing or clean pillow stuffing
- Elastic, fabric ties, or Velcro straps for the waistband
- Scissors or rotary cutter
- Sewing pins or clips
- Sewing machine or needle and thread
- Measuring tape
Step 1: Cut the Tail Shape
Fold your main fabric in half with the right sides facing each other. Draw a long tapered tail shape, wide at the base and narrow at the tip. For a toddler, a tail around 18 to 22 inches long works well. For an older child, 24 to 30 inches may look better. Keep the base wide enough to attach securely to a waistband, but avoid making the tail so wide that it swings like a wrecking ball.
Cut two matching tail pieces. If you are nervous about cutting directly into the fabric, make a paper pattern first. A grocery bag, newspaper, or wrapping paper works fine. Dinosaurs were resourceful. You can be too.
Step 2: Make the Spikes
Cut a long strip of felt or fleece for the spikes. Then cut triangles along one edge, keeping the bottom edge connected like a mountain range. Felt and fleece are great choices because they do not fray easily, which means less finishing work and more time for stomping around the house.
For a playful stegosaurus look, make the spikes large near the base and smaller toward the tip. For a dragon-like dinosaur tail, make the spikes sharper and closer together. If you want a softer toddler-safe version, round the points slightly.
Step 3: Sew the Tail Together
Place one tail piece right side up. Lay the spike strip along the top edge, with the spike points facing inward toward the center of the tail and the raw edge lined up with the fabric edge. Place the second tail piece on top, right side down, sandwiching the spikes between the two tail pieces.
Pin everything carefully. Sew around the tail with a 1/2-inch seam allowance, leaving a 4- to 5-inch opening along the bottom edge for turning and stuffing. Take your time around the tip of the tail. A gentle curve is easier to turn than a sharp point and gives the tail a smoother shape.
Step 4: Turn, Stuff, and Shape
Turn the tail right side out through the opening. Use your fingers or a blunt tool, such as a chopstick, to push out the tip gently. Do not use anything sharp unless you want your dinosaur tail to become a dinosaur tragedy.
Stuff the tail lightly at the tip first, then gradually add stuffing toward the base. The trick is to make it firm enough to hold its shape but soft enough to move comfortably. Overstuffing makes the tail heavy and bouncy in the wrong way. Understuffing makes it look like a tired carrot. Aim for “cheerful prehistoric plush.”
Step 5: Add the Waistband
You can make the waistband with fabric straps, elastic, ribbon, or Velcro. For younger children, Velcro is convenient because it is adjustable and quick to remove. For older kids, fabric ties may work well. Attach the straps securely to both sides of the base of the tail. Reinforce the stitches because this area takes the most pulling, tugging, and “Look at me, I’m a dinosaur!” energy.
Once the waistband is attached, hand-stitch the stuffing opening closed using a ladder stitch or small whipstitches. Try the tail on the wearer and check the length. The tail should hang behind the body without dragging on the floor.
Way 2: Make a No-Sew Felt or Fleece Dinosaur Tail
No sewing machine? No problem. A no-sew dinosaur tail is fast, friendly, and perfect for last-minute costumes. It can be made with felt, fleece, fabric glue, hot glue, or iron-on adhesive tape. This method is especially useful for parents, teachers, party hosts, and anyone who just remembered the costume event is tomorrow morning.
Best For
This tail is great for classroom crafts, birthday party favors, quick Halloween costumes, and beginner makers. It is not quite as durable as a sewn tail, but it can still look fantastic and hold up well with careful gluing.
Materials
- Felt or fleece in the main dinosaur color
- Contrasting felt for spikes
- Fabric glue, hot glue, or iron-on adhesive tape
- Stuffing, crumpled tissue paper, or fabric scraps
- Ribbon, elastic, or Velcro for the waistband
- Scissors
- Clothespins or clips
Step 1: Cut Two Tail Pieces
Cut two long tapered tail shapes from felt or fleece. If you are making multiple dinosaur tails for a party, create one cardboard template first, then trace it onto the fabric. This keeps the tails consistent and prevents the last one from accidentally becoming a giant pickle.
For no-sew projects, fleece and felt are forgiving because they stretch slightly and do not unravel like many woven fabrics. That means you can cut, glue, and go without worrying about raw edges.
Step 2: Add the Spikes
Cut a strip of triangle spikes from contrasting felt. Glue the spike strip to the inside edge of one tail piece, with the points facing inward. Let the glue cool or dry enough to stay in place. If using hot glue, adults should handle the glue gun, especially when working with younger kids.
Step 3: Seal the Tail Edges
Apply glue along the top and bottom edges of one tail piece, leaving an opening for stuffing. Press the second tail piece on top and clip the edges together while the glue sets. Work in small sections so the glue does not dry before you press the fabric together.
If using iron-on adhesive tape, follow the product instructions carefully. Use a pressing cloth to protect synthetic fabric, and avoid overheating felt or fleece. The goal is to bond the layers, not create a melted dinosaur fossil.
Step 4: Stuff Lightly
Once the glued edges are secure, add stuffing through the opening. For a lightweight party tail, you can use crumpled tissue paper. For a softer, longer-lasting tail, polyester fiberfill works better. Stuff from the tip upward and keep the tail flexible.
After stuffing, glue the opening closed. Hold or clip it until dry. Give the tail a gentle shake test. If nothing opens, congratulations: your dinosaur has passed quality control.
Step 5: Attach the Waist Tie
Glue or stitch ribbon, elastic, or Velcro straps to the base. Even on a no-sew tail, a few hand stitches through the waistband area can add strength. If you truly want zero sewing, use generous glue and reinforce the attachment with an extra felt patch over the strap ends.
This method is also easy to customize. Add polka dots for a cartoon dinosaur, orange spikes for a bold look, or metallic craft foam plates for a party-ready tail. Just keep decorations lightweight so the tail stays comfortable.
Way 3: Make a Cardboard Dinosaur Tail
A cardboard dinosaur tail is the most structured option. It works especially well when paired with a cardboard dinosaur body, box costume, or painted wearable frame. It is budget-friendly, recyclable, and surprisingly impressive when painted well.
Best For
Choose this method for school projects, cardboard costumes, photo booths, dinosaur party activities, and kids who love building as much as wearing. It is less cuddly than fabric, but it gives a bold cartoon-dinosaur silhouette.
Materials
- Large cardboard box or corrugated cardboard sheets
- Pencil and ruler
- Box cutter or strong scissors
- Paint or markers
- Hot glue, craft glue, or packing tape
- Elastic, ribbon, or belt loops
- Scrap cardboard for spikes or scales
Step 1: Draw the Tail Profile
Draw a long tail shape on cardboard. Make it wide at the base and narrow at the tip. For more strength, cut two matching tail shapes and glue them together with the corrugation lines running in different directions. This makes the tail sturdier without adding much weight.
If the wearer needs to sit down, keep the tail shorter or angle it slightly downward from the waist. A tail that sticks straight out may look hilarious, but it also turns chairs, doorways, and siblings into obstacles.
Step 2: Add a 3D Effect
For a flat tail, you can simply paint it and attach it to a belt. For a more dimensional tail, cut a long narrow strip of cardboard and tape it between two tail sides, creating a shallow box shape. This gives the tail thickness and makes it look more costume-like.
You can also glue cardboard triangles along the top edge as spikes. If sharp points are a concern, round the tips or use craft foam instead.
Step 3: Paint and Decorate
Paint the tail green, blue, purple, brown, or whatever color your dinosaur demands. Real dinosaurs may not have followed modern costume color trends, but your homemade dinosaur absolutely can. Add scales with a sponge, stripes with painter’s tape, or spots with a round brush.
Let the paint dry completely before wearing. This sounds obvious until someone tries on a half-dry tail and leaves green evidence on the couch.
Step 4: Attach the Tail to a Belt or Costume Body
Cut two small slits near the base of the cardboard tail and thread ribbon or elastic through them. Another option is to glue cardboard loops to the back and slide a belt through. If the tail is part of a box costume, attach it directly to the back of the body box with strong tape and hot glue.
Test the fit before the big event. The tail should feel secure but not pull the costume backward. Add extra tape or a cardboard brace if needed.
Comfort and Safety Tips for Any Dinosaur Tail
A great DIY dinosaur tail should be fun to wear, not a sneaky obstacle course. Keep the tail lightweight, especially for toddlers. Avoid making it so long that it drags on the ground. If the costume will be worn outdoors at night, add reflective tape to the tail, shoes, or treat bag for better visibility.
For Halloween or public events, make sure the wearer can walk, sit, climb steps, and turn around without knocking things over. Test the costume indoors before heading out. If the tail swings too much, shorten it or add a small loop that attaches to the back of pants or a shirt.
Be careful with hot glue, sharp scissors, box cutters, and small decorations. Adults should cut cardboard and operate glue guns for younger kids. Also consider fabric choice. Soft fleece, felt, cotton, and lightweight polyester blends are comfortable for many costumes. Avoid stiff, scratchy, or overly heavy materials that make the tail annoying after five minutes.
Creative Dinosaur Tail Ideas
Stegosaurus Tail
Use large colorful plates or triangles along the top. Make the plates oversized for a playful cartoon effect. This style looks especially cute with a matching hoodie.
T. Rex Tail
Skip the spikes and focus on a long tapered shape. Use brown, olive, or gray fabric and add darker stripes. Pair it with tiny arm sleeves for maximum comedy.
Triceratops Tail
Make the tail shorter and rounder, then add a matching headpiece with horns and a frill. The tail should support the costume, not steal the whole show.
Rainbow Dinosaur Tail
Use bright fabric scraps for spikes, spots, or stripes. This is a great way to use leftover felt and give the costume a cheerful, modern look.
Common Mistakes to Avoid
The first mistake is making the tail too heavy. A giant tail may look amazing for twelve seconds, then become a burden. Use lightweight stuffing and avoid heavy decorations. The second mistake is attaching the waistband weakly. Reinforce the base because kids will tug, twist, sit, and possibly attempt dinosaur gymnastics.
The third mistake is ignoring the wearer’s height. A tail that works for a six-year-old may drag behind a toddler. Always measure before cutting. The fourth mistake is using glue before checking placement. Dry-fit the pieces first, especially spikes and straps. Once hot glue is involved, the project develops opinions of its own.
My Experience Making Dinosaur Tails: What Actually Helps
The first time I helped make a dinosaur tail, I underestimated two things: how much stuffing a tail can swallow, and how seriously kids take dinosaur accuracy. I thought we were making a simple green tail with orange spikes. The child in charge informed me that the spikes needed to be “fiercer,” the tail needed “more power,” and the dinosaur was not green but “swamp volcano blue.” Naturally, we adjusted the plan. Crafting with kids is part construction, part negotiation, and part live theater.
One of the best lessons from making dinosaur tails is that comfort beats perfection every time. A beautifully shaped tail is useless if it twists sideways, slides down, or makes the wearer complain after ten minutes. The most successful tails I have seen use a wide, soft waistband and a lightweight body. Velcro is especially helpful because it lets kids put the tail on and take it off without needing an adult every single time. For younger kids, that independence is almost as exciting as the tail itself.
Another useful trick is to keep the tail slightly shorter than you think it should be. When a tail is lying flat on a table, it may look modest. Once it is attached to a running child, it gains personality. It swings, bounces, and occasionally clears small objects from coffee tables. A tail that ends above the ankles is much easier to manage than one that sweeps the floor.
Fabric choice also matters. Fleece is forgiving and cozy, which makes it excellent for beginner projects. Felt is great for spikes because it holds its shape and does not fray. Cotton looks neat but may need more careful sewing. Cardboard is wonderful for structure but should be rounded at the edges and reinforced where it attaches to the costume. If the tail is for a party, I prefer no-sew felt because it is fast and colorful. If the tail is for long-term dress-up play, I prefer the sewn fabric version because it survives more adventures.
Decorating is where the project becomes memorable. Kids love choosing spike colors, scale shapes, and silly details. One tail can have purple spots. Another can have lightning-bolt stripes. A third can be a “scientifically questionable but emotionally correct” glitter dinosaur. The point is not to recreate a museum model. The point is to make something that sparks imagination.
The best part comes after the tail is finished. Suddenly the room has a dinosaur. The couch becomes a mountain. The hallway becomes a jungle. Someone starts roaring at a lamp. A homemade dinosaur tail is more than a costume accessory; it is a permission slip for pretend play. And unlike many store-bought costumes, it carries the charm of being made by hand. Even if the seams wobble or the cardboard bends a little, the final result has personality. In fact, the imperfections often make it better.
If you are making your first dinosaur tail, start simple. Choose one method, gather your supplies, and remember that dinosaurs are famously unconcerned with perfect measurements. Make it safe, make it comfortable, and make it fun. The roaring will take care of itself.
Conclusion
Making a dinosaur tail is one of the easiest ways to turn ordinary materials into a costume with big personality. Whether you sew a soft stuffed tail, glue together a no-sew felt version, or build a bold cardboard tail, the project can be adapted for different ages, budgets, and skill levels. The key is to keep the design lightweight, comfortable, and secure. Add colorful spikes, playful patterns, and a waistband that stays put, and you will have a DIY dinosaur costume piece that is ready for Halloween, parties, school events, or everyday prehistoric adventures.
So grab the fabric, felt, cardboard, or whatever craft supplies are hiding in the closet. With a little cutting, stuffing, gluing, or sewing, you can make a dinosaur tail that inspires instant stomping, roaring, and possibly a very serious debate about whether the dinosaur is friendly or only friendly before snack time.
SEO Tags
Note: This article is written as original web-ready content based on established DIY costume-making practices, common sewing and no-sew craft methods, and practical safety considerations for children’s costumes.


