Table of Contents >> Show >> Hide
- Quick Jump
- Before You Start: Outdoor Light & Power Basics
- 1) Oversized “Wow” Bows (Mailbox, Trees, Porch Rails)
- 2) Candy Cane Pathway Stakes (Pool Noodles to the Rescue)
- 3) No-Ladder Outdoor “Tree” (Tomato Cage or Pallet Style)
- 4) Glowing Luminaria Bags (A Walkway That Looks Magical)
- 5) Giant Ornaments (Big, Bright, Ridiculously Photogenic)
- 6) Stacked Present Boxes (Porch or Yard “Gift Tower”)
- Experience Notes: What DIYers Learn the Hard Way (So You Don’t)
- Conclusion
Your neighbors are about to learn two things: (1) you have holiday spirit, and (2) you own at least one extension cord. The good news? You don’t need a warehouse of inflatablesor an engineering degree from the North Poleto make your yard look festive. With a few simple materials, a dash of creativity, and a healthy respect for wind, you can build DIY Christmas yard decorations that look intentionally charming (not “I panicked at 9 p.m. and taped tinsel to a shrub”).
Below are six easy Christmas yard decor ideas that work for tiny porches, big front lawns, and everything in between. They’re designed to be budget-friendly, weather-aware, and beginner-approvedbecause holiday decorating should feel like joy, not like you’re auditioning for a reality show called Survivor: Extension Cord Edition.
Before You Start: Outdoor Light & Power Basics
A gorgeous display is greatuntil it trips a breaker or turns into a spaghetti bowl of cords. Keep your DIY outdoor Christmas decorations cheerful and safe with a few fundamentals:
- Use a GFCI outlet for anything plugged in outdoors. It’s designed to reduce shock risk in damp conditions.
- Choose outdoor-rated lights and extension cords, and protect connections from moisture with weatherproof covers.
- Set a timer so your yard shuts down automatically at night (and you don’t have to do the “did I turn it off?” walk of shame).
- Inspect strands for damage before you hang them, and don’t overload circuitsholiday lighting should be treated like real wiring.
- For anything that looks like a candle (luminarias, lanterns, “glowing” décor), use battery LED lights outdoors.
Now, onto the fun part: making your yard look like it belongs on a Christmas card (but with fewer reindeer-related maintenance issues).
1) Oversized “Wow” Bows (Mailbox, Trees, Porch Rails)
If Christmas had a universal design language, it would be: greenery + lights + giant bows. Big outdoor bows instantly read as “festive,” even in daylight, and they scale beautifullyone bow can transform a mailbox, while three bows can make your porch look like it’s hosting Santa’s press conference.
What you’ll need
- Weather-resistant ribbon (wired ribbon is easiest)
- Zip ties or floral wire
- Optional: faux pine picks, pinecones, ornaments, mini string lights
How to DIY it
- Build the bow indoors where your fingers can still feel feelings.
- Create two loops, then two more, then keep going until it’s gloriously oversized.
- Pinch the center and secure tightly with floral wire or a zip tie.
- Fluff the loops, trim tails at an angle (or a V-cut) for that “store-bought” finish.
- Attach to mailbox post, porch rail, tree trunk, or wreath using zip ties (snug, but not “tree tourniquet”).
Pro tips for better curb appeal
- Match ribbon color to your light color (warm white + deep red looks classic; cool white + icy blue feels modern).
- Add a small bundle of faux greenery behind the bow for dimensioninstant upgrade, minimal effort.
- If you’re in a windy area, run a second zip tie through the bow’s center and around the railing/post for extra stability.
2) Candy Cane Pathway Stakes (Pool Noodles to the Rescue)
A candy cane walkway is the holiday equivalent of rolling out a red carpetexcept it’s peppermint-striped and makes guests feel like they’re entering a very polite candy kingdom. The DIY version is easier than it looks and surprisingly durable when you choose the right base.
What you’ll need
- Pool noodles (white works best) or PVC pipe
- Red outdoor tape, red duct tape, or exterior-safe paint
- Garden stakes or rebar (for stability)
- Optional: solar path lights or mini LED string lights
How to DIY it
- Cut pool noodles into 3–4 foot sections (tall enough to be seen, short enough to survive wind).
- Bend the top into a hook shape. (If the noodle fights you, warm it slightly indoors first, then hold the curve with tape until it “learns its manners.”)
- Create stripes with red tape spiraled down the noodle, or paint diagonal stripes and let dry completely.
- Slide each candy cane over a stake/rebar section pounded into the ground.
- Optional: wrap with mini LEDs or place solar lights at the base for extra glow.
Make it look intentional (not chaotic)
- Space stakes evenly (about 2–3 feet apart) along the walkway for a clean, symmetrical look.
- Keep the same height and stripe angle for every caneconsistency is what makes it feel “designed.”
- Use a timer for plug-in lights to simplify your routine and reduce risk from leaving lights on unattended.
3) No-Ladder Outdoor “Tree” (Tomato Cage or Pallet Style)
Want a Christmas tree vibe in the yard without the roof-climbing? Build a freestanding light tree. Two beginner-friendly options: a tomato cage tree (fast) or a pallet/wood tree (rustic and re-usable). Both scream “holiday,” neither requires you to become best friends with a ladder.
Option A: Tomato cage tree (15–30 minutes)
What you’ll need
- 1 large tomato cage
- Outdoor mini lights (LED preferred)
- Zip ties (optional)
- Star topper (optional, but delightful)
Steps
- Flip the tomato cage upside down so the wide ring is on the ground.
- Wrap lights from top to bottom in a spiral, spacing evenly.
- Secure loose areas with zip ties.
- Stake it down if your winter weather includes wind that “has opinions.”
Option B: Pallet/wood “tree” (a weekend-friendly build)
Use scrap wood or pallet slats to create a simple triangular tree silhouette, then wrap it in lights. The rustic look pairs beautifully with oversized bows, lanterns, and porch planters.
- Cut boards to graduated lengths and attach to a vertical backer board.
- Sand rough edges, paint or stain if desired.
- Add lights, then lean or stake it in place.
4) Glowing Luminaria Bags (A Walkway That Looks Magical)
Luminariasthose softly glowing paper-bag lanternsmake any path feel instantly special. They’re simple, affordable, and they photograph like a dream. The key is making them outdoor-ready: weight them down, and skip real flames.
What you’ll need
- White paper lunch bags
- Sand (or small pebbles) for weight
- Battery-operated LED tea lights
- Optional: craft knife + stencil for cutout designs
How to DIY it
- Add 1–2 inches of sand to each bag to keep it from tipping.
- Optional: cut simple shapes (stars, snowflakes) into the bag front.
- Place an LED tea light in the center and turn it on.
- Line your walkway or driveway edge, spacing bags evenly for a clean look.
Safety and weather tips
- Use LED lights onlyno open flames outdoors, especially near dry leaves or mulch.
- If rain is likely, switch to plastic luminary bags or place bags under a covered edge.
- For extra sparkle, alternate plain bags with cutout bags (the glow pattern looks high-effort, but it’s secretly easy).
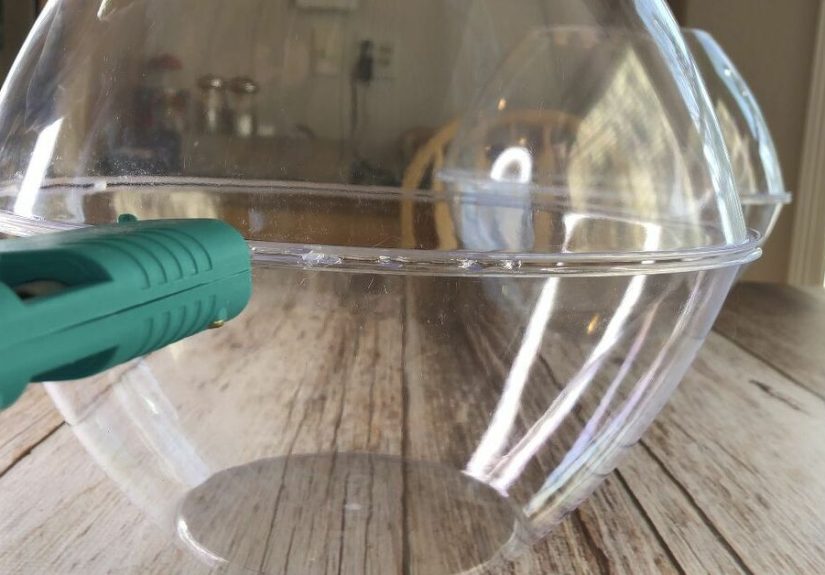
5) Giant Ornaments (Big, Bright, Ridiculously Photogenic)
Giant ornaments bring instant “holiday display” energy without needing a million tiny details. Hang them from a sturdy tree branch, cluster them near your front steps, or place them in a flower bed like festive “yard jewels.” Bonus: they look expensive even when they’re basically craft-store magic and good decisions.
What you’ll need (choose your base)
- Large plastic balls, beach balls, or lightweight foam spheres
- Outdoor-safe spray paint or acrylic paint + clear outdoor sealer
- Ribbon for hanging
- Optional: glitter spray (use sparingly unless you want “sparkle forever” in your life)
How to DIY it
- Paint your ornaments in 2–3 coordinating colors (classic red/green/gold or modern icy neutrals).
- Seal them with an outdoor clear coat so moisture doesn’t ruin the finish.
- Create a “cap” by gluing a small plastic cup or ornament cap to the top (optional, but it sells the illusion).
- Attach ribbon securely and hang from branches or hooks.
Design trick: go big on placement
- Cluster three ornaments at different heights for a styled look.
- Repeat the same colors in your bows or porch greenery to tie the whole yard together.
6) Stacked Present Boxes (Porch or Yard “Gift Tower”)
If you’ve ever wrapped a present and thought, “Wow, I should display this outside like a trophy,” this one’s for you. Lighted present boxes are a classic outdoor Christmas decoration lookeasy to DIY, easy to customize, and dramatically more elegant than a random inflatable snowman doing the splits.
What you’ll need
- 3 cardboard boxes (different sizes) or plastic storage crates
- Outdoor ribbon (wide for “gift wrap” bands)
- Cellophane wrap or plastic sheeting (for weather protection)
- Battery fairy lights or a small outdoor-safe light strand
- Hot glue + packing tape
How to DIY it
- Reinforce boxes with packing tape (corners firstalways corners).
- Line the inside with lights (battery fairy lights make this easiest and reduce cord clutter).
- Wrap each box with ribbon bands and a bow on top.
- Weatherproof: wrap the outside with clear plastic (especially the top seam) and tape underneath where it won’t be seen.
- Stack largest on bottom, then medium, then small. Secure stacks with hidden zip ties or tape between layers.
Make it survive the season
- Place the stack on a covered porch corner if possible (cardboard and sideways rain are not friends).
- Weigh the bottom box with a small brick or sandbag inside so wind can’t “redecorate” for you.
Experience Notes: What DIYers Learn the Hard Way (So You Don’t)
The internet is full of perfect holiday yard photos. What you don’t see is the behind-the-scenes stuff: the zip ties sacrificed, the ribbon that tried to escape, and the moment someone whispered, “Is that extension cord… warm?” (Please don’t let it be warm.)
Here are real-world, battle-tested lessons that make DIY Christmas yard decor easier, safer, and a lot less stressfulespecially if you’re decorating in cold weather, dealing with wind, or trying to keep things cute without turning your lawn into a tripping hazard.
1) Wind is the unofficial HOA president
Lightweight decorations (bows, paper bags, foam ornaments) look amazinguntil a gust decides to relocate them to your neighbor’s azalea bed. The fix is simple: add weight, add anchors, and assume every flat surface is secretly an airfoil. For luminarias, sand is non-negotiable. For stacked present boxes, put weight in the bottom. For candy canes, stake them like you mean it.
2) “Outdoor-rated” isn’t a vibeit’s a requirement
Outdoor extension cords, outdoor lights, weatherproof covers: boring words, important results. Outdoor setups deal with moisture, temperature swings, and the occasional surprise puddle. Plug into a GFCI outlet, protect connections, and don’t run cords where people walk. If you need to cross a path, use a proper cord cover so guests don’t do an accidental holiday dance move.
3) Timers save your sanity (and reduce risk)
A timer is the difference between “effortlessly festive” and “I woke up at 2 a.m. and remembered the yard is still glowing.” Timers also help limit how long lights stay on unattended, which safety experts commonly recommend. Even better: it makes your display consistentsame on/off times every dayso it looks polished.
4) Pick a simple color story and stick to it
The fastest way to make DIY decorations look “designer” is not buying expensive stuffit’s choosing a consistent palette. Try one of these:
- Classic: warm white lights + red bows + evergreen
- Modern: cool white lights + silver + icy blue
- Cozy rustic: warm lights + burlap ribbon + wood accents
- Playful: multi-color lights + bright ornaments + candy cane stakes
When your bows match your ornaments and your lights match your “tree,” the yard reads as intentionaleven if it was built in one Saturday.
5) Build in “setup and storage” from the start
DIY decor is more fun when it’s reusable. While building, ask: “How will Future Me store this without swearing?” A few practical moves:
- Wrap bows in tissue paper and store in a plastic tote so they don’t get crushed.
- Label light strands by location (“porch rail,” “tree,” “walkway”) so next year is a breeze.
- Use zip ties in places you can easily snip and reattach (instead of permanent glue everywhere).
6) Don’t underestimate daylight curb appeal
Nighttime sparkle is great, but you also want your yard to look good at 3 p.m. That’s where big shapes shine: oversized bows, giant ornaments, and stacked present boxes read clearly in daylight. Think bold silhouettes first, then add light as the bonus layer.
Conclusion
You don’t need a massive budgetor a garage full of animatronic reindeerto create a welcoming, festive front yard. Start with one project (giant bows are the gateway craft), then layer in light: candy cane pathway stakes, a no-ladder yard “tree,” luminaria bags, oversized ornaments, and a stacked present tower. Keep it safe with outdoor-rated gear, a GFCI outlet, and a timer, and you’ll have DIY Christmas yard decor that looks polished, joyful, and totally you.
![18 Best Types of Charts and Graphs for Data Visualization [+ How to Choose]](https://corkopencoffee.org/wp-content/uploads/2026/05/18-best-types-of-charts-and-graphs-for-data-visualization-how-to-choose-qKM1PBYG-thumb.jpg)


