Table of Contents >> Show >> Hide
- Why Dish Soap Works (And Why It Sometimes “Fails”)
- Your Dish-Soap Kitchen Cleaning Kit
- The Top-to-Bottom Plan (So You Don’t Mop Twice)
- Step 1: Greasy Pans, Pots, and Baking Sheets
- Step 2: Stovetop, Grates, and the Greasy Backsplash
- Step 3: Cabinets That Feel… Slightly Fryer-Adjoining
- Step 4: Counters, Kitchen Table, and High-Touch Spots
- Step 5: Sink, Faucet, and Drain Area
- Step 6: AppliancesMicrowave, Fridge, Dishwasher Exterior, and Stainless Steel
- Step 7: Sticky Kitchen Floors (Tile, Vinyl, Laminate… and the “Snack Zone”)
- Safety Notes: The “Please Don’t Mix a Chemistry Experiment” Section
- A Simple Routine That Keeps Your Kitchen Manageable
- Final Takeaway
- Real-Life Experiences: Dish Soap Wins (and the Lessons Sticky Floors Teach)
- SEO Tags
Dish soap has a wildly underrated résumé. It’s gentle enough to wash the spoon you licked (no judgment), but tough enough to tackle the greasy film that somehow teleports onto your stove hood. If you’ve ever stared at your kitchen and thought, “I need an all-purpose cleaner, a degreaser, a floor solution, and maybe a therapist,” good news: dish soap can cover most of that list.
This guide walks you through a practical, top-to-bottom kitchen clean using mostly dish soap and smart techniquebecause the real magic isn’t “more product.” It’s right dilution, proper dwell time, and rinsing like you mean it. We’ll hit everything from greasy pans and sticky cabinet handles to floors that feel like someone spilled soda in 2019 and never confessed.
Why Dish Soap Works (And Why It Sometimes “Fails”)
Dish soap is built to break up grease and help water lift it away. That’s the superpower: it grabs onto oily grime so it can be rinsed off instead of smeared around like a bad decision. The key is that dish soap is meant to be used diluted and then rinsed. When people say, “Dish soap left streaks,” what they usually mean is, “I used half the bottle and didn’t rinse.”
Another truth: dish soap is a cleaner, not a disinfectant. It removes dirt, grease, and food residue extremely well, which is already a huge win for kitchen hygiene. If you need to disinfect (like after raw chicken juice got ambitious), you can do that as a separate step using a labeled disinfectant according to instructionsafter you’ve cleaned away the grime.
Your Dish-Soap Kitchen Cleaning Kit
Before you start, grab a few basics so you’re not cleaning with a single soggy paper towel like it’s a survival challenge.
- Liquid dish soap (mild and grease-cutting)
- Warm/hot water (heat helps melt and lift grease)
- Spray bottle
- Microfiber cloths (at least 3: one for wash, one for rinse, one for dry/buff)
- Non-scratch sponge + a soft scrub brush
- Old toothbrush (for grout lines, knobs, and the little crevices where crumbs go to retire)
- Baking soda (optional, for stubborn gunk and deodorizing)
- Mop or microfiber floor pad + bucket
- Gloves if your hands get dry or you’re using hot water
Mix #1: The Everyday Dish-Soap Spray
This is your “works on most things” solution for counters, cabinet fronts, appliance exteriors, and quick degreasing.
- Fill a 16 oz spray bottle with warm water.
- Add about 1/2 teaspoon dish soap (roughly a small squeezeless than you think).
- Swirl gently (don’t shake like a cocktail unless you enjoy foam parties).
Mix #2: The Heavy-Duty Degrease Bowl
For greasy cabinet areas near the stove, range hood filters, stove grates, and sticky buildup:
- In a bowl or sink, mix hot water with a small squirt of dish soap.
- For extra grime, add 1–2 tablespoons baking soda (optional).
Quick rule: If you can see thick suds sitting on the surface after wiping, you used too much soap. That’s not “extra clean.” That’s “future sticky residue.”
The Top-to-Bottom Plan (So You Don’t Mop Twice)
Clean from high to low: backsplash and cabinets → counters and sink → appliances → floors. Gravity is undefeated, so let it work for you. Also, start with the greasiest items (pans, filters) early so they can soak while you do everything else.
Step 1: Greasy Pans, Pots, and Baking Sheets
If your pan looks like it survived a medieval battle, dish soap plus heat is your best friend. Grease dissolves better with warm water, and soaking gives soap time to do its job.
For everyday greasy pans
- Scrape out leftover food (a rubber spatula is perfect).
- Fill the pan with hot water and a small squirt of dish soap.
- Let it soak 10–20 minutes.
- Use a non-scratch sponge to wipe clean, rinse well, and dry.
For burnt-on bits (the “I turned my back for one second” pan)
- Deglaze: put the pan on low heat, add a cup of water, and gently scrape loosened bits with a wooden spoon.
- Turn off heat, let the pan cool, then add dish soap and wash normally.
Note: Avoid harsh scrubbing on nonstick surfaces. For cast iron, keep soap minimal, rinse quickly, and dry thoroughly to prevent rust.
Step 2: Stovetop, Grates, and the Greasy Backsplash
The area around the stove collects oil mist like it’s a hobby. Dish soap is excellent here because it’s designed to cut grease without requiring aggressive chemicals.
Stovetop (glass, enamel, stainless)
- Remove grates/burner caps if applicable and set them to soak in the Heavy-Duty Degrease Bowl.
- Spray the stovetop lightly with your Everyday Dish-Soap Spray.
- Let it sit 2–5 minutes (dwell time matters).
- Wipe with a damp microfiber cloth. Follow with a clean-water cloth to rinse, then dry to prevent streaks.
Backsplash (tile, painted, laminate, sealed stone)
- Use the Everyday Dish-Soap Spray and a microfiber cloth or non-scratch sponge.
- For grout lines, use an old toothbrush with a tiny dab of dish soap (or a paste of baking soda + water).
- Rinse with clean water and dry with a towel.
Surface caution: Dish soap is generally safe for many hard surfaces when diluted, but some stones (especially marble) can be sensitive. When in doubt, spot-test in a hidden area or check your countertop/backsplash manufacturer guidance.
Step 3: Cabinets That Feel… Slightly Fryer-Adjoining
Cabinets near the stove often have a sneaky layer of grease that attracts dust, turning into a sticky matte finish that’s hard to ignore once you notice it. Dish soap is ideal hereused gently, with minimal water.
How to clean cabinet fronts (without damaging the finish)
- Dip a microfiber cloth into warm, soapy water (lightly soapyno foam mountain).
- Wring it out well so it’s damp, not wet.
- Wipe cabinet doors, especially around handles and edges.
- Rinse by wiping again with a cloth dampened with clean water.
- Dry immediately with a clean towel.
Pro tip: Heat helps. If the grease is stubborn, warm the area first with a slightly hotter (not dripping) cloth, or let the soapy cloth sit on the spot for a minute before wiping.
Step 4: Counters, Kitchen Table, and High-Touch Spots
Counters don’t need a complicated chemistry set. For daily grime and cooking splatter, dish soap spray is usually enough. The trick is not leaving soap behindespecially on shiny surfaces.
Countertop cleaning routine
- Clear the surface (yes, the mail pile tootoday we are brave).
- Spray lightly with the Everyday Dish-Soap Spray.
- Wipe with a microfiber cloth.
- Rinse-wipe with a clean damp cloth.
- Dry to prevent streaks and water marks.
High-touch hot list: cabinet knobs, fridge handle, microwave buttons, faucet lever, light switches. These spots get gross fast. A quick dish soap wipe + rinse goes a long way.
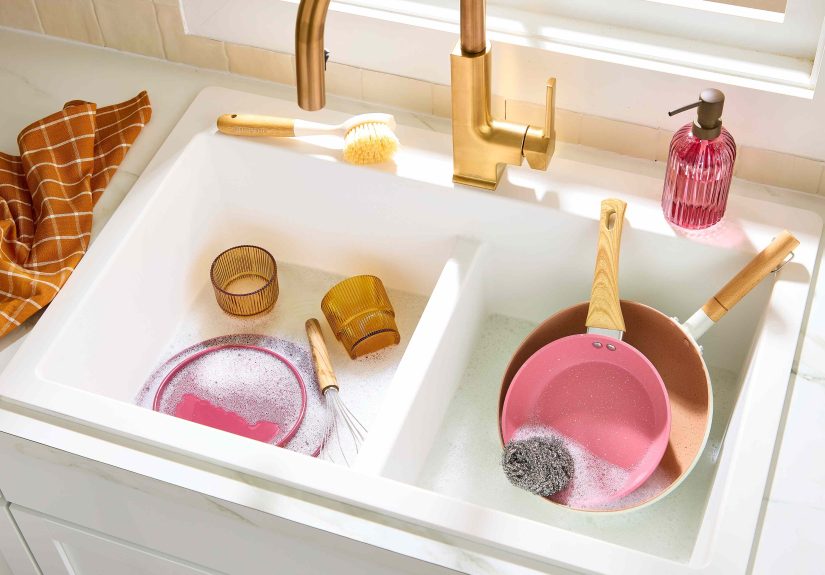
Step 5: Sink, Faucet, and Drain Area
The sink is both your cleaning headquarters and the place where mystery smells sometimes appear without warning. Dish soap handles grease and food residue beautifully, and it’s gentle enough for most sink materials.
Quick sink reset
- Rinse out food scraps (use a strainer if you have one).
- Apply a few drops of dish soap to a sponge and scrub the sink basin.
- For extra shine (and mild deodorizing), sprinkle baking soda and scrub again.
- Rinse thoroughly and wipe dry.
Drain reminder: If the sink smells funky, it’s often buildup. Flush with hot water and a little dish soap, then rinse again with hot water. If you use stronger products for clogs, follow the label and don’t mix cleaners.
Step 6: AppliancesMicrowave, Fridge, Dishwasher Exterior, and Stainless Steel
Microwave interior (low drama, high reward)
- Make a bowl of warm water with a few drops of dish soap.
- Microwave it for 1–2 minutes until steamy (watch closely).
- Let it sit closed for 2 minutes to loosen splatters.
- Wipe inside with a cloth or sponge, then rinse-wipe and dry.
Stainless steel (no streaks allowed)
- Use a lightly soapy damp cloth to remove fingerprints and grease.
- Rinse-wipe with a clean damp cloth.
- Dry immediately with a microfiber towel, wiping with the grain if visible.
Why the dry step matters: Soap and water left behind can streak. Drying is not “extra.” Drying is the difference between “sparkling” and “why does my fridge look sad?”
Important: Don’t use dish soap in the dishwasher
Regular dish soap creates too many suds for dishwashers and can lead to a foamy mess. Dishwasher detergents are formulated differently. Use dish soap for hand-washing and for cleaning the dishwasher exterior, not as dishwasher detergent.
Step 7: Sticky Kitchen Floors (Tile, Vinyl, Laminate… and the “Snack Zone”)
Kitchen floors collect a special blend of crumbs, grease, and invisible “why is it sticky here?” energy. Dish soap can clean floors well if you use very little and rinse.
Before mopping: dry clean first
- Sweep or vacuum to remove grit (grit + mop = sandpaper situation).
- Spot-treat sticky patches: a damp cloth with a drop of dish soap, then rinse-wipe.
Mopping with dish soap (the right way)
- Fill a bucket with warm water.
- Add just a few drops of dish soap (seriouslydrops).
- Mop in sections.
- Rinse the mop often in clean water.
- Finish with a quick rinse pass using plain water to remove any soap film.
Floor warning: Too much soap can leave a sticky or slippery residue. If your floor feels tacky after drying, you didn’t “clean wrong”you just need a plain-water rinse mop to remove leftover soap.
Material caution: For hardwood or specialty finishes, use the floor manufacturer’s recommended cleaner and minimal water. Dish soap is great for many resilient surfaces (like vinyl and tile) when diluted, but wood floors can be moisture-sensitive.
Safety Notes: The “Please Don’t Mix a Chemistry Experiment” Section
Keep dish soap simple. Don’t mix multiple cleaners together, especially bleach, ammonia-based products, strong acids, or drain cleaners. Dangerous fumes can form when incompatible cleaners are combined. If you need to use a disinfectant like bleach for a specific reason, clean first with dish soap, rinse thoroughly, and then disinfect as a separate step following label directionsnever in the same bucket or bottle.
- Ventilate: crack a window or run the fan when cleaning heavily.
- Label any spray bottles clearly.
- Store cleaners out of reach of kids and pets.
- When in doubt, use one product at a time, rinse between steps, and don’t “hack” random mixtures.
A Simple Routine That Keeps Your Kitchen Manageable
Daily (10 minutes)
- Dish soap spray wipe: counters + stove + sink
- Quick handle wipe: fridge + microwave
- Sweep high-crumb zones
Weekly (30–45 minutes)
- Cabinet fronts near the stove
- Backsplash and grout touch-up
- Appliance exterior wipe + stainless buff
- Full mop with a proper rinse pass
If you keep the soap dilution mild and rinse as you go, your kitchen stays cleaner longerand you won’t need a “deep clean” that feels like preparing a rental unit for an inspection.
Final Takeaway
Dish soap is the kitchen-cleaning MVP because it’s designed to break up grease without being harshand it plays nicely with most surfaces when diluted. The winning formula is simple: use less soap than you think, give it a minute to work, and rinse and dry. Do that, and you can go from greasy pans to sticky floors without turning your kitchen into a chemical battleground.
Real-Life Experiences: Dish Soap Wins (and the Lessons Sticky Floors Teach)
Let’s talk about the stuff cleaning guides don’t always say out loud: most kitchens aren’t “dirty,” they’re just living their best chaotic life. The mess is usually a combination of cooking enthusiasm, snack traffic, and the laws of physics (grease floats, splatters, and then silently settles on everything you love). Dish soap shines in real kitchens because it’s forgiving, flexible, and fastif you use it like a tool, not like a flood.
One common scenario: the “greasy cabinet handle mystery.” You wipe the cabinet doors and they look fine, but the handles feel… tacky. That’s often a mix of cooking oil mist and skin oils that build up in the exact spot everyone grabs. The best dish-soap move here isn’t scrubbing harder; it’s dwell time. A damp microfiber cloth with a tiny bit of soapy water held against the sticky area for 30–60 seconds loosens the grime so it wipes away cleanly. Follow with a rinse-wipe and a dry towel, and suddenly the handle doesn’t feel like it’s been lightly glazed.
Then there’s the “range hood filter shock,” where you take it down and realize it looks like it’s been deep-fried. People often assume they need a harsh degreaser, but a soak in very hot water with dish soap (and optionally baking soda) can be surprisingly effective. The real lesson is: let soaking do the heavy lifting. While it sits, you can clean the stovetop and backsplash, then come back and rinse the filter. It’s the cleaning equivalent of delegating.
Floors bring their own drama. The classic mistake is thinking, “The floor is sticky, so I’ll add more soap.” That feels logical until you remember soap can leave residue. In real life, the sticky floor fix is almost always: use less soap, rinse more. A few drops of dish soap in mop water is plenty. If you end up with a tacky feel after drying, don’t panic and don’t add more cleaner. Do a plain warm-water mop (no soap), focusing on the high-traffic zones. That rinse pass removes the leftover film, and your socks stop making that faint “peel” sound when you walk. Victory.
Another “real kitchen” moment: the countertop that looks clean but feels streaky. This is especially common on dark countertops and stainless steel. The fix isn’t switching productsit’s switching steps. Dish soap cleans; it doesn’t always finish. After your soapy wipe, do a quick rinse-wipe with clean water, then dry. That last dry step is where the “wow” happens, because it removes both water spots and microscopic soap traces.
And finally, the most relatable experience: cleaning while dinner is still happening. You don’t need to deep-clean everything every time you cook. Dish soap helps you do “micro cleans” that prevent big cleans. A quick soapy wipe of the stove knobs and backsplash right after cooking (once it’s cool) stops grease from hardening into a stubborn layer. A 30-second sink scrub with dish soap before bed prevents the morning funk. A fast floor spot-wipe around the trash can and sink keeps the “mystery stickiness” from spreading like gossip.
In other words: dish soap works in real kitchens because it supports realistic habits. It’s the cleaning product version of comfy sneakersreliable, not fancy, and surprisingly good at getting you out of a mess.