Table of Contents >> Show >> Hide
- Before You Fry: What “Deep Fried” Means (and Why It Matters)
- Ingredients and Gear Checklist
- How to Make Deep Fried Chicken: 15 Steps
- Choose the right chicken pieces (and size them for even cooking)
- Dry the chicken and season it early (yes, early)
- Soak in buttermilk (or a quick brine) for tenderness and flavor
- Make a dredge that’s built for crunch
- Set up your “frying assembly line” to avoid chaos
- Pull chicken from the marinade and let excess drip off
- Dredge thoroughlyand press for crags
- Rest the coated chicken (the most ignored step that fixes everything)
- Heat oil to the right temperature (and keep it there)
- Test the oil before committing your chicken to it
- Fry in batches (crowding is the enemy of crisp)
- Turn strategically, not constantly
- Cook to temperature, not vibes
- Drain correctly so your crust stays crunchy
- Season while hot, rest briefly, then serve like a legend
- Safety Notes (Because Hot Oil Has No Sense of Humor)
- Troubleshooting: Common Fried Chicken Problems (and Fixes)
- Serving and Storage Tips
- Conclusion: Crunch You Can Count On
- Real-Life Frying Experiences (The “I Learned This So You Don’t Have To” Section)
Deep-fried chicken is one of life’s greatest magic tricks: you take a humble bird, give it a spa day in seasoning, dunk it in hot oil, andpoofsuddenly everyone in the house “just happened to be nearby” when dinner is ready. If you’ve ever wondered why restaurant fried chicken tastes like it was blessed by crispy angels, the secret is not mystery. It’s process: seasoning, moisture control, oil temperature control, and a tiny bit of patience (yes, even you).
This guide breaks down a classic American-style deep fried chicken method into 15 clear steps, with the “why” behind each move, plus fixes for common problems like soggy breading, burnt crust, and chicken that’s still doing its own thing in the middle. Ready? Tie on an apron, put on your bravest face, and let’s make chicken that crunches loud enough to scare your neighbors’ pets.
Before You Fry: What “Deep Fried” Means (and Why It Matters)
“Deep fried” means the chicken cooks surrounded by hot oil, not just kissed by a shallow puddle. You don’t necessarily need a countertop fryer; a heavy Dutch oven or deep, sturdy pot works beautifully. The benefit is more even browning and a crust that sets faster, which helps keep the meat juicy. The tradeoff is that oil temperature becomes the boss of your kitchenso we’ll keep it happy.
Ingredients and Gear Checklist
Chicken
- Bone-in, skin-on pieces (thighs, drumsticks, wings, breasts cut in halves) for best flavor and juiciness
- Or boneless tenders if you want faster frying (and fewer dramatic “is it done?” moments)
Marinade / Brine Options
- Buttermilk (classic): tenderizes, seasons, and helps coating stick
- Salt + spices: the flavor foundation
- Optional: hot sauce, mustard, garlic powder, onion powder, paprika, cayenne
Coating (Dredge)
- All-purpose flour
- Cornstarch (or potato starch) for extra crispness
- Baking powder (optional) for lighter, craggy crunch
- Seasonings: salt, black pepper, paprika, garlic powder, onion powder, cayenne
Oil
- Neutral, high-heat oil: peanut, canola, vegetable, or rice bran oil
- Enough to submerge chicken pieces (usually 2–3 inches deep in a Dutch oven, more for a full deep fry)
Tools That Make This Easier
- Heavy pot or Dutch oven (6-quart or larger)
- Clip-on fry thermometer or instant-read thermometer (ideally both)
- Wire rack + sheet pan (for resting and draining)
- Tongs or spider strainer
- Paper towels (as backup, not a soggy destiny)
How to Make Deep Fried Chicken: 15 Steps
-
Choose the right chicken pieces (and size them for even cooking)
Mixed bone-in pieces are traditional, but they cook at different speeds. If you’re frying breasts, cut them into smaller portions so they finish around the same time as thighs and drumsticks. Even sizing = fewer undercooked surprises.
-
Dry the chicken and season it early (yes, early)
Pat chicken dry with paper towels. Sprinkle salt (and a little pepper) on all sides. Even 30–60 minutes of “early salting” helps seasoning penetrate and improves juiciness. If you can do it a few hours ahead, you’ll taste the difference.
-
Soak in buttermilk (or a quick brine) for tenderness and flavor
For classic deep fried chicken, buttermilk is the MVP. Combine buttermilk with spices (paprika, garlic powder, onion powder, cayenne, pepper) and optional hot sauce. Submerge chicken and refrigerate 2–8 hours. Short on time? Even 45–60 minutes helps. This step boosts flavor and keeps the meat from drying out.
-
Make a dredge that’s built for crunch
In a large bowl, mix flour with cornstarch (a common crispy secret) plus salt and your seasonings. A reliable starting point is roughly 3 parts flour to 1 part cornstarch, then adjust. More starch = lighter, crisper crust. Optional: add a little baking powder for extra airy crunch.
-
Set up your “frying assembly line” to avoid chaos
Arrange: chicken in marinade → dredge bowl → wire rack on a sheet pan. Keep one hand for wet, one for dry, unless you enjoy wearing batter gloves you didn’t ask for. Place a clean rack nearby for finished chicken.
-
Pull chicken from the marinade and let excess drip off
Lift each piece from the buttermilk and let it drip for a few seconds. You want it wet enough to grab coating, not so wet that it turns your dredge into paste.
-
Dredge thoroughlyand press for crags
Coat each piece in the flour-starch mix, pressing firmly so it adheres. For a thicker crust, “double dredge”: flour → back into buttermilk briefly → flour again. The pressure creates those ridges and crunchy bits everyone fights over.
-
Rest the coated chicken (the most ignored step that fixes everything)
Place breaded chicken on a wire rack and let it sit 10–30 minutes. This rest hydrates the flour slightly and helps the coating bond, which means less breading falling off in the oil. It also gives you time to get the oil temp rightlike a responsible adult.
-
Heat oil to the right temperature (and keep it there)
Pour oil into a heavy pot (2–3 inches deep for deep-fry behavior; more if you want full submersion). Heat to about 350°F. When chicken goes in, the temperature will dropyour job is to keep the frying range steady, usually around 325°F to 350°F. Some cooks prefer a slightly lower, steadier fry (around 300°F) for extra-even cooking. Use a thermometer and adjust heat as needed.
-
Test the oil before committing your chicken to it
Drop in a pinch of dredge. It should sizzle immediately and float, not sink sadly like a rock. If it browns too fast, lower the heat. If it barely bubbles, you’ll end up with oily, pale crust.
-
Fry in batches (crowding is the enemy of crisp)
Gently lower chicken into the oilaway from you to avoid splashes. Don’t overcrowd the pot. Too much chicken drops the oil temp, and low oil temp = greasy chicken. Work in batches and let the oil recover between rounds.
-
Turn strategically, not constantly
Let the crust set before moving pieces. Turn occasionally for even browning, but don’t flip every 10 seconds like you’re trying to teach the chicken a new dance. Big pieces typically take 12–18 minutes total depending on size and oil temperature. Smaller wings and drumettes can be faster.
-
Cook to temperature, not vibes
Fried chicken should reach a safe internal temperature of 165°F in the thickest part (avoid bone when checking). Many cooks aim for about 160–165°F for white meat and slightly higher (around 170°F) for dark meat for best texture. If the crust is perfect but the inside needs a little more time, finish pieces in a 300–325°F oven for a few minutes.
-
Drain correctly so your crust stays crunchy
Transfer fried chicken to a wire rack on a sheet pan. This keeps air circulating so the bottom doesn’t steam itself into softness. If you want to pull off extra surface oil, you can place paper towels under the rack (or use a small amount of paper towel strategically without letting the chicken sit directly on it).
-
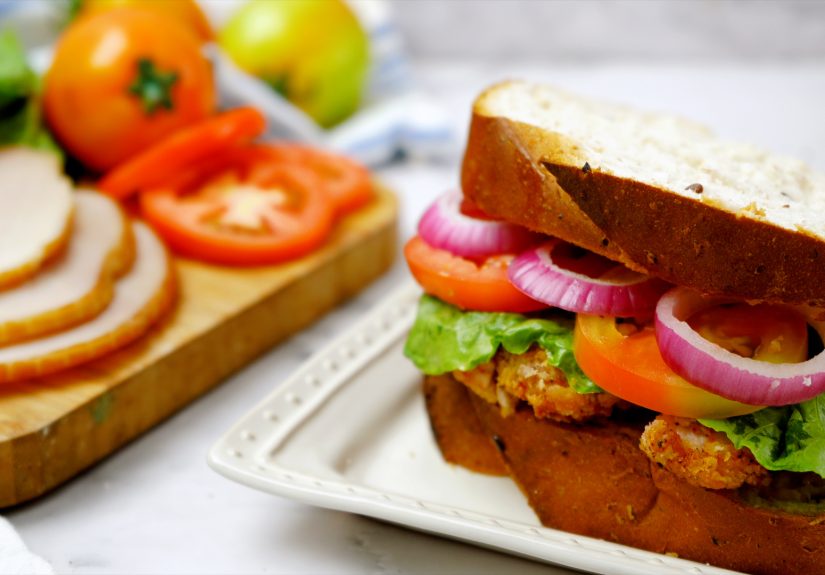
Season while hot, rest briefly, then serve like a legend
A final pinch of salt right after frying is a professional move. Let the chicken rest 5–10 minutes before serving; it keeps juices inside and prevents “lava mouth.” Serve with pickles, hot sauce, slaw, biscuits, or whatever makes you happiest.
Safety Notes (Because Hot Oil Has No Sense of Humor)
- Never fill your pot more than halfway with oilbubbling and displacement are real.
- Keep a lid nearby. If oil ever ignites, turn off heat and cover the pot. Do not add water.
- Dry chicken well and add it gently to reduce splatter.
- Keep kids, pets, and dangling sleeves away from the fry zone.
Troubleshooting: Common Fried Chicken Problems (and Fixes)
“My breading fell off.”
Usually: coating didn’t rest long enough, chicken was too wet, or you moved it too soon. Next time: let excess marinade drip, press dredge firmly, rest on a rack 10–30 minutes, and don’t touch the chicken for the first couple minutes in the oil.
“It’s brown outside but raw inside.”
Oil was too hot or pieces were too large. Next time: keep oil closer to 325–350°F (or even a steady 300°F approach), cut large breasts smaller, and finish in the oven if needed.
“It’s greasy.”
Oil was too cool or pot was overcrowded. Fry in smaller batches, let oil return to temperature, and use a thermometer like it’s your co-pilot.
“It’s not crispy enough.”
Add starch (cornstarch or potato starch) to your dredge, try a double dredge, and make sure you’re draining on a rack. For ultra-crisp results, you can do a quick second fry: let chicken rest 5–10 minutes, then fry again for 60–90 seconds at 350–375°F.
Serving and Storage Tips
Fried chicken is best hot and fresh, but leftovers don’t have to be sad. Store cooled chicken in the fridge uncovered for an hour (so it doesn’t steam), then move to a container. Reheat on a rack in a 375°F oven or in an air fryer until hot and crisp. The microwave is technically an option, but it’s also technically a crime against crunch.
Conclusion: Crunch You Can Count On
Perfect deep fried chicken is less about secret ingredients and more about smart steps: season early, soak for juiciness, build a starch-boosted dredge, rest the coating, control oil temperature, and cook to a real internal temp. Do that, and you’ll get chicken that’s crisp, golden, and unapologetically deliciousevery time.
Real-Life Frying Experiences (The “I Learned This So You Don’t Have To” Section)
The first time I tried deep fried chicken at home, I assumed confidence was an ingredient. Spoiler: confidence does not crisp. I had a big bowl of flour, a pot of oil, and the kind of optimism you only see right before someone realizes they forgot to buy a thermometer. The chicken came out… edible, technically. But the crust had the texture of a winter coat, and the inside was playing a fun game of “Is it done or is it just warm?” That day taught me the core truth of frying: oil temperature is the steering wheel, not a suggestion. Once I finally started using a thermometer, everything improved immediatelylike going from guessing your speed on the highway to actually looking at the dashboard.
Another lesson: the resting step is not optional, no matter how impatient you feel. I used to dredge and toss chicken straight into the oil. It looked like a good idea until the breading separated and floated away like little golden life rafts. Resting the coated chicken on a rack for even 10 minutes made the coating cling like it had signed a lease. The crust also developed those dramatic craggy bitsthe crunchy corners that people “accidentally” pick off while the chicken is cooling. (You know who you are.)
I also learned that “more chicken per batch” is the fastest way to turn deep fried chicken into deep disappointed chicken. The oil temperature drops, the bubbling gets lazy, and suddenly your coating is absorbing oil instead of crisping. The fix was painfully simple: fry fewer pieces at once and let the oil climb back to the right range between batches. Yes, it takes longer. But you know what takes longer than that? Explaining to your family why the chicken tastes like oil and regret.
My favorite upgrade came from playing with the dredge. Straight flour can be delicious, but adding cornstarch changed the texture in a very “wait, why is this so crunchy?” way. The crust got lighter, crispier, and less bready. I tried going heavy on starch once, and it got almost shatteringly crispgreat for wings, a little intense for thick bone-in pieces. The sweet spot ended up being a blend: flour for structure, starch for crunch, and enough seasoning that the crust tastes like something on its own. Because nobody wants “crispy bland” chicken. That’s just crunchy sadness.
Finally, draining is a bigger deal than I expected. Putting fried chicken straight on a plate can trap steam underneath and soften the bottom. A wire rack fixed that instantly. If I’m feeling extra, I set paper towels under the rack to catch drips while keeping the chicken elevated. The difference is realespecially when you’re making multiple batches and the first pieces need to stay crispy while you finish frying. One more small habit: I season right after frying, while the surface is hot. Salt sticks better, and it tastes more integrated. The end result is chicken that stays crunchy longer, tastes bolder, and makes you wonder why you ever paid restaurant prices for something you can absolutely crush at home with a pot, a thermometer, and a little patience.


