Table of Contents >> Show >> Hide
- Fried Potato Basics: The Stuff That Makes Everything Better
- Way #1: Diner-Style Skillet Home Fries (Crispy Outside, Tender Inside)
- Way #2: Classic Double-Fry French Fries (The “Why Are These So Good?” Method)
- Way #3: Crispy Smashed Potatoes (Boil, Smash, Shallow-Fry = Magic)
- Way #4: Seasoned Fried Potato Wedges (Crispy, Fluffy, Dip-Ready)
- Dips and Toppings That Make Fried Potatoes Even Better
- Common Mistakes (And How to Fix Them)
- Storing and Reheating Fried Potatoes (So They’re Still Worth Eating)
- Real-Life Fried Potato Lessons (The 500-Word “Experience” Section)
- Conclusion: Your Fried Potato Era Starts Now
Fried potatoes are the culinary equivalent of a cozy hoodie: reliable, comforting, and somehow appropriate at any hour.
Breakfast? Home fries. Lunch? Crispy wedges. Midnight snack? “Just one more fry” (said no honest person ever).
The best part is you don’t need a restaurant fryer or a chef’s hat with 37 mysterious pleatsjust smart prep,
the right heat, and a tiny bit of patience (yes, even when the potatoes are trying to rush you).
This guide walks you through how to make fried potatoes in four crowd-pleasing styles:
diner-style skillet home fries, classic double-fry French fries,
crispy smashed potatoes, and seasoned fried potato wedges.
Along the way, you’ll learn why drying matters, when to salt, how to avoid soggy sadness, and what to do
when your potatoes decide to glue themselves to the pan like a dramatic breakup text.
Fried Potato Basics: The Stuff That Makes Everything Better
Pick the right potato
- Russet potatoes: high starch, fluffy inside, great for classic fries and extra-crispy results.
- Yukon Gold: slightly waxier, creamy texture, excellent for home fries and skillet styles.
- Red potatoes: hold their shape well, great for wedges and chunkier skillet potatoes.
Cut evenly (your future self will thank you)
Uneven pieces cook unevenlytiny bits burn while big chunks stay underdone. Aim for consistent sizes:
cubes for home fries, sticks for fries, halves for smashed potatoes, and wedges for… well, wedges.
Rinse/soak to reduce surface starch
If you want crispy fried potatoes, washing away excess surface starch helps prevent gumminess and
encourages browning. A quick rinse works for skillet styles; a 20–30 minute soak is great for fries.
Then drain well.
Dry like you mean it
Water + hot oil = sputtering chaos and slower crisping. Pat potatoes very dry with towels, and let them air-dry
a few minutes if you have time. Think of it as sending your potatoes to “crisp camp.”
Use the right fat (and enough of it)
For deep-frying, choose a neutral oil with a higher smoke point (canola, peanut, vegetable). For skillet frying,
oil plus a little butter (or clarified butter/ghee) gives flavor without burning as easily.
Salt timing matters
- French fries: salt immediately after frying while the surface is still hot and slightly oily.
- Skillet potatoes: season in layerssome early, then adjust at the end.
- Coated wedges: season the coating, then finish with a pinch of salt right after frying.
Way #1: Diner-Style Skillet Home Fries (Crispy Outside, Tender Inside)
These are the breakfast heroes that make eggs feel fancy. The key is controlling steam early and browning late:
you want the potatoes to cook through, then crisp up in a hot skillet.
Best for
Breakfast plates, brunch bowls, breakfast burritos, and “I’m not hungry” lies.
What you’ll need
- 1½ to 2 pounds Yukon Gold or russet potatoes (½-inch cubes)
- 2–3 tablespoons oil (plus 1 tablespoon butter optional)
- ½ onion, diced (optional but recommended)
- Seasonings: salt, pepper, paprika (smoked or sweet), garlic powder
- Optional add-ins: bell peppers, poblano, chopped herbs
Step-by-step
-
Par-cook (recommended): Simmer potato cubes in salted water until just barely tender,
about 5–8 minutes depending on size. Drain thoroughly and let steam-dry. -
Heat the skillet: Warm a heavy skillet (cast iron is great) over medium heat.
Add oil (and butter if using). -
Start the cook: Add potatoes in a single layer. Cover for a few minutes to finish cooking
the centers with gentle steam. -
Uncover and crisp: Remove the lid and let moisture evaporate. Then keep cooking,
stirring only occasionally, until browned and crisp on multiple sides. -
Add onion/peppers: Toss in onions and peppers once potatoes are partly browned so the veggies
don’t burn before the potatoes are crisp. -
Season and finish: Add paprika, garlic powder, salt, pepper. Finish with herbs if you’re feeling
like someone who owns matching plates.
How to make home fries extra crispy
- Don’t overcrowdwork in batches if needed.
- Let the potatoes sitconstant stirring prevents crust formation.
- Dry after par-cookingsteam is the enemy of crunch.
Way #2: Classic Double-Fry French Fries (The “Why Are These So Good?” Method)
Restaurant-style fries are usually cooked twice: first to cook the interior, second to crisp and brown the outside.
This isn’t chef dramait’s physics (and deliciousness).
Best for
Burgers, sandwiches, game day spreads, and convincing everyone you “barely did anything.”
What you’ll need
- 2 pounds russet potatoes (cut into ¼-inch sticks)
- Neutral oil for deep frying
- Salt (fine or flaky)
- Optional: vinegar-water soak (helps keep fries from breaking; not required)
Step-by-step
-
Soak and rinse: Soak cut fries in cold water 20–30 minutes (or longer if you want).
Rinse once more until water is less cloudy. - Dry thoroughly: Drain and pat very dry. If you skip this, the oil will throw a tantrum.
-
First fry (blanch): Heat oil to about 325°F. Fry in small batches until fries are
cooked through but pale (typically 3–5 minutes). Remove and drain. -
Rest: Let fries cool at least 15–30 minutes (you can refrigerate to speed this up).
Resting helps the exterior dry and set for crisping. - Second fry (crisp): Heat oil to about 375°F. Fry again until golden and crisp.
- Salt immediately: Toss with salt right away. Fries want seasoning when they’re hot and happy.
Pro tips for crispy fries at home
- Batch size matters: Too many fries drop the oil temp and invite sogginess.
- Use a thermometer: Guessing oil temp is how legends become cautionary tales.
- Drain on a rack: Paper towels work, but a rack prevents steaming.
Way #3: Crispy Smashed Potatoes (Boil, Smash, Shallow-Fry = Magic)
Smashed potatoes are the best of both worlds: creamy inside, crispy craggy edges outside.
They also look “rustic,” which is a fancy way of saying, “Yes, I did smash them. On purpose.”
Best for
Party snacks, steak sides, brunch boards, and dipping into anything with a pulse.
What you’ll need
- 1½ pounds small potatoes (baby reds or small Yukon Golds)
- Oil for shallow frying (and optional butter for flavor)
- Salt, pepper
- Optional toppings: garlic, rosemary, chives, Parmesan, chili crisp
Step-by-step
-
Boil until very tender: Start potatoes in salted water, simmer until a knife slides in easily.
Drain and let them steam-dry 10 minutes. -
Smash: Place potatoes on a board and press each one flat with a spatula or the bottom of a glass.
Aim for about ½-inch thick. -
Shallow fry: Heat oil in a skillet over medium heat until shimmering.
Cook potatoes in a single layer until deep golden on the bottom, then flip and crisp the other side. - Season and top: Salt right away. Add herbs, Parmesan, or a garlicky butter drizzle.
Make them “restaurant crispy”
- Let boiled potatoes steam-dry so the surface isn’t wet.
- Don’t move them too soonwait for a crust before flipping.
- Add toppings after crisping (cheese too early can burn).
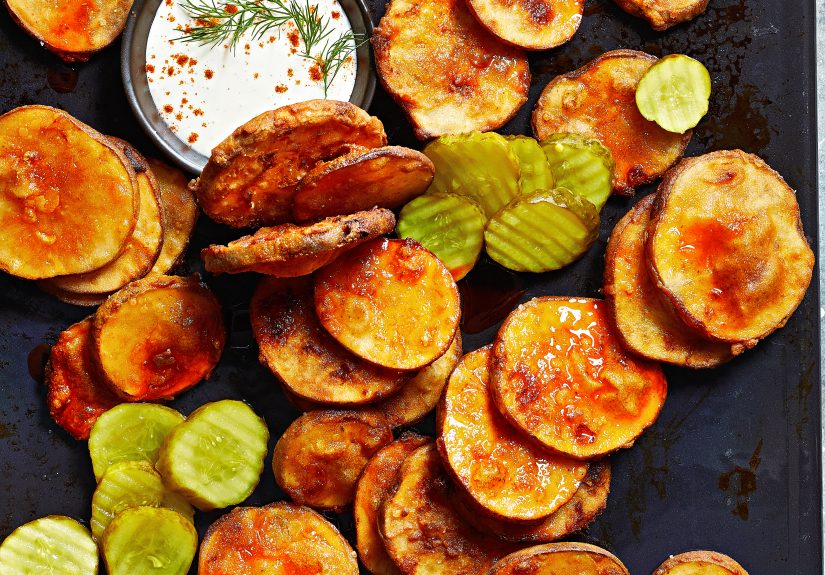
Way #4: Seasoned Fried Potato Wedges (Crispy, Fluffy, Dip-Ready)
Wedges are fries’ chunkier, more confident cousin. They’re easier to cut, harder to overcook,
and basically built for dunking in ranch, ketchup, or that spicy mayo you swear you only use “sometimes.”
Best for
Chicken sandwiches, burgers, family dinners, and “I’ll just eat the side dish” meals.
What you’ll need
- 2 pounds russet or red potatoes (cut into wedges)
- Oil for frying
- Coating: ¼ cup flour + 2 tablespoons cornstarch (optional but very effective)
- Seasonings: paprika, garlic powder, onion powder, pepper, salt
Step-by-step
- Soak briefly (optional): 10–20 minutes in cold water helps remove surface starch. Drain and dry well.
- Season the coating: Mix flour, cornstarch, and spices. Toss wedges lightly so they’re dusted, not buried.
- Fry: Heat oil to about 375°F. Fry in batches until deeply golden and tender inside.
- Drain and salt: Let excess oil drip off and salt immediately.
Flavor ideas
- Garlic-Parmesan: Toss hot wedges with melted butter, garlic, and Parmesan.
- Chili-lime: Add chili powder + lime zest, finish with lime juice.
- Cajun: Paprika + cayenne + oregano + thyme for that bold kick.
Dips and Toppings That Make Fried Potatoes Even Better
- Spicy mayo: mayo + hot sauce + a squeeze of lemon.
- Ranch upgrade: ranch + chopped dill + black pepper.
- Breakfast mode: top home fries with a fried egg and hot sauce.
- Loaded smashed potatoes: sour cream, chives, bacon bits, and cheddar.
Common Mistakes (And How to Fix Them)
“My potatoes are soggy.”
- You overcrowded the pan or fryer. Cook in batches.
- You didn’t dry them enough. Pat dry + air-dry a few minutes.
- Your oil wasn’t hot enough. Use a thermometer and stabilize heat between batches.
“They burned outside but stayed raw inside.”
- Pieces were too large or uneven. Cut consistently.
- Heat was too high too soon. Lower heat or par-cook (especially for home fries and wedges).
“They stuck to my skillet.”
- Skillet wasn’t preheated, or you didn’t use enough oil.
- You tried to flip before a crust formed. Give it timepotatoes release when they’re ready.
Storing and Reheating Fried Potatoes (So They’re Still Worth Eating)
Fried potatoes are best fresh, but leftovers don’t have to be tragic. Cool completely, refrigerate in a sealed container,
and reheat in a hot skillet or oven/air fryer until crisp. Avoid microwaving unless your goal is “warm potato pillows.”
Real-Life Fried Potato Lessons (The 500-Word “Experience” Section)
If you’ve ever made fried potatoes and thought, “Why don’t these taste like the diner/restaurant/version in my dreams?”
welcome to the club. The membership card is greasy (in a good way), and the meetings are held near the stove.
Here are the most useful, very-human lessons that tend to show up after you’ve cooked a few batchesespecially the batches
that humbled you.
First: the pan is not your enemy, but it does require respect. The biggest “aha” moment for many home cooks is realizing that
crispness takes time. When potatoes hit hot oil, they don’t instantly become golden. They go through a slightly awkward
phase where they look pale and unimpressive, like they haven’t decided who they are yet. If you stir too early, you interrupt
crust formation and end up with soft, steamed cubes that taste fine but won’t crunch. The trick is learning to wait just long
enoughlisten for steady sizzling, look for browned edges, and only then start flipping.
Second: dryness is basically a superpower. The most dramatic improvement you can makewithout buying anythingis simply drying
your potatoes better. After boiling, draining, rinsing, or soaking, give them a minute to steam off. Spread them on a towel.
Pat them again. It feels excessive until you taste the difference: instead of “oily and limp,” you get “crisp and proud.”
This is especially noticeable with fries, where one batch can come out shatteringly crisp and the next batch can slump if the
potatoes were even a little damp.
Third: batch cooking is not a suggestion; it’s the law of the land. Everyone wants to dump all the potatoes in at once because
we are busy people with big dreams and small attention spans. But overcrowding drops the oil temperature and traps steam, which
is basically a crispness thief. Cooking in smaller batches feels slower, yet it often finishes faster because you’re not
fighting temperature recovery and sogginess. Also, you get to snack on “quality control fries,” which is the most delicious
workplace perk imaginable.
Fourth: seasoning is a timing game. Salt too early on raw potatoes in a skillet and you can draw out moisture that slows browning.
Salt too late on fries and it won’t stick. The sweet spot is salting fries immediately after frying, and seasoning skillet potatoes
in layerssome during cooking, then a final adjustment at the end. Once you get this right, you’ll notice your potatoes taste
“complete,” not just “potato with salt nearby.”
Finally: fried potatoes are forgiving in the most charming way. If your home fries aren’t crisp enough, turn them into a hash with
onions and peppers. If your wedges cooked unevenly, finish them in the oven for a few minutes. If fries went soft on the counter,
toss them back into hot oil for a quick re-crisp. Fried potatoes reward calm problem-solvingand they taste like comfort even when
they’re not perfect. Which, honestly, is a pretty great life lesson… delivered in carbs.
Conclusion: Your Fried Potato Era Starts Now
Whether you’re chasing diner-style home fries, restaurant-level French fries, crispy smashed potatoes, or bold seasoned wedges,
the roadmap is the same: choose the right potato, cut evenly, dry thoroughly, and let heat do its job.
Start with one method, master it, then rotate the others in whenever your cravings demand a crispy sidekick.
And remember: if someone asks how you got them so perfect, you can say, “Oh, you know… just vibes.”
(And maybe a thermometer.)
![18 Best Types of Charts and Graphs for Data Visualization [+ How to Choose]](https://corkopencoffee.org/wp-content/uploads/2026/05/18-best-types-of-charts-and-graphs-for-data-visualization-how-to-choose-qKM1PBYG-thumb.jpg)


