Table of Contents >> Show >> Hide
- Why Under-the-Sink Spaces Go Off the Rails
- The $1 Rule: Tiny Spending, Big Payoff
- Step 1: The 12-Minute Reset
- Step 2: Map the Pipes Before You “Organize” Anything
- Step 3: $1 Tools That Punch Way Above Their Weight
- Step 4: Build a Simple Under-Sink System That Stays Put
- Step 5: Keep It Organized Without Becoming a Cabinet Butler
- Common Under-Sink Mistakes (and How to Dodge Them)
- Conclusion: A Dollar (and a Plan) Beats Chaos Every Time
- Field Notes: My $1 Under-Sink Adventures (500-ish Words of Real Talk)
The space under your sink is where good intentions go to… ferment. It starts innocently: one extra sponge. Then a “backup” bottle of cleaner. Then five “backups.”
Suddenly you’re playing a risky game of cabinet Jenga every time you need dishwasher podsone wrong move and a rogue spray bottle bonks you on the knuckles.
Here’s the good news: under-sink organization doesn’t require a fancy pull-out system, a weekend-long renovation, or the emotional fortitude to fold cleaning rags into origami swans.
With a handful of $1-ish items (hello, dollar store) and a plan that respects the reality of pipes, humidity, and mystery drips, you can turn that chaos cave into a
calm, grab-and-go zone.
Why Under-the-Sink Spaces Go Off the Rails
Under-sink cabinets are awkward by design. You’ve got plumbing in the middle, a low ceiling (aka the sink basin), random bumps and valves, and the kind of darkness where
half-used products go to hide forever. It’s also a spot where small leaks can show up firstmeaning the “storage” area can turn into a surprise science fair if you’re not careful.
The fix isn’t “buy more stuff.” The fix is giving every category a home and choosing containers that work with your cabinet’s weird geometry instead of fighting it.
The $1 Rule: Tiny Spending, Big Payoff
A true one-dollar budget is a vibe, not a prison. Many dollar stores now price items around $1–$1.25, and that’s still a bargain for organization that saves you time daily.
The goal is to spend a few bucks total (not a few bucks per bin) and get a system that’s:
- Visible: so you stop buying duplicates you already own.
- Movable: so you can pull one category out instead of excavating the whole cabinet.
- Leak-aware: so drips don’t turn into rust, mold, or ruined supplies.
Step 1: The 12-Minute Reset
Empty It Like You Mean It
Take everything out. Yes, everything. This is the only way to locate the sticky mystery puddle and the cleaning brush you swore you “put somewhere safe.”
Wipe down the cabinet floor and corners. If the area smells like “old sponge,” you’re doing it right.
Do the “Nope” Sort
Make three quick piles:
- Use: things you actually reach for.
- Backup: unopened extras you truly need.
- Nope: expired, nearly empty, crusty, or “why do we have three of these?”
Safety note (said lovingly, with zero desire for drama): the under-sink zone can be warm and humid. That’s not ideal for certain items. In general, avoid storing:
food, paper goods (like extra paper towels), and small appliances down there. And if you keep harsh cleaners under the sink, store them in a way that’s
secure from kids and petsideally in a lidded bin, up high in the cabinet, or behind a simple child latch.
Step 2: Map the Pipes Before You “Organize” Anything
Under-sink organization succeeds or fails based on one thing: respecting the plumbing. Before you buy bins, take 60 seconds to measure:
the cabinet width, depth, and the “usable height” under the sink basin. Then note where the pipes sit and how much side space you have on the left and right.
Pro move: cut a scrap piece of cardboard to the footprint of the biggest bin you want. If it can’t slide in and out easily, your future self will hate your past self.
Step 3: $1 Tools That Punch Way Above Their Weight
1) Dollar-Store Bins: The Modular MVP
The simplest under-sink storage solutions are often the best: small plastic bins. Pick 2–3 sizes (small, medium, skinny) instead of a random assortment that looks like
you were shopping during a power outage.
- Small bin: sponges, dish brushes, scrub pads, dishwasher pods.
- Medium bin: sprays, wipes, gloves, microfiber cloths.
- Skinny bin: trash bags, travel-size backups, refill cartridges.
Clear bins make it easier to see what you have, but opaque bins are great if you want the cabinet to look instantly calmer. Either worksjust commit.
2) Adhesive Hooks: Cabinet Door Gold
The back of the cabinet door is “free real estate,” and it’s criminally underused. A couple of stick-on hooks can hold rubber gloves, a small scrub brush,
or microfiber cloths. This keeps wet-ish items from pooling on the cabinet floor and frees up bin space for bulky bottles.
If your door gets slammed often (hi, toddlers), choose hooks that feel sturdy and place them where items won’t block shelves or smash into pipes when the door closes.
3) The Tension-Rod Spray-Bottle Bar
This is the hack that makes people feel like a genius in under five minutes: add a tension rod across the cabinet (usually near the top), then hang spray bottles
by their triggers. Your cleaners float. Your cabinet floor opens up. Your life gets… slightly better.
If you can’t find a true $1 tension rod, buy the cheapest one that fitsthis is still one of the highest-ROI under-sink organization moves you can make.
Keep heavier items (like gallon jugs) on the bottom, and hang your daily sprays up top.
4) Binder Clips + Zip Ties: The “Why Does This Work?” Duo
Binder clips aren’t just for paperworkthey’re tiny clamps. Use them to:
- Clip a small trash-bag roll so it doesn’t unravel.
- Clamp a glove pair together so you stop collecting “single gloves” like sad little sock orphans.
- Hold a microfiber stack in place inside a bin.
Zip ties can secure a small basket to a cabinet wall or to an existing wire shelf. It’s not fancy, but it’s strongand it costs pocket change.
5) Shelf Liner or a Plastic Placemat: Leak Insurance
You don’t need a premium under-sink mat to protect your cabinet floor. A cheap plastic placemat or a sheet of shelf liner can act as a barrier and make it easier
to wipe up drips. Bonus: it’s an “early warning system”you’ll notice new moisture faster than if it’s soaking into wood.
6) Labels That Prevent “Where Does This Go?” Amnesia
You can have the prettiest bins on earth and still lose the battle if nobody knows what goes where. Simple labels (tape + marker works!) keep categories stable:
“Dishwashing,” “Sprays,” “Trash Bags,” “Bathroom Backups,” “Tools.”
The secret is labeling the category, not the product. Products change; categories don’t.
Step 4: Build a Simple Under-Sink System That Stays Put
Most under-sink cabinet organization fails for one reason: it’s too complicated. Keep it to a few zones, then choose the cheapest containers that make those zones easy.
Here are two layouts that work in real American homes (including rentals, small apartments, and the classic “why is the pipe in the middle?” cabinet).
Kitchen Under-Sink Organization: The 5-Bin Blueprint
- Bin 1: Dishwashing (pods, sponges, brush heads, rinse aid)
- Bin 2: Counter & Stove (all-purpose spray, degreaser, cloths)
- Bin 3: Trash & Recycling (bags, small rolls, deodorizer)
- Bin 4: “Occasionals” (stainless polish, specialty cleaners)
- Bin 5: Tools (drain snake, plumber’s tape, extra sponge wand)
Put the “daily” bins in front. Put backups in the back. If you must store a couple of tall bottles, give them a dedicated corner so they don’t topple into everything else.
And if you use the tension rod, hang your most-used sprays so they’re literally a one-handed grab.
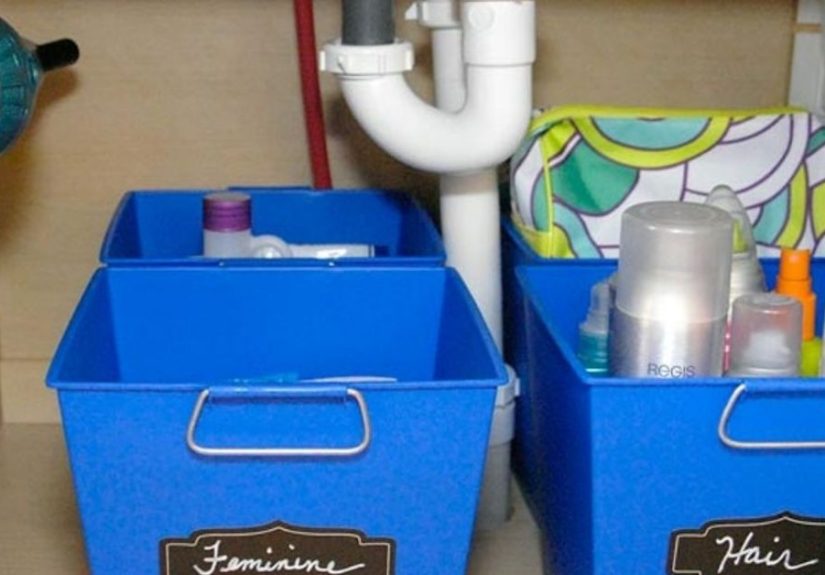
Bathroom Under-Sink Organization: The 4-Zone Vanity
- Zone 1: Daily Care (face wash refills, toothpaste backups, deodorant)
- Zone 2: Hair (extra shampoo/conditioner, styling tools in a bin)
- Zone 3: Cleaning (toilet cleaner, wipes, gloves)
- Zone 4: First Aid / Extras (bandages, travel bottles, tissues if your cabinet stays dry)
Bathrooms are where you really feel the “dark cabinet effect.” Clear bins or labels help you stop buying a third bottle of body wash because the other two were hiding
behind a bottle of window cleaner (which does not belong in a bathroom, but here we are).
Step 5: Keep It Organized Without Becoming a Cabinet Butler
A perfect system that collapses in two weeks is just a craft project. You want a system that survives Tuesday night, after a long day, when you’re not interested
in “decanting” anything.
- The 60-second reset: once a week, shove each item back into its labeled bin. Done.
- The “one backup” rule: unless you’re stocking for a large household, keep one backup per staple.
- Use-first basket: keep a small bin labeled “Use Next” for nearly empty products so they get finished instead of replaced.
- Monthly leak glance: look for dampness, rust, or swelling. Catching small problems early saves money and your cabinet’s sanity.
Common Under-Sink Mistakes (and How to Dodge Them)
Mistake: Storing Paper Towels and Anything That Hates Moisture
If your cabinet is prone to humidity or drips, paper goods are basically acting as a sponge on purpose. Keep them in a dry pantry or closet and reserve under-sink storage
for items that can handle the environment.
Mistake: Letting Random Bottles Free-Range
Loose bottles topple. Leaks hide. Labels face backward. Put bottles in a bin or corral them with a simple “bottle zone” so the cabinet doesn’t become a slippery pileup.
Mistake: Overcomplicating the Categories
“Stove Cleaner,” “Counter Cleaner,” “Glass Cleaner,” “Shower Cleaner,” “Things That Smell Like Lemon But Might Be Bleach”no. Use broad categories that match how you think:
“Sprays,” “Dishwashing,” “Backups,” “Tools.” Your future self will thank you.
Mistake: Forgetting Safety
Under-sink cabinets are a common spot for cleaning chemicals. If children or pets are in the home, store harsh products in a lidded bin pushed to the back, consider a simple
childproof latch, and never store chemicals in food containers. Also avoid mixing products or storing anything that could react dangerously if it leaks.
Conclusion: A Dollar (and a Plan) Beats Chaos Every Time
Under-sink organization isn’t about making a cabinet look like a showroom. It’s about making daily life easier: one bin for dishwashing, one spot for sprays, hooks for gloves,
and a tension rod that turns spray bottles into a neat little lineup instead of a plastic stampede.
Start small. Spend smart. Label the categories. And the next time you reach under the sink, you’ll grab what you needwithout triggering a bottle avalanche or discovering
a cleaner you bought in 2019 and have been emotionally avoiding ever since.
Field Notes: My $1 Under-Sink Adventures (500-ish Words of Real Talk)
I once opened an under-sink cabinet and immediately understood how archaeologists feel. Layers. Eras. A suspicious crust along the back panel. A half-empty bottle of cleaner
with a label so faded it looked like it survived the Dust Bowl. If your cabinet is currently in that state, I’m not judging youbecause I’ve been you.
My first mistake was thinking I needed “the perfect organizer.” I spent 45 minutes browsing sleek pull-out drawers online, convinced I was one purchase away from becoming
the kind of person who alphabetizes spices. Spoiler: I am not that person. Also, I didn’t want to spend $60 to fix a space that mostly stores $3 dish soap.
That’s like buying a tuxedo to take out the trash.
So I tried the dollar store route. I grabbed three bins, a roll of tape, and a pack of hooks. Total cost was less than the fancy coffee I’d been sipping while doom-scrolling
“kitchen cabinet organization” photos. At home, I did the big empty-and-wipe move and discovered two important things: (1) the cabinet floor was slightly warped from old drips,
and (2) I owned four bottles of nearly identical all-purpose cleaner. Apparently my stress response is “buy citrus-scented liquids.”
The bins saved me immediately. One bin became “Dishwashing,” which meant sponges stopped migrating. Another became “Sprays,” which meant I could pull out the whole category
like a drawer. The third became “Trash Bags,” which felt boringuntil I realized I’d been storing trash bags in three different locations, like a squirrel hiding acorns
for a future it doesn’t trust.
The hooks were the surprise hero. Hanging gloves and a small scrub brush on the cabinet door cleared the floor space, and it also stopped that gross “gloves stuck to
something damp” situation. (If you know, you know. If you don’t know, protect your innocence.)
Then came the tension rod. I installed it in about 90 seconds, hung my spray bottles by the triggers, and felt like I’d unlocked a secret level in adulthood.
Suddenly the cabinet had a “top floor” and a “bottom floor.” The bottom floor became backups and a small tool bin. The top floor became daily sprays, lined up like
they were auditioning for a cleaning product commercial.
The best part? Maintenance is easy. Once a week, I do a 60-second reset: shove sprays back into their bin or onto the rod, toss sponges into the dishwashing bin,
and wipe any drips. The cabinet doesn’t stay perfect forever (life happens), but it no longer returns to its natural state of chaos. And thaton a $1-ish budgetis
a win worth celebrating.