Table of Contents >> Show >> Hide
Do you have an old antique trunk gathering dust in your attic or storage space? What if I told you that with a little creativity and some DIY magic, that dusty, worn-out relic could transform into a stunning, functional piece of furniture? That’s right today, we’re going to show you how to turn an antique trunk into a charming bookshelf that not only serves as a practical storage solution but also adds a touch of vintage flair to your home décor.
The Allure of Antique Trunks
Before we dive into the transformation process, let’s take a moment to appreciate the charm of antique trunks. These timeworn treasures, often used for travel and storage, are a piece of history, each with its own unique character. From their sturdy wooden frames to the intricate metal hardware, antique trunks bring an undeniable sense of nostalgia. So, why let them sit unused when you can give them a new life as a bookshelf?
Why Turn an Antique Trunk Into a Bookshelf?
You’re probably wondering, “Why would I want to turn something so iconic into a bookshelf?” Well, first off, it’s a fantastic way to reuse and repurpose a beautiful piece of furniture. Secondly, these trunks are often the perfect size for books, knick-knacks, and other small décor items. And let’s be honest they make for one heck of a conversation starter!
Plus, you get the added benefit of saving space. If you’re living in a small apartment or trying to declutter your home, a trunk bookshelf can provide ample storage while serving as a statement piece. So, grab that antique trunk, and let’s get started!
What You’ll Need to Get Started
Before you begin this fun project, let’s gather all the necessary materials:
- Antique trunk (duh!)
- Paint or wood stain (depending on the look you want)
- Sandpaper
- Wooden shelves or pre-made shelving units
- Measuring tape
- Power drill or screwdriver
- Wood screws or brackets
- Clear polyurethane finish (for protection)
- Paintbrushes or rags for staining
Once you have everything you need, you’re all set to get started!
Step-by-Step Guide: How to Turn an Antique Trunk into a Bookshelf
Step 1: Clean and Prepare the Trunk
Start by cleaning the trunk thoroughly. Dust, dirt, and grime can build up over the years, so give it a good wipe-down with a damp cloth. If the trunk has old leather or fabric on it, you may want to use a vacuum with a soft attachment to get into all the nooks and crannies.
If you plan on refinishing or staining the wood, use sandpaper to smooth out any rough patches or old paint. Sanding not only helps the finish adhere better but also brings out the natural beauty of the wood.
Step 2: Measure and Cut the Shelves
Next, you’ll need to measure the interior of the trunk to determine the size of the shelves. This is a crucial step because you want your shelves to fit snugly inside the trunk, without being too tight or too loose. Use a measuring tape to get the width, depth, and height of the space inside the trunk, and then cut the wooden shelves accordingly.
If you’re not confident with cutting wood, many home improvement stores offer pre-made shelving units or wood planks that you can cut to size. You can also purchase adjustable brackets that allow you to customize the height of the shelves later on.
Step 3: Paint or Stain the Trunk
Depending on your aesthetic, you can choose to paint or stain your trunk. If you love the vintage look, a dark wood stain will enhance the rich, antique feel. Alternatively, if you’re after a more modern vibe, a fresh coat of paint in a bold color (think navy blue, emerald green, or a soft pastel) can transform the trunk into a stylish focal point.
Apply paint or stain with a brush or rag, and be sure to follow the manufacturer’s instructions for drying times. For extra durability, consider applying a clear polyurethane finish to protect the surface and give it a smooth, glossy appearance.
Step 4: Install the Shelves
Once your trunk is clean, sanded, and painted, it’s time to install the shelves. Using your measurements from earlier, position the wooden shelves inside the trunk. If you’re using adjustable brackets, mark the spots where you want to place the brackets and secure them with screws.
For a more permanent installation, use wood screws to attach the shelves directly to the interior of the trunk. Make sure the shelves are level before securing them fully, so everything sits properly once you start filling it up with books and décor.
Step 5: Add the Finishing Touches
Now comes the fun part! Fill your new bookshelf with books, plants, photo frames, or any other items that speak to your style. If you want to enhance the vintage look, add some old-timey décor such as vintage bookends, antique trinkets, or decorative metal pieces.
And just like that, your antique trunk has been transformed into a beautiful, functional bookshelf that will impress your guests and keep your reading material organized!
Creative Ideas to Style Your New Bookshelf
Once your antique trunk is up and running as a bookshelf, the possibilities for styling it are endless! Here are a few ideas to get your creative juices flowing:
- Rustic Vibes: Pair your trunk bookshelf with other rustic furniture, such as a reclaimed wood coffee table or a distressed armchair, to create a cozy, vintage-inspired living room.
- Library Chic: Stack a few of your favorite books on top of the trunk for an added layer of style. You can even use vintage books with worn spines to enhance the look.
- Mix and Match: Don’t be afraid to combine different styles. A trunk bookshelf pairs wonderfully with modern décor, so feel free to experiment with clean lines and minimalist design.
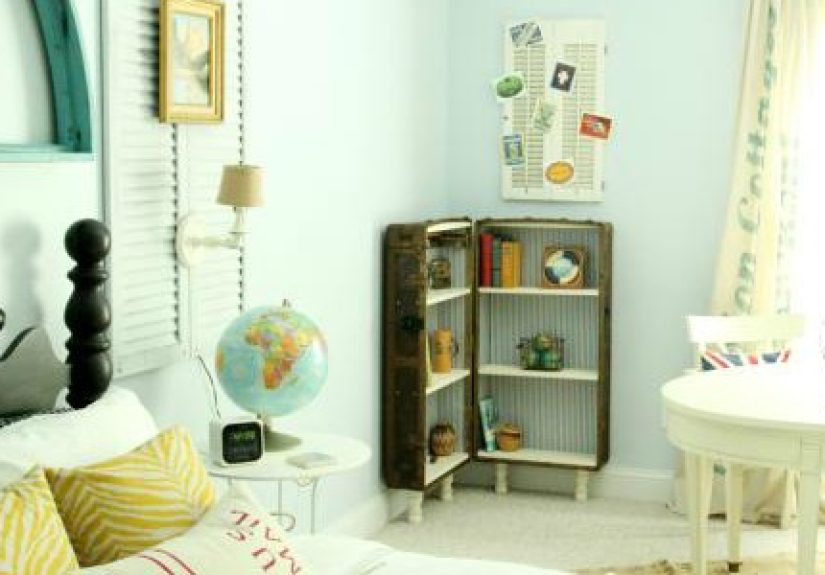
- Travel-Themed: Since trunks were originally used for travel, you could style your bookshelf with travel-related décor, such as vintage maps, globe figurines, and old postcards.
Conclusion
Transforming an antique trunk into a bookshelf is a rewarding and fun DIY project that breathes new life into a forgotten piece of history. Not only does it help you declutter your space, but it also adds a unique, rustic touch to your home. So, whether you’re a DIY novice or a seasoned pro, this project is a fantastic way to upcycle an old trunk into something beautiful and functional.
So, what are you waiting for? Dust off that old trunk and get started on your next home makeover. Your new bookshelf awaits!
Additional Thoughts: My Experience with Repurposing Antique Trunks
Repurposing antique trunks is one of my favorite ways to get creative with home décor. I recently took an old, battered trunk that had been sitting in my family’s basement for years and turned it into a stylish bookshelf for my living room. The process was surprisingly simple and the transformation was jaw-dropping!
The best part? My guests constantly ask me where I found such a unique bookshelf. Every time I tell them it was once a dusty old trunk, they can’t believe it! It’s always a conversation starter, and I love how it adds a sense of history to my home. Plus, it’s sturdy enough to hold not only books but also my collection of vintage camera equipment.
If you’ve got a trunk just sitting around collecting dust, I highly recommend giving this project a try. It’s a great way to personalize your space, save money, and repurpose something that holds sentimental value. Trust me, you won’t regret it!
meta_title: Turn an Antique Trunk into a Stylish Bookshelf | Remodelaholic
meta_description: Discover how to turn an antique trunk into a functional, stylish bookshelf. Step-by-step instructions and creative ideas to transform your home décor!
sapo: Uncover the secrets to turning an antique trunk into a stunning bookshelf! This step-by-step guide includes creative styling ideas and DIY tips to add vintage charm to your home.
keywords: antique trunk, repurpose trunk, bookshelf, DIY bookshelf, upcycle furniture, vintage home décor, trunk makeover


