Table of Contents >> Show >> Hide
- Before You Start: Read the Fabric, Not Just the Room
- Way 1: Freeze, Crack, and Lift the Wax
- Way 2: Use Gentle Heat to Pull Wax Out of the Fibers
- Way 3: Remove the Leftover Oily or Colored Residue
- Mistakes to Avoid When Removing Wax from Upholstery
- When to Call a Professional Cleaner
- Conclusion
- Real-World Wax Removal Experiences: What Homeowners Usually Learn the Hard Way
- SEO Tags
Wax on upholstery has a special talent for showing up at the worst possible moment. It waits until you light a candle for “ambiance,” then immediately turns your couch into a crime scene. One tiny drip becomes a hardened blob, then a greasy shadow, then a colorful reminder that your relaxing evening had other plans. The good news is that wax is removable. The bad news is that it likes to leave behind friends: dye, oil, and a little chaos.
If you act carefully, you can usually save upholstered furniture without turning a small mess into a full-on fabric tragedy. The key is not to panic, not to scrub, and definitely not to attack the spot like you are sanding a deck. Upholstery needs patience. In most cases, removing wax comes down to three reliable methods: harden and lift the wax, melt and absorb the residue, then clean away any leftover oily or colored stain. Those steps sound simple, but the details matter. Use too much heat, and you can damage synthetic fibers. Use the wrong cleaner, and you may trade a wax stain for a water ring. Rub too hard, and your sofa may never forgive you.
This guide breaks down the three safest and most practical ways to remove wax from upholstery, along with fabric-specific tips, common mistakes, and real-life cleanup experiences that show what works and what absolutely deserves a dramatic “do not do this again.”
Before You Start: Read the Fabric, Not Just the Room
Before you touch the wax, check your upholstery care tag. This small, easy-to-ignore label is more important than your confidence level. Most upholstered furniture uses cleaning codes such as W, S, WS, or X.
- W: Water-based cleaners are generally safe.
- S: Use solvent-based cleaners only.
- WS: Either water-based or solvent-based cleaners may work.
- X: Vacuuming or light brushing only; no water or solvent-based cleaner.
If your furniture is labeled X, or if the fabric is delicate, vintage, silk-blend, heavily textured, or richly colored velvet, stop and think twice before trying a wet cleaner or heat method. Sometimes the smartest DIY move is knowing when to let a professional take over.
You should also test any cleaner or method on a hidden area first. That means under a cushion, behind a skirt, or in another low-visibility spot. Use only white, clean cloths or plain brown paper without printed ink. Colored towels can transfer dye, and printed paper can leave marks. Also, avoid aggressive rubbing. Upholstery fibers can flatten, fuzz, or discolor faster than you would expect.
Gather these supplies before you begin:
- Ice cubes in a plastic bag or a cold pack
- A spoon, plastic scraper, old credit card, or dull butter knife
- A vacuum with an upholstery attachment
- Plain brown paper bag, paper towels, or a clean white cotton cloth
- An iron on low heat or a hair dryer on low
- Rubbing alcohol or an upholstery-safe spot cleaner
- Mild dish soap if your fabric code allows it
- Patience, because wax removal does not reward drama
Way 1: Freeze, Crack, and Lift the Wax
The first method is the safest starting point for most upholstery: make the wax hard, then remove as much of it as possible without pushing it deeper into the fabric. If the wax is still soft or slightly warm, resist the urge to wipe it. Wiping warm wax usually smears it into the fibers and spreads the mess. That is how a tiny drip becomes a weird continent.
How to do it
- Place ice cubes in a plastic bag or use a cold pack.
- Hold it over the wax until the wax becomes firm and brittle.
- Use a spoon, plastic edge, or dull knife to gently lift and chip away the wax.
- Work slowly so you do not snag the upholstery weave.
- Vacuum up the loose pieces with an upholstery attachment.
This method works especially well for fresh candle drips, thick blobs of wax, and spills on textured upholstery where a lot of the wax is sitting above the surface. It is also the least risky option for fabrics that do not love heat. If the wax breaks into flakes, that is good news. If it behaves like a stubborn crayon fossil, keep chilling and lifting in small rounds.
What this method does not always remove is the thin waxy film or the oily, dyed shadow left behind by colored or scented candles. Think of it as phase one: removing the bulk of the mess. For many small spills, this may be enough. For others, you will need method two or three to finish the job.
Best for
Fresh wax spills, thick wax drips, textured fabrics, and situations where you want the lowest-risk first step.
Way 2: Use Gentle Heat to Pull Wax Out of the Fibers
Once you have removed the thick wax, you may still see a flat residue that feels slightly greasy or stiff. That is when gentle heat can help. The goal is not to cook the upholstery. The goal is to warm the remaining wax just enough for it to transfer into absorbent paper or a clean cloth.
This is the classic wax-removal move, and it works beautifully when done carefully. It also goes very badly when done with high heat, steam, impatience, or a “let me just hold the iron here for a second” mindset. That second is how synthetic upholstery learns fear.
How to do it
- Place a plain brown paper bag, paper towel, or clean white cloth over the remaining wax.
- Set your iron to the lowest heat setting, with no steam.
- Briefly press the paper or cloth for a few seconds at a time.
- Lift and check the material. If wax is transferring, move to a clean area of the paper or cloth.
- Repeat until the wax no longer transfers.
If you do not want to use an iron, a hair dryer on low can also soften the wax. Warm the spot gently, then blot it with paper towels or a clean cloth as the wax loosens. This takes longer, but it gives you a little more control on shaped cushions, tufted upholstery, or areas where an iron feels awkward.
Never use high heat. Many upholstery fabrics contain synthetic fibers such as polyester, rayon, or blends that can distort under too much heat. Also avoid steam unless your manufacturer specifically says it is safe. Steam and over-wetting can create water marks, damage backing materials, or change the texture of the fabric.
Best for
Thin residual wax, wax trapped in fibers, and cleanup after method one.
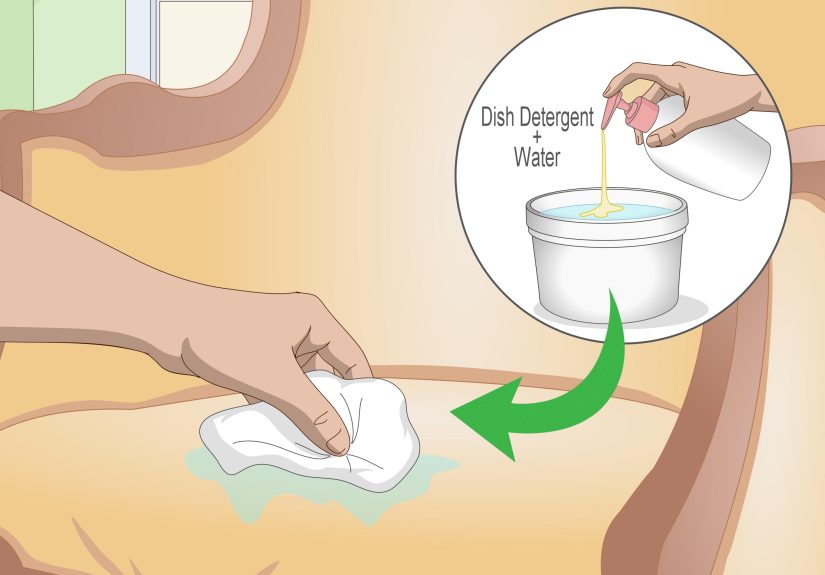
Way 3: Remove the Leftover Oily or Colored Residue
Even after the wax itself is gone, the stain may remain. That is because candle wax often contains oils, fragrance compounds, and dyes. In other words, the wax may have left the building, but its dramatic makeup trailer is still parked on your couch.
This last step depends on your upholstery code. For many fabrics, a small amount of rubbing alcohol on a white cloth can help lift residual color or oily marks. For W or WS fabrics, a tiny amount of mild dish soap mixed with water may also help. For S fabrics, use only a solvent-safe product designed for upholstery. For X fabrics, this is usually where you stop DIY cleanup and call a pro.
How to do it
- Test your chosen cleaner on a hidden area first.
- Dampen a clean white cloth; do not soak it.
- Blot the stain gently from the outside toward the center.
- Do not scrub. Blot, pause, and repeat.
- If using a soap solution on a safe fabric code, lightly blot with plain water afterward to remove residue.
- Blot dry and let the area air-dry completely.
If the stain is from colored wax, you may need several light rounds rather than one aggressive cleaning session. That is normal. Upholstery usually responds better to repeated gentle treatment than to one heroic overreaction. If you see color transfer to your cloth, that means the residue is lifting. If you see fabric color transfer from the upholstery itself, stop immediately.
Best for
Residual oily marks, color stains, and the faint shadow left behind after the wax is physically removed.
Mistakes to Avoid When Removing Wax from Upholstery
Some cleaning mistakes are small. Others create a second problem that is somehow more annoying than the first. Here are the big ones to avoid:
- Do not wipe melted wax. It spreads.
- Do not use a sharp blade. One slip and your chair has a custom slash.
- Do not oversaturate the fabric. Water rings and adhesive damage are not fun souvenirs.
- Do not use high heat. Low and slow wins this race.
- Do not use colored rags or printed paper. Ink and dye transfer are very real.
- Do not scrub. Blotting protects the fabric texture.
- Do not ignore the care code. Upholstery tags are not decorative confetti.
Also, if the wax spill happened on velvet, silk, antique upholstery, or furniture with unknown cleaning instructions, be conservative. Fancy fabric tends to punish overconfidence.
When to Call a Professional Cleaner
DIY wax removal works surprisingly well in many cases, but not every couch should become a home experiment. Consider calling a professional if:
- The upholstery code is X
- The fabric is delicate, vintage, or expensive
- The wax is deeply embedded over a large area
- The candle dye has left a strong stain
- You already tried one method and made the area worse
- The cushion filling or backing seems affected
There is no shame in outsourcing a wax disaster. In fact, it may be cheaper than replacing a cushion cover you accidentally turned into modern art.
Conclusion
If you remember only one thing, let it be this: removing wax from upholstery is less about brute force and more about sequence. First, harden and lift what you can. Second, use gentle heat to absorb what remains. Third, clean the leftover residue according to the fabric code. That three-part approach is what gives you the best chance of saving the fabric without leaving behind damage, discoloration, or a suspicious patch that forever tells the story of “the candle incident.”
Take your time, use the lowest effective heat, blot instead of scrub, and always respect the care label. Wax may be stubborn, but it is not magic. With the right method, your upholstery can recover, and your living room can go back to looking intentional instead of lightly attacked by melted decor.
Real-World Wax Removal Experiences: What Homeowners Usually Learn the Hard Way
One of the most common experiences with wax on upholstery starts with confidence. Someone sees a drip on the arm of a sofa and thinks, “No problem, I’ll just wipe it up.” Five seconds later, the wax is flatter, wider, and somehow more committed to the fabric than before. That first mistake teaches the biggest lesson: warm wax behaves more like a smear than a spill. People often think speed is everything, but with wax, the smarter move is to slow down and let the material harden first. It feels counterintuitive, but it works.
Another very typical experience happens with light-colored upholstery and scented candles. At first, the wax blob comes off beautifully after chilling and scraping. Victory music begins to play in your head. Then the light hits the cushion just right, and there it is: a faint yellow, pink, or oily ring. This is where many people assume the cleanup failed, when really they are just in the second half of the job. The wax itself may be gone, but the dye or fragrance oil can remain. Homeowners often report that the final shadow is what bothers them most, not the original wax chunk. That is why the residue-cleaning step matters so much.
Microfiber furniture creates its own category of drama. People often say the wax came off, but the spot looked darker until it dried completely. That experience usually teaches two things: first, less liquid is better; second, drying time matters. Upholstery can look temporarily worse when it is damp, which makes people panic and clean harder. Unfortunately, cleaning harder is usually how rings, texture changes, and over-wet spots happen. The better move is to blot lightly, step away, let the area dry, and reassess later with calm eyes instead of emergency eyes.
Households with kids tend to collect the most inventive wax stories. Birthday candles, craft wax, wax warmers, and toppled jar candles all seem magnetically drawn to upholstered benches and chairs. In those cases, the experience people describe most often is surprise at how far the wax traveled. A tiny spill on the surface can seep into seams, buttons, or textured weaves. Cleanup becomes less about one stain and more about working section by section. People usually learn that vacuuming small brittle pieces after scraping is incredibly helpful. Otherwise, those little flakes hide in creases and later reappear like confetti from a very bad party.
Probably the most valuable lesson homeowners share is that the safest method is rarely the fastest-looking one. Slow scraping beats force. Low heat beats high heat. Blotting beats rubbing. Testing a hidden area beats optimism. And calling a professional beats ruining a beloved chair because a candle tried to become a permanent design feature. Once people go through one wax cleanup the right way, they usually remember the routine forever. Or, at the very least, they start placing candles a little farther away from the sofa. Personal growth comes in many forms.


